In this post we will discuss how to use the auto-filtering feature in MindFusion.Spreadsheet for WinForms.
Introduction
We start off by creating a new Windows Forms Application in Visual Studio, adding a WorkbookView control to the main form and adding the Northwind database (nwind.mdb) as a data source. For simplicity we only add the Orders table. After compiling the application we can add the DataSource and the OrdersTableAdapter as components to the main form.
Loading the data
We traverse the rows in the data source and populate the spreadsheet by assigning the data to the Data property of the respective worksheet cells. The first cell in each column is set to the name of the corresponding database field. Finally, the columns are resized to fit their contents through the ResizeColumnsToFit method of the view. The complete code of the data loading can be found in the LoadData method.
Turning auto-filtering on
Auto-filtering is enabled by calling the AutoFilter method of the CellRange class. If the CellRange represents a range of cells, then auto-filtering is applied to that range. If the CellRange represents a single cell, then auto-filtering is applied to the rectangular area of data cells, which includes this cell. In this application, we enable auto-filtering on the loaded data, by calling AutoFilter on cell A1. In addition, we apply auto-filtering criteria on the 6-th column (ShipVia) by calling the AutoFilter overload.
workbook1.Worksheets[0].CellRanges["A1"].AutoFilter();
workbook1.Worksheets[0].CellRanges["A1"].AutoFilter(
    6, "<>1", AutoFilterOperator.Or, null, true);
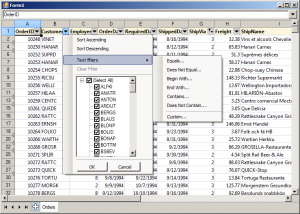
The following image shows the running sample:

The source code is available for download from here:
https://mindfusion.eu/_samples/SpreadsheetAutoFilter.zip
MindFusion.Spreadsheet for WinForms can be downloaded from here:
MindFusion.Spreadsheet for WinForms
About MindFusion.Spreadsheet for WinForms: A powerful .net spreadsheet component with great capabilities for editing, styling and formatting large amounts of data.
