This tutorial shows how to load graph data from XML and create diagram objects corresponding to the graph nodes and edges.
1. Right-click the project in Package Explorer and choose New -> Other from the context menu. Create a new XML file called SampleGraph.xml and add to it content in the following form:
XML
 Copy Code Copy Code
|
|---|
<?xml version="1.0" encoding="utf-8" ?>
<Graph>
<Nodes>
<Node id="0" name="start" />
<Node id="1" name="activity 1" />
<Node id="2" name="task 1" />
<Node id="3" name="task 2" />
<Node id="4" name="activity 2" />
<Node id="5" name="task 3" />
<Node id="6" name="task 4" />
<Node id="7" name="activity 3" />
<Node id="8" name="task 5" />
<Node id="9" name="task 6" />
<Node id="10" name="end" />
</Nodes>
<Links>
<Link origin="0" target="1" />
<Link origin="1" target="2" />
<Link origin="1" target="3" />
<Link origin="2" target="4" />
<Link origin="3" target="4" />
<Link origin="4" target="5" />
<Link origin="4" target="6" />
<Link origin="5" target="10" />
<Link origin="6" target="10" />
<Link origin="0" target="7" />
<Link origin="7" target="8" />
<Link origin="8" target="9" />
<Link origin="1" target="9" />
<Link origin="9" target="10" />
</Links>
</Graph> |
2. Add a windowOpened event handler to the JFrame:
| Java
Copy Code
|
|---|
this.addWindowListener(new WindowAdapter()
{
@Override
public void windowOpened(WindowEvent e)
{
loadGraph(diagram, "SampleGraph.xml");
}
}); |
3. Create the loadGraph method and declare the following variables. "nodeMap" maps diagram nodes to their identifiers, and "bounds" contains the default node size.
| Java
Copy Code
|
|---|
void loadGraph(Diagram diagram, String filepath)
{
HashMap<String, DiagramNode> nodeMap = new HashMap<String, DiagramNode>();
Rectangle2D.Float bounds = new Rectangle2D.Float(0, 0, 15, 8);
} |
4. Load the XML document and its root element using the XML DOM API:
| Java
Copy Code
|
|---|
// load the graph XML
Document document = loadXmlFile(filepath);
Element root = document.getDocumentElement(); |
5. Load the graph node elements and create their corresponding ShapeNode objects by calling the createShapeNode method of the Factory class. createShapeNode is just a shortcut to creating a ShapeNode instance using the "new" operator and adding it to the Nodes collection of the diagram. Additionally, this code maps the new node to the "id" attribute of the XML element, and sets the node's Text to the value of the "name" attribute.
| Java
Copy Code
|
|---|
// load node data
NodeList nodes = root.getElementsByTagName("Node");
for (int i = 0; i < nodes.getLength(); ++i)
{
Element node = (Element)nodes.item(i);
ShapeNode diagramNode = diagram.getFactory().createShapeNode(bounds);
nodeMap.put(node.getAttribute("id"), diagramNode);
diagramNode.setText(node.getAttribute("name"));
} |
6. Load the graph links and create corresponding DiagramLink objects. The Origin and Destination of the links are accessed by their ids through the "nodeMap" dictionary.
| Java
Copy Code
|
|---|
// load link data
NodeList links = root.getElementsByTagName("Link");
for (int i = 0; i < links.getLength(); ++i)
{
Element link = (Element)links.item(i);
DiagramNode origin = nodeMap.get(link.getAttribute("origin"));
DiagramNode target = nodeMap.get(link.getAttribute("target"));
diagram.getFactory().createDiagramLink(origin, target);
} |
7. Arrange the diagram using the LayeredLayout class.
| Java
Copy Code
|
|---|
// arrange the graph
LayeredLayout layout = new LayeredLayout();
layout.setLayerDistance(12);
layout.arrange(diagram); |
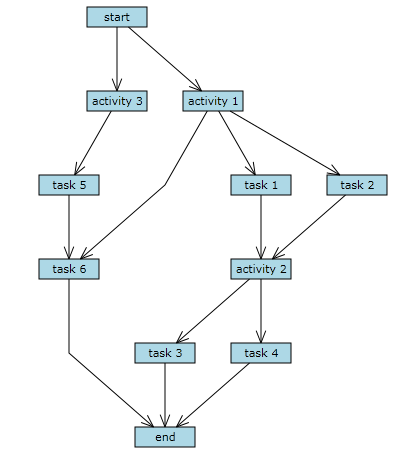
8. Build and run the project. If everything is fine, you should see this representation of the graph: