To apply an effect to the nodes in a diagram, create an instance of one of the effect classes and add this instance to the Diagram.NodeEffects collection. To apply the effect to individual nodes, add the instance to the node's Effects collection. To discard the diagram effects for a particular node, add a null reference (Nothing in Visual Basic) at position 0 in the node's Effects collection. Effects can also be applied through styles by adding them to the DiagramStyle.NodeEffects and DiagramNodeStyle.Effects collections respectively.
It is possible to combine different effects by adding instances of their appropriate types to the effect collections. If is also admissible to apply more than one effect of the same type.
The currently supplied effect types are Aero and Glass. They are examined in more details in the sections below.
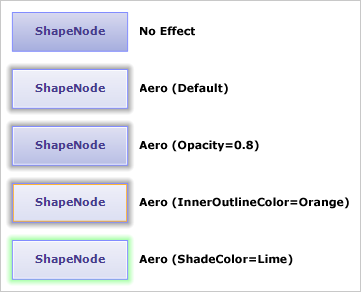
The Aero effect is represented by the AeroEffect class. The effect is designed to roughly resemble the Aero theme of Windows. More specifically, the effect adds semi transparency to the nodes, a smooth shade at the outside and a thin inset stroke. The semi transparency is specified through the Opacity property. Opacity varies from 0 to 1 inclusive, where 0 indicates full transparency and 1 indicates the original node color. The semi transparency is applied only on the node brush. The colors of the shade and the inner stroke are specified through the ShadeColor and InnerOutlineColor properties respectively. The following image illustrates how these properties affect the output:
The following example applies the Aero effect on the nodes of an existing diagram:
C#
 Copy Code Copy Code
|
|---|
AeroEffect effect = new AeroEffect(); |
Visual Basic
 Copy Code Copy Code
|
|---|
Dim effect As New AeroEffect() |
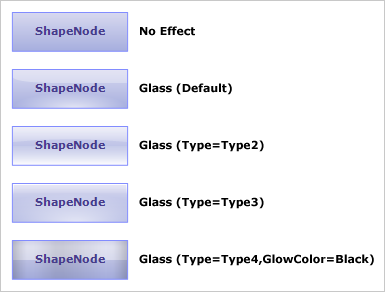
The Glass effect is represented by the GlassEffect class. The Glass effect adds visuals on top of the nodes in order to give the impression of a reflective surface. There are several variations of this effect, which can be selected through the Type property. The color of the reflection and the ambient color can be specified through the ReflectionColor and GlowColor properties respectively. When UsePenAsGlow is set to true the color of the node's pen is used as the ambient color. The following image illustrates the differences between the distinct effect types:
The following example applies a Glass effect with the default settings to the nodes of a diagram:
C#
 Copy Code Copy Code
|
|---|
diagram.NodeEffects.Add(new GlassEffect()); |
Visual Basic
 Copy Code Copy Code
|
|---|
diagram.NodeEffects.Add(New GlassEffect()) |
The values of the effect properties are usually selected in accordance with the color scheme of the target diagram and the desired end result. In addition different types of effects can be applied simultaneously to achieve more interesting results. The examples below demonstrate possible effect combinations in various color contexts.
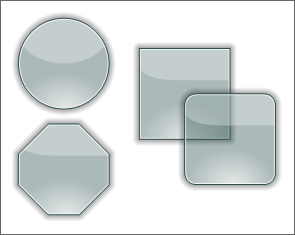
In this example the Aero and Glass effects are combined. The Aero effect is useful in scenarios when dark nodes are placed on light background or vice versa, in order to emphasize the contrast.
Here is the code that applies the above effects:
C#
 Copy Code Copy Code
|
|---|
diagram.NodeEffects.Add(new GlassEffect()); |
Visual Basic
 Copy Code Copy Code
|
|---|
diagram.NodeEffects.Add(New GlassEffect()) |
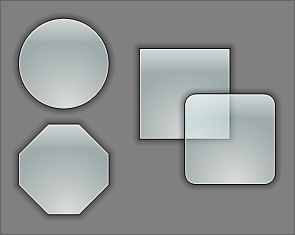
This example is similar to the first one, only this time the nodes are painted in light colors and the background is dark.
Here is the code that applies the above effect:
C#
 Copy Code Copy Code
|
|---|
GlassEffect glassEffect = new GlassEffect(); |
Visual Basic
 Copy Code Copy Code
|
|---|
Dim glassEffect As New GlassEffect() |
This example uses bright colors on black background to create a glow effect. The example utilizes an Aero effect with ShadeColor set to the color of the nodes' pens.
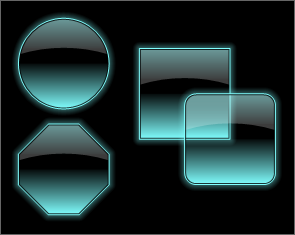
Here is the code that applies the above effects:
C#
 Copy Code Copy Code
|
|---|
GlassEffect glassEffect = new GlassEffect(); |
Visual Basic
 Copy Code Copy Code
|
|---|
Dim glassEffect As New GlassEffect() |