
In this blog post we will demonstrate how to customize the spreadsheet control so users can input in another language. We build a budget table whose data is in Korean. We will also use the latest localization capabilities of the component to add some auxiliary forms, which UI is also in Korean.
The sample uses WPF but the same methods of the control are available in Spreadsheet for WinForms.
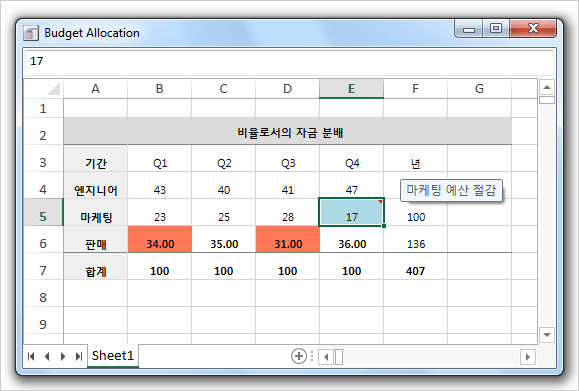
A spreadsheet in Korean
I. General Settings
We create a new WPF project in Visual Studio and name it “BudgetAllocation”. You can drag and drop the WorkbookView control from the Toolbox if you have installed the Spreadsheet for WPF component or the WPF Pack. Another option is to add the required dll-s manually:
- MindFusion.Spreadsheet.Wpf
- MindFusion.Licensing
- MindFusion.Common
In the XAML tag we add a mapping to the Spreadsheet control:
xmlns:ss="http://mindfusion.eu/spreadsheet/wpf"
Then, in the XAML file we create an instance of the MindFusion.Spreadsheet.Wpf.WorkbookView that holds a MindFusion.Spreadsheet.Wpf.Workbook:
<ss:WorkbookView x:Name=”workbookView”>
<ss:Workbook x:Name=”workbook” />
</ss:WorkbookView>
The next step is to add a new Worksheet to the Workbook and make it the active sheet:
var activeSheet = workbook.Worksheets.Add();
workbookView.ActiveWorksheet = activeSheet;
activeSheet.BeginInit();
......
activeSheet.EndInit();
With that we have completed the general settings for the project and is time to pay attention to the localization.
II. Localization
Spreadsheet for WPF can be localized to support different language through external XML files and the Locale property of the Workbook class. In our sample we will use Korean. First, let’s tell the control that we want to type in Korean:
workbook.Locale = new CultureInfo("ko-KR");
We need to change the default Font for the spreadsheet to one that does support Korean, we’ve chosen Malgun Gothic:
var globalStyle = activeSheet.CellRanges[0, 0, activeSheet.Columns.Count - 1, activeSheet.Rows.Count - 1].Style;
globalStyle.FontName = "Malgun Gothic";
The next step is to localize the UI of all forms that might appear when the user interacts with the spreadsheet. That happens through an XML file that we load and assign to the workbook:
 var file = @"../../Localization/Localization.KR.xml";
       if (file != null && File.Exists(file))
            workbook.SetLocalizationInfo(file);
The component provides ready to be used UI localization files for 6 of the most common languages in the world. In our case we use the file for Korean. You will find those files in a subfolder called Localization on your hard driver, in the installation folder of the control.
Once we’ve finished localizing the spreadsheet it’s time to add some data:
III. Data
Specifying data for each cell is very easy, it is made through the Data property of the Cell instance:
activeSheet.Cells["A2"].Data = "비율로서의 자금 분배";
A cell can contain a formula, and it is specified this way:
activeSheet.Cells["F4"].Data = "=SUM(B4:E4)";
IV. Appearance
The different cells and cell ranges in our spreadsheet have different formats and we set them through the Style property:
activeSheet.Cells["A3"].Style.FontBold = true;
activeSheet.Cells["A3"].Style.Background = new SolidColorBrush(Color.FromRgb(240, 240, 240));
activeSheet.Cells["A3"].Style.BorderBottomBrush = new SolidColorBrush(Color.FromRgb(220, 220, 220));
activeSheet.Cells["A3"].Style.BorderRightBrush = new SolidColorBrush(Color.FromRgb(220, 220, 220));
You can style a range of cells as well:
var heading = activeSheet.CellRanges["A2:G2"];

var headingStyle = heading.Style;
headingStyle.FontBold = true;
headingStyle.VerticalAlignment = MindFusion.Spreadsheet.Wpf.VerticalAlignment.Middle;
....
Cells can be merged:
heading.Merge();
Cells that render numbers can be formatted according to your needs:
var salesStyle = activeSheet.CellRanges[1, 5, 4, 5].Style;
salesStyle.FontBold = true;
salesStyle.Format = "#,##0.00;(#,##0.00)";
For some cells we use conditional formatting – that means we style them differently based on their data value:
// Set a conditional format
var format1 = salesStyle.ConditionalFormats.Add();
format1.Type = ConditionalFormatType.CellValue;
format1.Operator = ComparisonOperator.LessThan;
format1.First = "35";
format1.Style.Background = new SolidColorBrush(Color.FromArgb(255, 255, 120, 85));
format1.Style.Background.Freeze();
In this case we raise alert by painting red those cells whose value is less than 35 in cells that have column index 1 to 4 and row index 5.
V. Context Menu
We add a context menu to the Workbook control in XAML this way:
<ss:WorkbookView.ContextMenu>
<ContextMenu MenuItem.Click=”ContextMenu_Click”>
<MenuItem Header=”Delete Cells Form…” />
<MenuItem Header=”Insert Cells Form…” />
<MenuItem Header=”Worksheet Rename Form…” />
</ContextMenu>
</ss:WorkbookView.ContextMenu>
The ContextMenu has 3 items that allow the user to delete or insert cells as well to rename the worksheet. Let’s look at the event handler of the Click event:
//handle clicks on the context menu
private void ContextMenu_Click(object sender, RoutedEventArgs e)
   {
       var menu = sender as ContextMenu;
       var index = menu.Items.IndexOf(e.OriginalSource);

       switch (index)
       {
           case 0:
               {
                    new DeleteCellsForm(workbook).ShowDialog();
                    break;
                 }
            case 1:
                 {
                     new InsertCellsForm(workbook).ShowDialog();
                     break;
                 }
             case 2:
                 {
                     new WorksheetRenameForm(workbook, "New name").ShowDialog();
                     break;
                 }
          }
    }
We recognize the menu item that was clicked based on its index. After that we show the appropriate form. The InsertCellsForm, DeleteCellsForm and WorksheetRenameForm are all found in the MindFusion.Spreadsheet.Wpf.StandardForms namespace and we have to add a reference to the MindFusion.Spreadsheet.Wpf.StandardForms.dll. Once we do that, since we’ve set the localization info to point to a Korean file, those forms also show in Korean:
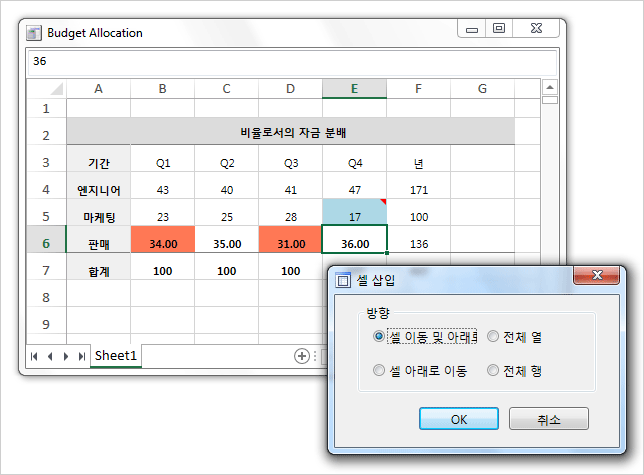
Spreadsheet UI in Korean
With that our sample is ready. You can download the full source code together with the localization file and the necessary component libraries from here:
Download Spreadsheet Localization Sample in WPF
About Spreadsheet for WPF: A native WPF component that allows developer to add to their applications functionality similar to those of Microsoft Excel. The diverse features of the component include smart API, rich styling options, support for numerous import/export formats, custom DB functions, formula and charts. Find out more about MindFusion Spreadsheet for WPF here.