This tutorial shows how to load hierarchical data recursively from XML and create diagram items corresponding to the hierarchy.
1. Follow the Eclipse or Android Studio guide to create a new Android project and add a DiagramView to its main Activity.
2. Right-click the project's assets folder and choose New -> File from the context menu (If using Android Studio, you might have to create assets folder first by selecting New -> Folder -> Assets Folder from app's context menu). Create a new XML file called SampleTree.xml and add to it content in the following form:
XML
 Copy Code Copy Code
|
|---|
<?xml version="1.0" encoding="utf-8" ?>
<Project>
<Activity Name="Activity 1">
<Activity Name="sub-activity 1">
<Activity Name="sub-activity 1-1" />
<Activity Name="sub-activity 1-2" />
</Activity>
<Activity Name="sub-activity 2">
<Activity Name="sub-activity 2-1" />
<Activity Name="sub-activity 2-2" />
<Activity Name="sub-activity 2-3" />
</Activity>
<Activity Name="sub-activity 3">
<Activity Name="sub-activity 3-1" />
<Activity Name="sub-activity 3-2" />
</Activity>
</Activity>
<Activity Name="Activity 2">
<Activity Name="sub-activity 1">
<Activity Name="sub-activity 1-1" />
<Activity Name="sub-activity 1-2" />
<Activity Name="sub-activity 1-3" />
</Activity>
<Activity Name="sub-activity 2">
<Activity Name="sub-activity 2-1" />
<Activity Name="sub-activity 2-2" />
</Activity>
</Activity>
<Activity Name="Activity 3">
<Activity Name="sub-activity 1">
<Activity Name="sub-activity 1-1" />
<Activity Name="sub-activity 1-2" />
<Activity Name="sub-activity 1-3" />
<Activity Name="sub-activity 1-4" />
</Activity>
<Activity Name="sub-activity 2" />
<Activity Name="sub-activity 3">
<Activity Name="sub-activity 3-1" />
<Activity Name="sub-activity 3-2" />
</Activity>
</Activity>
</Project> |
3. Open MainActivity.java and navigate to the onCreate override. Call the loadTree method from the end of onCreate:
| Java
Copy Code
|
|---|
@Override
protected void onCreate(Bundle savedInstanceState)
{
super.onCreate(savedInstanceState);
setContentView(R.layout.activity_main);
DiagramView view = (DiagramView)findViewById(R.id.diag_view);
diagram = view.getDiagram();
diagram.setBackBrush(new SolidBrush(Color.white));
loadTree(diagram, "SampleTree.xml", this);
} |
4. Add the following member to the activity class to hold the default node size.
| Java
Copy Code
|
|---|
final RectF bounds = new RectF(0,0,30,8); |
5. In loadTree, load the specified file using the XML DOM API. Create the tree root node and call the createChildren method, which builds the tree recursively.
| Java
Copy Code
|
|---|
void loadTree(Diagram diagram, String fileName, Context context)
{
// load the tree xml
DocumentBuilderFactory factory = DocumentBuilderFactory.newInstance();
DocumentBuilder builder = factory.newDocumentBuilder();
Document xml = builder.parse(
getAssets().open(fileName));
Element rootElement = (Element)xml.getFirstChild();
// create diagram elements recursively
ShapeNode root = diagram.getFactory().createShapeNode(bounds);
root.setText("Project");
createChildren(diagram, root, rootElement);
} |
6. Define createChildren as follows. It takes as parameters the parent DiagramNode and parent XML element, iterates the child XML elements to build the next level of the hierarchy, and creates corresponding diagram items by calling createShapeNode and createDiagramLink.
| Java
Copy Code
|
|---|
void createChildren(Diagram diagram, DiagramNode parentNode, Node parentElement)
{
NodeList elements = parentElement.getChildNodes();
for (int i = 0; i < elements.getLength(); i++)
{
Node element = elements.item(i);
if (element.getNodeName().equals("Activity"))
{
ShapeNode node = diagram.getFactory().createShapeNode(bounds);
node.setText(((Element)element).getAttribute("Name"));
diagram.getFactory().createDiagramLink(parentNode, node);
createChildren(diagram, node, element);
}
}
} |
7. Use TreeLayout to arrange the diagram. Add the following code to the end of the loadTree method.
| Java
Copy Code
|
|---|
// arrange using TreeLayout
TreeLayout layout = new TreeLayout();
layout.setType(TreeLayoutType.Cascading);
layout.setDirection(TreeLayoutDirection.LeftToRight);
layout.setLinkStyle(TreeLayoutLinkType.Cascading2);
layout.setNodeDistance(5);
layout.setLevelDistance(-5); // let horizontal positions overlap
layout.arrange(diagram); |
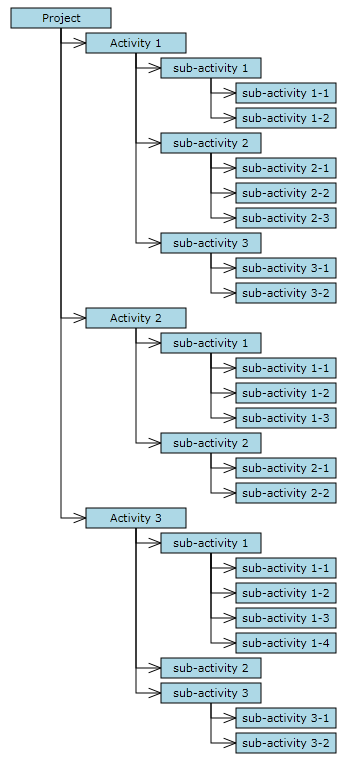
8. Build and run the project. If everything is fine, you should see this representation of the hierarchy: