Follow the steps shown in Setting up your website to use NetDiagram in order to create a new ASP.NET Web Site.
Before using the NetDiagram control, you must add it to the Toolbox pane.
- Select View -> Toolbox from the menu to display the Toolbox.
- Select the appropriate category to place the control and right-click on it (or right-click anywhere in the Toolbox pane). From the context menu, select Choose Items. You may also use Tools -> Choose Toolbox items to add the NetDiagram control to the Toolbox.
- In the Choose Toolbox items dialog box, select the .NET Framework Components tab, click the Browse button.
- Navigate to the NetDiagram installation folder. Navigate to the subfolder for the particular .NET version. The assembly files are usually found in C:\Program Files\MindFusion\NetDiagram\ or in the folder where you have installed the product.
- Select MindFusion.Diagramming.WebForms.dll, the assembly file that contains the NetDiagram component, and click the Open button.
- Once the dll has been added to the list of components, click OK.
- If you intend to apply the ImageMap mode on the client side, select the MindFusion.Extenders.dll to add it to the Toolbox.
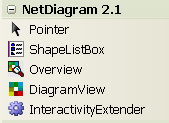
The following items appear in the toolbox.

Click OK to close the Choose Toolbox items dialog box.