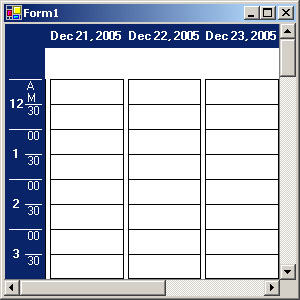
This tutorial will show you how to create a simple day schedule application based on MindFusion.Scheduling.
Select File -> New -> Project from the Visual Studio menu. In the dialog that appears, select Visual C# Projects from the list on the left, then Windows Application from the list on the right. Type in the name of your project (the tutorial uses Tutorial1) and click 'OK'.
Before using the Calendar control, you must add it to the toolbox. Display the toolbox by selecting View -> Toolbox from the menu. Then select the appropriate category for the control and right-click on it. From the context menu choose 'Add/Remove Items...'. In the "Customize toolbox" dialog click the 'Browse...' button and navigate to the control assembly file - MindFusion.Scheduling.dll. This file is usually found in the 'c:\Program Files\MindFusion\MindFusion.Scheduling for WinForms' folder or in the folder where you have installed the product. Once the dll is added to the list of components, click 'OK'. A Calendar item should appear in the selected category in the toolbox. Click on this item and drag it to the form's working area. This creates a new MindFusion.Scheduling Calendar control on the form.
Select the newly created control and click View -> Properties Window from the menu. In the Properties window change the name of the control to 'calendar' and set Dock to Fill.
Change CurrentView to Timetable. The timetable view displays rows of cells corresponding to the time of the day, and the cells in each column correspond to a specific date.
Expand the TimetableSettings property and set ShowDayHeader to Enabled. TimetableSettings contains settings used with the timetable view. There are corresponding settings objects available for each of the view types.
Initially the timetable displays only one day - usually the day when the control was added to the form. To change the set of displayed days, you must add a few lines of code. For that purpose, double-click on the form's title bar in the designer area. This switches to source code view and automatically creates an event handler for the form's Load event (named Form1_Load). Add the next lines to the body of the event handler.
C#
 Copy Code Copy Code
|
|---|
calendar.BeginInit(); |
Visual Basic
 Copy Code Copy Code
|
|---|
calendar.BeginInit() |
The code above adds 5 days to the timetable view, starting from today.
The first and last methods called above are used together to enclose code, which contains series of modifications to the calendar. BeginInit disables the internal update logic of the control, while EndInit resumes the control's normal behavior and updates its internal state to reflect all changes made since the call to BeginInit.
You can also set VisibleColumns to more than 1 to ensure more than one column is visible initially.
Compile and run the application. If you have set VisibleColumns to 3, the result should look like the image shown below.
