


Tutorial 1: Getting Started
This tutorial will show you how to create a simple application with MindFusion.DataViews for WPF.
Select File -> New -> Project from the Visual Studio menu. In the dialog that appears, select Visual C# -> Windows from the tree on the left, then WPF Application from the list on the right. Type in the name of your project (the tutorial uses Tutorial1) and click 'OK'.
Before using the ActivityChart control, it must be added it to the toolbox. Display the toolbox by selecting View -> Toolbox from the menu. Then select the appropriate category for the control and right-click on it. From the context menu choose 'Choose Items...'. In the "Customize Toolbox Items" dialog select the Components tab and click the 'Browse...' button. Then navigate to the control assembly file - MindFusion.DataViews.Wpf.dll. This file is found in the installation folder of the product. Once the dll is added to the list of components, click 'OK'. An ActivityChart item should appear in the selected category in the toolbox. Click on this item and drag it to the window's working area. This creates a new ActivityChart control on the window.
 Note Note |
|---|
Be sure to also reference the MindFusion.DataViews.Wpf.dll assembly. The file is located in the installation folder of the product. |
First prepare the main window control by setting its Height to 600, its Width to 800 and its WindowState to Maximized. Select the newly created control and click View -> Properties Window from the menu. In the Properties window change the name of the control to activityView and set Margin to 0.
The complete generated XAML code should look similar to the following:
XAML
 Copy Code Copy Code
|
|---|
<Window x:Class="Tutorial1.Window1" |
First switch to code source view - by clicking View -> Code or by pressing F7. To create some activities and add them to the chart, you could use the built-in Activity class. First, prepare a collection that will hold the Activity objects. In the window's constructor add the following line:
| Note |
|---|
Be sure to include the MindFusion.DataViews.Wpf namespace via the using (Imports in Visual Basic) keyword in the beginning of the file. |
| C#
Copy Code
|
|---|
ObservableCollection<Activity> activities = new ObservableCollection<Activity>(); |
| Visual Basic
Copy Code
|
|---|
Dim activities As New ObservableCollection(Of Activity)() |
Next, create seven Activity objects with different StartTime, EndTime, Progress and ActivityName and add them to the collection. For example:
| C#
Copy Code
|
|---|
Activity a0 = new Activity() |
| Visual Basic
Copy Code
|
|---|
Dim a0 As New Activity() With { _ |
After you've created some activities, create an IProjectViewModel by calling the CreateViewModel method on activityView to create the ViewModel for the specified activity model. This is enough to display the data in the ActivityChart.
| C#
Copy Code
|
|---|
IProjectViewModel project = activityView.CreateViewModel(activities, null, null, null, typeof(Activity), null, null, null); |
| Visual Basic
Copy Code
|
|---|
Dim project As IProjectViewModel = activityView.CreateViewModel(activities, Nothing, Nothing, Nothing, GetType(Activity), Nothing, Nothing, Nothing) |
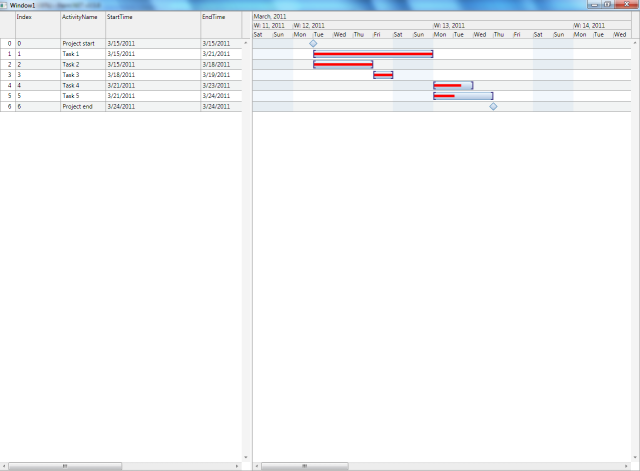
Compile and run the application. The result should look similar to the image below:
| Note |
|---|
You can find the complete source code of this tutorial in the product installation folder, under the folder for the appropriate .NET version and language. |


