This tutorial will show you how you can use custom Model classes with MindFusion.DataViews for WPF.
1. Getting started
Follow step 1 from Tutorial 1. Add the MindFusion.DataViews.Wpf controls to Visual Studio Toolbox (See step 2 in Tutorial 1). Manually reference the MindFusion.DataViews.Wpf.dll by clicking Project -> Add Reference... -> Browse and navigating to the file (usually located in the products installation folder).
2. Creating custom model classes
2.1 MyActivity class
In Visual Studio click Project -> Add Class... and name the new class MyActivity. This class will expose the following properties - Name, Start, End, Progress and Children. The complete code for MyActivity.cs (MyActivity.vb in Visual Basic) looks like this:
C#
 Copy Code Copy Code
|
|---|
// MyActivity.cs
class MyActivity
{
public MyActivity()
{
Children = new List<MyActivity>();
} public string Name { get; set; }
public DateTime Start { get; set; }
public DateTime End { get; set; }
public double Progress { get; set; }
public List<MyActivity> Children { get; set; }
} |
| Visual Basic
Copy Code
|
|---|
' MyActivity.vb
Class MyActivity
Public Sub New()
Children = New List(Of MyActivity)()
End Sub
Public Property Name() As String
Get
Return m_Name
End Get
Set(ByVal value As String)
m_Name = Value
End Set
End Property
Private m_Name As String
Public Property Start() As DateTime
Get
Return m_Start
End Get
Set(ByVal value As DateTime)
m_Start = Value
End Set
End Property
Private m_Start As DateTime
Public Property [End]() As DateTime
Get
Return m_End
End Get
Set(ByVal value As DateTime)
m_End = Value
End Set
End Property
Private m_End As DateTime
Public Property Progress() As Double
Get
Return m_Progress
End Get
Set(ByVal value As Double)
m_Progress = Value
End Set
End Property
Private m_Progress As Double
Public Property Children() As List(Of MyActivity)
Get
Return m_Children
End Get
Set(ByVal value As List(Of MyActivity))
m_Children = Value
End Set
End Property
Private m_Children As List(Of MyActivity)
End Class |
2.2 MyDependency class
Create a new class and name it MyDependency. This class will implement the IDependency interface which exposes the following members - From, To and DependencyType. The complete code for MyDependency.cs (MyDependency.vb in Visual Basic) looks like this:
| C#
Copy Code
|
|---|
// MyDependency.cs
class MyDependency : IDependency
{
public MyDependency()
{
}
#region IDependency Members
public DependencyType DependencyType { get; set; }
public object From { get; set; }
public object To { get; set; }
#endregion
} |
| Visual Basic
Copy Code
|
|---|
' MyDependency.vb
Class MyDependency
Implements IDependency
Public Sub New()
End Sub
#Region "IDependency Members"
Public Property DependencyType() As DependencyType Implements IDependency.DependencyType
Get
Return m_DependencyType
End Get
Set(ByVal value As DependencyType)
m_DependencyType = Value
End Set
End Property
Private m_DependencyType As DependencyType
Public Property From() As Object Implements IDependency.From
Get
Return m_From
End Get
Set(ByVal value As Object)
m_From = value
End Set
End Property
Private m_From As Object
Public Property [To]() As Object Implements IDependency.To
Get
Return m_To
End Get
Set(ByVal value As Object)
m_To = value
End Set
End Property
Private m_To As Object
#End Region
End Class |
2.3 MyResource class
Create a new class and name it MyResource. This class will expose the following properties - Title and Description. The complete code for MyResource.cs (MyResource.vb in Visual Basic) looks like this:
| C#
Copy Code
|
|---|
// MyResource.cs
class MyResource
{
public MyResource()
{
}
public string Title { get; set; }
public string Description { get; set; }
} |
| Visual Basic
Copy Code
|
|---|
' MyResource.vb
Class MyResource
Public Sub New()
End Sub
Public Property Title() As String
Get
Return m_Title
End Get
Set(ByVal value As String)
m_Title = Value
End Set
End Property
Private m_Title As String
Public Property Description() As String
Get
Return m_Description
End Get
Set(ByVal value As String)
m_Description = Value
End Set
End Property
Private m_Description As String
End Class |
2.4 MyAllocation class
Create a new class and name it MyAllocation. Add the following members - Activity, Resource, Start, End and Progress. The complete code for MyAllocation.cs (MyAllocation.vb in Visual Basic) looks like this:
| C#
Copy Code
|
|---|
// MyAllocation.cs
class MyAllocation
{
public MyAllocation()
{
}
public MyActivity Activity { get; set; }
public MyResource Resource { get; set; }
public DateTime Start { get; set; }
public DateTime End { get; set; }
public double Progress { get; set; }
} |
| Visual Basic
Copy Code
|
|---|
' MyAllocation.vb
Class MyAllocation
Inherits MyActivity
Public Sub New()
End Sub
Public Property Activity() As MyActivity
Get
Return m_Activity
End Get
Set(ByVal value As MyActivity)
m_Activity = Value
End Set
End Property
Private m_Activity As MyActivity
Public Property Resource() As MyResource
Get
Return m_Resource
End Get
Set(ByVal value As MyResource)
m_Resource = Value
End Set
End Property
Private m_Resource As MyResource
Public Property Start() As DateTime
Get
Return m_Start
End Get
Set(ByVal value As DateTime)
m_Start = Value
End Set
End Property
Private m_Start As DateTime Public Property [End]() As DateTime
Get
Return m_End
End Get
Set(ByVal value As DateTime)
m_End = Value
End Set
End Property
Private m_End As DateTime Public Property Progress() As Double
Get
Return m_Progress
End Get
Set(ByVal value As Double)
m_Progress = Value
End Set
End Property
Private m_Progress As Double
End Class |
3. Set up an ActivityChart and a ResourceChart in the main window
From Visual Studio Toolbox drag an ActivityChart and a ResourceChart controls and drop them to the main window area. Customize their properties and name them activityView and resourceView respectively. Next, layout the two charts in the root Grid on two rows. In order to bind the views to the custom created classes, their BindingExpression properties must be set with information pointing to the respective properties to be bound in the model classes. For example the ActivityNameExpression BindingExpression property should point to the Name property in the MyActivity class, the ResourceDescriptionExpression property should point to the Description property of the MyResource class. The complete generated XAML should look similar to the following:
| XAML
Copy Code
|
|---|
<Window x:Class="Tutorial5.Window1"
xmlns="http://schemas.microsoft.com/winfx/2006/xaml/presentation"
xmlns:x="http://schemas.microsoft.com/winfx/2006/xaml"
xmlns:dataviews="http://mindfusion.eu/dataviews/wpf"
Title="Window1" WindowState="Maximized" Height="600" Width="800">
<Grid>
<Grid.RowDefinitions>
<RowDefinition />
<RowDefinition />
</Grid.RowDefinitions>
<dataviews:ActivityChart
Name="activityView" Grid.Row="0"
ActivityNameExpression="{Binding Name}"
ActivityStartTimeExpression="{Binding Start}"
ActivityEndTimeExpression="{Binding End}"
ActivityProgressExpression="{Binding Progress}"
ActivityChildrenExpression="{Binding Children}"
ResourceTitleExpression="{Binding Title}"
ResourceDescriptionExpression="{Binding Description}"
AllocationActivityExpression="{Binding Activity}"
AllocationResourceExpression="{Binding Resource}"
AllocationStartTimeExpression="{Binding Start}"
AllocationEndTimeExpression="{Binding End}"
AllocationProgressExpression="{Binding Progress}"/>
<dataviews:ResourceChart Name="resourceView" Grid.Row="1" />
</Grid>
</Window> |
 Note Note |
|---|
If there will be two or more views that will share a single project, you need to define the binding expressions in only one of the views. As in the above example, these properties are set only for the ActivityChart instance. |
4. Create the data
Create some data to be displayed in the views - activities, dependencies, resources and allocations. You can follow the patterns, shown in the previous tutorials, but this time use the newly created custom classes. As the MyActivity class defines a Children property and the chart views are able to display sets of data in hierarchical relationship (See TreeGrid), let's add some subactivities like this:
| C#
Copy Code
|
|---|
MyActivity a2 = new MyActivity()
{
Start = a0.End,
End = a0.End.AddDays(3),
Progress = 1,
Name = "Task 2",
};
a2.Children.Add(new MyActivity() { Name = "SubTask 2.1", Start = a2.Start, End = a2.Start.AddDays(1), Progress = 1 });
a2.Children.Add(new MyActivity() { Name = "SubTask 2.2", Start = a2.Start.AddDays(1), End = a2.Start.AddDays(3), Progress = 1 });
myActivities.Add(a2); |
| Visual Basic
Copy Code
|
|---|
Dim a2 As New MyActivity() With { _
.Start = a0.[End], _
.[End] = a0.[End].AddDays(3), _
.Progress = 1, _
.Name = "Task 2" _
}
a2.Children.Add(New MyActivity() With { _
.Name = "SubTask 2.1", _
.Start = a2.Start, _
.[End] = a2.Start.AddDays(1), _
.Progress = 1 _
})
a2.Children.Add(New MyActivity() With { _
.Name = "SubTask 2.2", _
.Start = a2.Start.AddDays(1), _
.[End] = a2.Start.AddDays(3), _
.Progress = 1 _
})
myActivities.Add(a2) |
5. Create the project and bind the views to the data
Create the IProjectViewModel by calling the CreateViewModel method. Pass the types of the custom classes as parameters to the method like this:
| C#
Copy Code
|
|---|
project = activityView.CreateViewModel(myActivities, myDependencies, myResources, myAllocations, typeof(MyActivity), typeof(MyDependency), typeof(MyResource), typeof(MyAllocation)); |
| Visual Basic
Copy Code
|
|---|
project = activityView.CreateViewModel(myActivities, myDependencies, myResources, myAllocations, GetType(MyActivity), GetType(MyDependency), GetType(MyResource), GetType(MyAllocation)) |
Now the project is created and bound to activityView.All is left to do is to associate the ResourceChart with it:
| C#
Copy Code
|
|---|
resourceView.DataContext = project; |
| Visual Basic
Copy Code
|
|---|
resourceView.DataContext = project |
| Note |
|---|
Please note that with this setup the Model will be updated by changes in the View, but the view won't get updated by direct changes to the Model. In order to support two-way data binding, the Model must implement the INotifyPropertyChanged interface and raise the PropertyChanged event when appropriate. For information how to do this, check this article. |
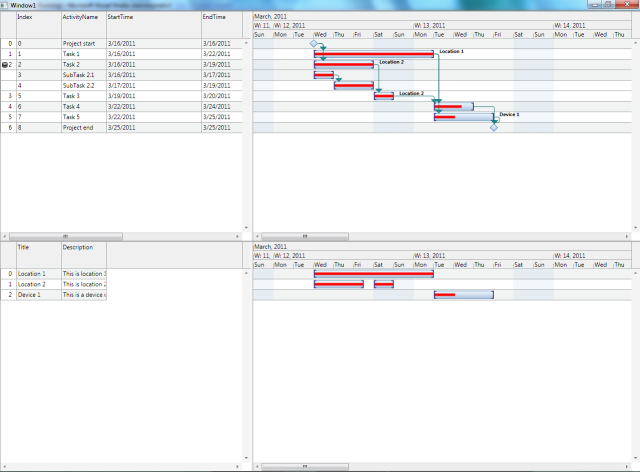
6. Build and run
Compile and run the application. The result will be similar to this image:
| Note |
|---|
You can find the complete source code of this tutorial in the product installation folder, under the folder for the appropriate .NET version and language. |


