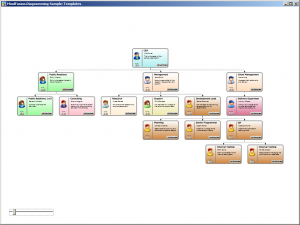
In this blog you will learn how to create a presentation of a hierarchical organization using MindFusion WPF Diagram control. The hierarchy is presented as a diagram, where each node represents an employee in the organization and each link represents the direct relationship between employees. The nodes in the diagram use custom templates to give a more detailed description of the employee, as well as to enable editing of various properties.
Setup
Create a new WPF application and add the necessary assemblies to the project. In the main window, declare the following namespace:
xmlns:diag="http://mindfusion.eu/diagramming/wpf"
Then declare an instance of the DiagramView class inside the root grid:
<diag:diagramview x:name="diagramView">
    <diag:diagram x:name="diagram" backbrush="White">
</diag:diagram></diag:diagramview>
Creating the custom node
To create the custom node, from the “Project -> Add New Item” menu add a new CustomControl (WPF) item to the project. This automatically creates a themes folder inside the project and a generic.xaml resource dictionary, which contains the template of the newly added class. Rename the newly created file (and class) to OrgChartNode. Ensure that the new class derives from TemplatedNode rather than Control. Then define the following dependency properties in the class: Title, FullName, and Image, of types string and ImageSource respectively.
Define the appearance of the node in its template in the generic.xaml file. In this case the node will display a round border, an image of the employee, its title, name, and description, and several buttons that can be used to change the role of the employee or add subordinates. The components bind directly to the properties of the node class. For example:
<textbox acceptsreturn="False" fontfamily="Verdana" fontsize="12" borderbrush="Transparent" background="Transparent" text="{Binding FullName}"></textbox>
The complete listing of the node’s template can be found in the project below.
To handle the Click event of the buttons in the template, register a routed event handler in the OrgChartNode class:
AddHandler(Button.ClickEvent, new RoutedEventHandler(OnClick));
...
void OnClick(object sender, RoutedEventArgs e)
{
    ...
}
Declare an Index property in the OrgChartNode class, which will indicate the role of the employee. Changing the role will automatically update the title and background color of the node:
public int Index
{
    get { return Images.IndexOf(Image); }
    set
    {
        if (value != -1)
        {
            Image = Images[value];
            Title = Titles[value];
            Brush = Fills[value];
        }
        else
        {
            Image = null;
        }

        InvalidateVisual();
    }
}
Create the hierarchy
Now that the custom node is ready, we can create a diagram representing the hierarchy. In the code behind of the main window, create a series of OrgChartNode objects, each representing an employee in the organization, then link the nodes using the CreateDiagramLink method of the diagram Factory class:
var node1 = new OrgChartNode
{
    Bounds = new Rect(0, 0, 300, 160),
    FullName = "Mike Powell",
    Text = "This is the leader of the sample organization.",
    Index = 2
};
diagram.Nodes.Add(node1);

var node2 = new OrgChartNode
{
    Bounds = new Rect(0, 0, 300, 160),
    FullName = "Emily Williams",
    Text = "Emily is the leader highest in the PR hierarchy.",
    Index = 1
};
diagram.Nodes.Add(node2);
...
diagram.Factory.CreateDiagramLink(node1, node2);
Finally, arrange the hierarchy by using the built-in tree layout:
TreeLayout layout = new TreeLayout();
layout.Type = TreeLayoutType.Centered;
layout.LinkStyle = TreeLayoutLinkType.Cascading3;
layout.Direction = TreeLayoutDirections.TopToBottom;
layout.KeepRootPosition = false;
layout.LevelDistance = 40;
layout.Arrange(diagram);
The following image illustrates the result:
The source code of the project together with all necessary libraries can be downloaded from here:
Download Organization Hierarchy Sample
You are welcome to ask any questions about the Diagram control at MindFusion discussion board or per e-mail at support@mindfusion.eu.
Click here here to visit the official page of the WPF diagram control.
We hope you find this tutorial useful and thank you for your interest in MindFusion developer tools.

