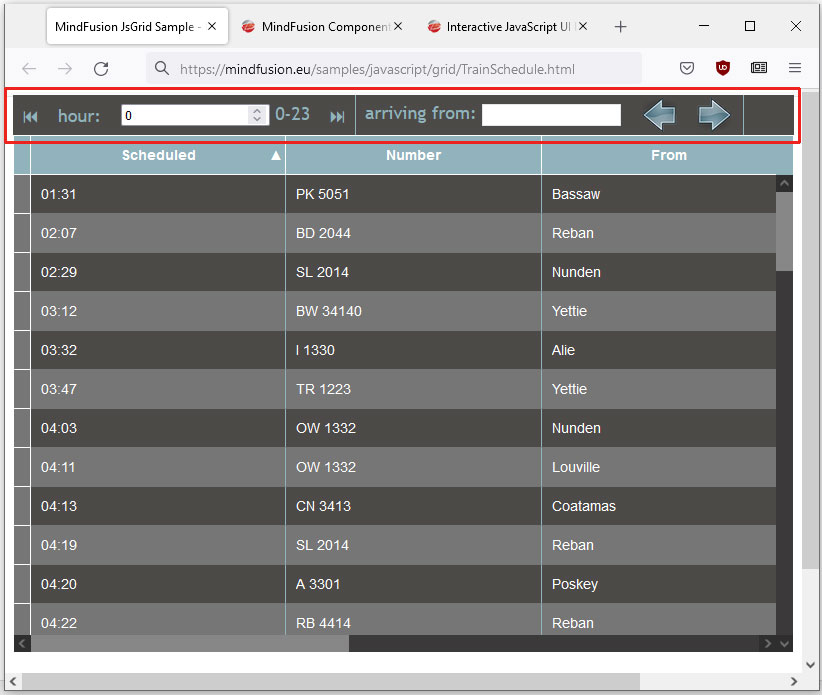
In this blog post we are going to look at the way you can build the ToolStrip that you see at the image below. We use the ToolStrip control, which is part of MindFusion Pack for JavaScript. Here is the final result:

We will go through the process of creating the toolstrip step-by-step, from scratch, clarifying the most important details.
You can run the sample online at https://mindfusion.eu/samples/javascript/grid/TrainSchedule.html
I. General Setup
The ToolStrip class is part of the UI controls that ship with MindFusion Pack for JavaScript. The UI controls are found in the common-ui.js file and we need to add a reference to it. We also need to reference a few other JavaScript libraries:
<script src="../scripts/drawing.js" type="text/javascript"></script>
<script src="../scripts/controls.js" type="text/javascript"></script>
<script src="../scripts/common.js" type="text/javascript"></script>
<script src="../scripts/common-collections.js" type="text/javascript"></script>
<script src="../scripts/common-ui.js" type="text/javascript"></script>
We need a DIV element for the ToolStrip control to render itself onto. The location and the size of the DIV specify the location and size of the toolstrip. It is important that we provide the DIV with an id, because we will reference it from code.
<div style="position: absolute; top: 100px; width: 98%; bottom: 20px;">
	<div id="toolstrip" style="font-size:large;">
</div>
</div>
With that the setup in the HTML part of our application is done. We are ready to write some JavaScrit code that will create and customize the toolstrip.
II. The ToolStrip: Initialization and Settings
The constructor of the ToolStrip class requires the DOM element of the DIV that represents the toolstrip. So, we get it thanks to the id that we assigned to it and create the ToolStrip object. By default a toolstrip can be scrolled and dragged. We want to prevent this and set scrollable and allowDrag to false.
var strip = new MindFusion.Common.UI.ToolStrip(document.getElementById("toolstrip"));
strip.scrollable = false;
strip.allowDrag = false;
The menus and content in general of at ToolStrip is set with instances of the ToolStripItem class. Items can be empty and their content is set with the template property. Then can also be icons, labels or separators. The type is set with the ToolStripItemType enumeration in the constructor. This is how you create a ToolStripItem of type label:
strip.items.add(new MindFusion.Common.UI.ToolStripItem(MindFusion.Common.UI.ToolStripItemType.Label, "hour:"));
The template of a ToolStripItem is set as HTML code. With the template below we set an input as the content of the ToolStripItem:
item = new MindFusion.Common.UI.ToolStripItem(MindFusion.Common.UI.ToolStripItemType.Default);
item.template = "<input type="number" id="hour_input" min="0" value="0"> 0-23";
strip.items.add(item);
When you create the HTML template you can use any HTML tags, styles and attributes that you would normally use when you write pure HTML.
The separator item renders as a line. It has no special properties and is styled according to the theme:
strip.items.add(new MindFusion.Common.UI.ToolStripItem(ui.ToolStripItemType.Separator));
The icon ToolStripItem represents clickable images in the toolstrip. Here we use one of the numerous properties of ToolStripItem size
item = new MindFusion.Common.UI.ToolStripItem(MindFusion.Common.UI.ToolStripItemType.Icon);
item.imageSrc = "../images/next_train.png";
item.size = MindFusion.Common.Unit.pixel(36);
strip.items.add(item);
It is worth browsing through the members of the ToolStripItem class – you can find many useful properties that allow you to customize the looks and feels of your toolstrip.
It is important to remember to call the render method after you’ve finished initialization of the toolstrip:
strip.render();
We have demonstrated how you can create items for your toolstrip from all item types. Now it is time to deal with interactivity: how to handle events for the items.
III. Handling ToolStripItem Events
The events for toolstrip items are raised by the container: the ToolStrip control. For handling clicks on the items, we use itemClick The ToolStrip control is of type ListContainer and boasts many events: itemDrag, itemMouseEnter, selectionChanged to name a few. It is worth going through them. This is how to handle clicks on a ToolStripItem:
strip.itemClick.addEventListener(function(sender, args)
{
    var index = sender.items.indexOfItem(args.item);


    switch (index)
    {
       case 0:
         handleClickOnItem0();
         break;
       case 1:
         handleClickOnItem1();
         break;
      default:
        return;
     }
});
The ToolStrip control used in various samples that ship with MindFusion JavaScript Pack. The code for this sample is taken from the “Train Schedule” demo, which can be downloaded from the following link:
Download the Train Schedule Sample
Technical support is available through MindFusion forums or the HelpDesk. You can also write at support@mindfusion.eu
About MindFusion Pack for JavaScript: A rich set of fully-interactive and customizable libraries written in pure JavaScript. The pack includes heavy-weight controls like flowchart, scheduling and charts, as well as versatile UI controls like ToolStrip, a Window, ImagePicker and more. Each library features numerous properties, which you can use to make it fit best into your application. The pack features various samples that demonstrate how the libraries are used and provides plenty of sample code to study and implement in your own projects. Appearance is theme-based, the pack boasts a set of more than 10 CSS themes, which are also editable. MindFusion first-class customer support is available for all licensees and evaluators free of charge. Each license is permanent and included 12-month upgrades. Find out more at the JavaScript Pack page.
