
This blog post is a step-by-step guide on how to create a tool that parses *.jar files and builds the class hierarchy. The visualization of the diagram is performed by MindFusion Java Swing Diagram library.
Here is an image of the final application:
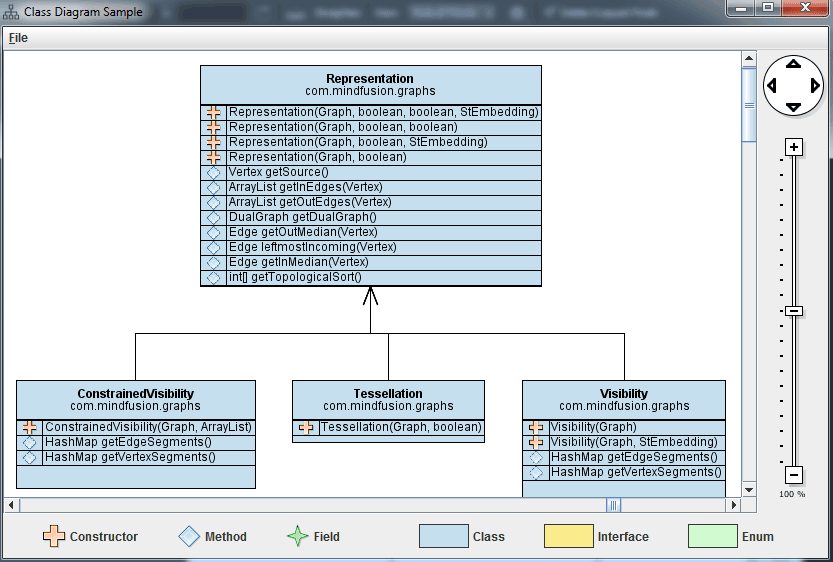
Class Library Tool in Java
In part one we will take a look at the controls that build the user interface for the application.
I. UI Controls
We will use three controls from the diagram library:
    private Diagram diagram;
    private DiagramView diagramView;
    private ZoomControl zoomer;
One JScrollPane:
private JScrollPane _scrollPane;
and a JPanel for the legend and a JMenuBar.
    JPanel controlsPanel = new JPanel();
    JMenuBar menuBar;
Those controls build the user interface. At the top is the menu bar with menus for handling the *.jar files. In the center is a scrollable area that contains the diagram. Right to it is a zoom control. At the bottom is the panel with the legend – images and text that explain the colors and symbols on the class diagram.
II. The Diagram Controls
The three diagram controls are the Diagram, the DiagramView and the ZoomControl. The diagram needs a diagramView to render itself onto. The diagramView users a scrollPane to provide scroll functionality for the flowchart. The zoomControl is a typical Java Swing control, we set a few customization options on it to make it pass the layout of our application.
       //diagram initialization
        diagram = new Diagram();
        diagram.setAutoResize(AutoResize.RightAndDown);
We set auto resize for the diagram and assign it to the diagramView:
        //initialize a diagramView that will render the diagram.
        diagramView = new DiagramView(diagram);
        diagramView.setVisible(true);
The scrollPane is initialized with the diagramView and scrolls automatically when the view is bigger than the available size:
         //use a scroll pane to host large diagrams
        _scrollPane = new JScrollPane(diagramView);
        _scrollPane.setVisible(true);
        _scrollPane.setAutoscrolls(true);
The zoomControl is also attached to the diagramView. It’s important that we set its Dimension, the width will be used by the Java layout manager to calculate the available space for it on the application.
        //provide a zoomer for the diagram
        zoomer = new ZoomControl();
        zoomer.setView(diagramView);
        zoomer.setPreferredSize(new Dimension(70, 50));
        zoomer.setVisible(true);
The arrangement of the controls in the JFrame is done with the BorderLayout. It’s important that we set the layout before we start adding the controls:
     getContentPane().setLayout(new BorderLayout());
     this.add(zoomer, BorderLayout.EAST);
     this.add(createLegendPanel(), BorderLayout.SOUTH);
The zoomer is to the right, the legend panel is at the bottom. The last control that we add is the scrollPane with the diagram, we align it to the center, which means that all the available space would be allocated to her.
this.add(_scrollPane, BorderLayout.CENTER);
Finally, we create the menu bar.
this.setJMenuBar(createMenuBar());
III. The Legend Panel
The legend panel is a JPanel with BoxLayout of type “LINE_AXIS”.
        JPanel controlsPanel = new JPanel();
        controlsPanel.setLayout(new BoxLayout(controlsPanel, BoxLayout.LINE_AXIS));
        controlsPanel.setBorder(BorderFactory.createEmptyBorder(10, 10, 10, 10));
        controlsPanel.add(Box.createHorizontalGlue());
The legend items are ImageIcon-s – for each symbol in the diagram there’s an icon. We have also created images for the colors of the diagram. Each icon is rendered with explanation label.
Generally, each item on the LegendPanel is initialized like this:
        //create labels for each item on the legend
        JLabel label = new JLabel("Constructor", constructorIcon, JLabel.CENTER);
        label.setAlignmentX(JComponent.CENTER_ALIGNMENT);
        controlsPanel.add(label);
        controlsPanel.add(Box.createRigidArea(new Dimension(10, 0)));
        controlsPanel.add(Box.createHorizontalGlue());
The layout distributes evenly the available space between the items and we get an easy-to-read legend at the bottom of the application.
IV. The Menu
The menu at the top is implemented as a JMenuBar, which uses mnemonic keys and accelerators to grant access to the menu items with keyboard shortcuts. The only menu item and submenu items currently present are File -> Open jar.
        //Build the first menu.
        menu = new JMenu("File");
        menu.setMnemonic(KeyEvent.VK_F);
        menu.getAccessibleContext().setAccessibleDescription(
                "File operations");
        menuBar.add(menu);
The “Open jar” command uses action listener, which brings up the Open File diagolg. This is a JFileChooser, which filters all files except *.jar files.
     //the method that handles events
    public void actionPerformed(ActionEvent e)
    {
        //identify the command
        if ("open_jar".equals(e.getActionCommand())) {

            //a list with MemberInfo objects that hold class info
            ArrayList membersList = new ArrayList();
            fileChooser = new JFileChooser();

            //set the default directory to this file's directory
            fileChooser.setCurrentDirectory(currFile);

            //filter only *.jar files
            FileFilter filter = new FileNameExtensionFilter(null, "jar");
            fileChooser.setFileFilter(filter);
            fileChooser.removeChoosableFileFilter(fileChooser.getAcceptAllFileFilter());
            .......
If the method confirms that the user has selected a valid jar, the path to the file is provided to the method that reads and parses the jar, which will be topic for the second part of this tutorial.
The whole sample is available for direct download from this link:
Download the Class Diagram Tool in Java Application
MindFusion support team welcomes your questions about the Java diagram library or any other of our programming tools at the discussion board or per e-mail at support@mindfusion.eu
About Diagramming for Java Swing: MindFusion.Diagramming for Java Swing provides your Java application with all necessary functionality to create and customize a diagram. The library is very easy to integrate and program. There are numerous utility methods, rich event set, more than 100 predefined shapes. The tool supports a variety of ways to render or export the diagram, advanced node types like TreeView nodes, hierarchical nodes, tables, container nodes and many more. There are 15 automatic layouts, various input / output options and fully customizable appearance. A detailed list with JDiagram’s features is uploaded here. You can check the online demo to see some of the functionality implemented.
Diagramming for Java Swing is royalty free, there are no distribution fees. Licenses depend on the count of developers using the tool – check here the prices.