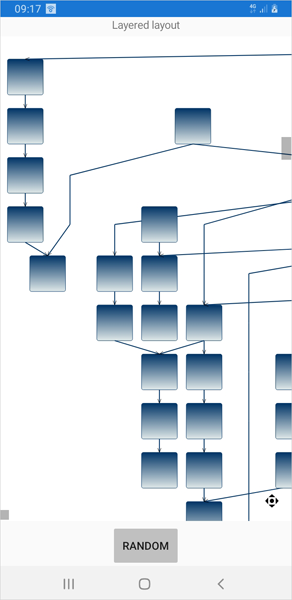
In this tutorial we demonstrate how to create a sample diagram and arrange it with the LayeredLayout. The diagram is generated with the Xamarin flowchart library. Here is a screenshot of the final application on an Android phone:

I. Project Setup
We start Visual Studio and type “Xamarin.Forms” in the search box for project templates. Among the search results we choose “Mobile App (Xamarin.Forms)” and press “Next”.

Then we choose a name for our application and press “Create”. Select the platforms you want to target: iOS, Android and UWP. Our sample application supports them all.
When the new application is created we create a new folder called References and copy in it all assembly references that are needed by the project. These are:
- MindFusion.Common
- MindFusion.Diagramming
- MindFusion.Licensing
for the main, common project, shared by all projects for the platforms.
Then in the Android you need to add references to:
- MindFusion.Common
- MindFusion.Common.Android
- MindFusion.Diagramming
- MindFusion.Diagramming.Android
For the iOS project you need references to:
- MindFusion.Common
- MindFusion.Common.iOS
- MindFusion.Diagramming
- MindFusion.Diagramming.iOS
and for the UWP project, you need to add references to:
- MindFusion.Common
- MindFusion.Common.Universal
- MindFusion.Diagramming
- MindFusion.Diagramming.Universal
Then, in the xaml page of the common project, you need to add reference to the diagramming assembly:
<ContentPage xmlns="http://xamarin.com/schemas/2014/forms"
             xmlns:x="http://schemas.microsoft.com/winfx/2009/xaml"
             xmlns:d="http://xamarin.com/schemas/2014/forms/design"
             xmlns:mc="http://schemas.openxmlformats.org/markup-compatibility/2006"
             xmlns:diag="clr-namespace:MindFusion.Diagramming;assembly=MindFusion.Diagramming"
             mc:Ignorable="d"
             x:Class="LayeredLayout.MainPage"></ContentPage>
We add the mapping xmlns:diag to the MindFusion.Diagramming namespace in the MindFusion.Diagramming assembly. Then we need to declare an instance of the DiagramView class, and we do it in XAML:
>diag:DiagramView x:Name="diagramView"
			HorizontalOptions="FillAndExpand"
			VerticalOptions="FillAndExpand">
II. Diagram Initialization
In the code-behind file for the MainPage in the common project, we declare a class variable Diagram. We assign it to the diagram, associated with the DiagramView
Diagram diagram;

public MainPage()
{
	InitializeComponent();
	diagram = diagramView.Diagram;
...........................
...........................
...........................
}
We will create a diagram on button click, so we add a button control to the XAML code:
<StackLayout
	Orientation="Horizontal"
	HorizontalOptions="Center"
	Spacing="5" Padding="5">
<Button
Text="Random"
BorderColor="Black"
BackgroundColor="Silver"
Clicked="OnRandomClick"
/>
We will handle the Click event of the button to generate the graph. We do this in a method called RandomGraph. We first, clear all items from the diagram, if there are any:
  private void RandomGraph()
  {
     diagram.ClearAll();
     ....................
}
We generate the nodes with the CreateShapeNode method of the Factory class that is accessible through a property of diagram.
ShapeNode node = diagram.Factory.CreateShapeNode(0, 0, 40, 40);
node.AnchorPattern = AnchorPattern.TopInBottomOut;
The node constructor takes as a parameter the location and size of the node with its four values: top, left, width and height. We don’t care about the location, because we will auto-arrange the nodes with a layout algorithm.
The AnchorPattern property is important and determines the points, where links can dock to the node. We use one of the values of the AnchorPattern enumeration. The member TopInBottomOut means that incoming links will enter through the top side of the node and outgoing links will start from its bottom side.
Finally, we create randomly links between nodes. We use again the Factory class, this time it is the CreateDiagramLink method. We pick random nodes and provide them as parameters to the method:
private void RandomGraph()
 {
      diagram.ClearAll();

      for (int i = 0; i < 30; ++i)
      {
            int c = diagram.Nodes.Count;
            int g = 2 + random.Next(15);
            for (int j = 0; j < g; ++j)
            {
             ShapeNode node = diagram.Factory.CreateShapeNode(0, 0, 40, 40);
             node.AnchorPattern = AnchorPattern.TopInBottomOut;
               if (j > 0)
                   diagram.Factory.CreateDiagramLink(diagram.Nodes[diagram.Nodes.Count - 2], node);
              }
              if (i > 0)
              {
                  for (int j = 0; j < 1 + random.Next(3); ++j)
                      diagram.Factory.CreateDiagramLink(
                       diagram.Nodes[random.Next(c)],
                       diagram.Nodes[c + random.Next(g)]);
           }
       }
  }
III. Arranging the Diagram
We choose the LayeredLayout for the automatic arrangement. Like all other algorithms, it is a member of the Layout namespace and is applied with a single method: arrange The arrange method is a member of the Diagram class. It is called with the instance of the layout, that you want to have applied:
layout.Arrange(diagram);
The different algorithms have different options that fine-tune the arranged graph. We apply the Reassign Anchoring type to the graph, which means the links will be reassigned to the positions, where the algorithms find most appropriate. The NodeDistance and LayerDistance properties allow us to control the spacing between the nodes and the layers of the graph. They are used by many of the algorithms.
We apply two more layout-specific properties: EnforceLinkFlow and StraightenLongLinks . As their names suggest, they try to make links follow one direction and straighten those links that cross layers.
And with that our tutorial is finished. You can download the sample project from this link:
A Sample Diagram in Xamarin with the LayeredLayout: Download Code
Diagramming for Xamarin: The diagramming component provides all Xamarin-applications with the complete feature-set to create, edit and customize flowcharts, diagrams, graphs, hierarchies, schemes and much more. The control’s API is intuitive and easy to use with plenty of properties that allow you to control every aspect of the appearance and behavior of the diagram. You have a rich set of predefined nodes and links to choose from, as well table nodes, composite nodes, different brush and pen types, various layout algorithms. Learn more about Diagramming for Xamarin at https://mindfusion.eu/xamarin-diagram.html
