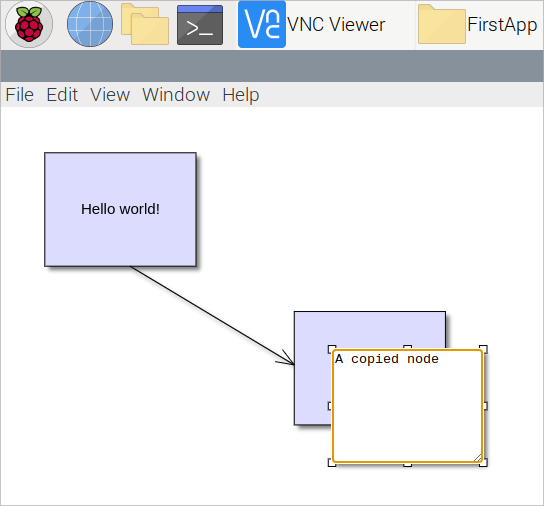
In this blog post we will demonstrate how to setup a Unix/Linux system to run a sample JavaScript diagram application under Electron.js. We use a Raspberry Pi computer which runs Raspberry Pi OS – the Debian-based OS optimized for the Raspberry Pi hardware.
Here is how our test application looks like:

We want to make a clean installation of Node.js and npm, that’s why we remove all previous versions and installations, if any:
sudo apt-get remove nodejs
sudo apt-get remove npm
After we have uninstalled npm and Node.js, we remove the content of the npm and node_modules folders.
sudo rm -rf ~/.npm
sudo rm -rf /usr/local/lib/node_modules
Then we install npm and node.js by running the install script directly from the npmjs website:
curl -0 -L https://npmjs.org/install.sh | sudo sh
We can check if the installation was successful by querying the system about its current version of npm and node.js:
npm -v
node -v
If you have uninstalled npm to install it anew, you might get the following error:
-bash: /usr/bin/npm: No such file or directory
A common scenario is that the new npm is installed in a new location and bash has cached the path. Run
hash -r
to remove all previously stored mappings.
Before you start installing electron, make sure the current user has write rights over the node_modules directory. We check who the owner of the directory is:
ls -la /usr/local/lib/node_modules
In our case the result was:
drwxr-xr-x 3 root root 4096 Nov 30 12:48 .
drwxr-xr-x 6 root   root 4096 Nov 30 12:29 ..
drwxr-xr-x 9 root root 4096 Nov 30 12:29 npm
This means that read rights of the node_modules directory are owned by root, which is not the current user. Even when you run npm install commands with “sudo” you might still get access violoation error of the type:
Error: EACCES: permission denied, mkdtemp '/usr/local/lib/node_modules/electron/electron-download-4LQBL9'
You can fix that by giving rights to the current user:
sudo chown -R pi: /usr/local/lib/node_modules
In our case the user is called “pi” – you need to specify the name of your user here. Now the query for the directory returns:
pi@raspberrypi:~ $ ls -la /usr/local/lib/node_modules
total 12
drwxr-xr-x 3 pi pi   4096 Nov 30 12:48 .
drwxr-xr-x 6 pi root 4096 Nov 30 12:29 ..
drwxr-xr-x 9 pi pi   4096 Nov 30 12:29 npm
And we are ready to install Electron.js. We install it globally with:
npm install electron -g
And we have setup our system to run Node.js and Electron.js.
II. Diagram Setup
We prepare an empty page using the default template from the Electron quick start guide. In the body of the web page we create a Canvas, which will be used by the diagram:
<div>
	<canvas id="diagram">
	</canvas>
</div>
Then we add references to the diagram scripts:
<script src="MindFusion.Common.js"></script>
<script src="MindFusion.Diagramming.js"></script>
We have placed those scripts in the same directory as the web page. Then we start a new script section where we create the diagram:
<script>

   //create the Diagram
   var Diagram = MindFusion.Diagramming.Diagram;

    // create diagram object
    const canvas = document.getElementById("diagram");
    const diagram = Diagram.create(canvas);
    diagram.setUndoEnabled(true);
    diagram.setAllowInplaceEdit(true);

</script>
We first create a namespace mapping to the MindFusion.Diagramming.Diagram class. Then we get the HTML Canvas that we placed in the web page. We use the ID to identify it. We create the Diagram object with the create static method, which takes the Canvas as a parameter. Then we enable undo and in-place edit for the newly created diagram.
Let’s create a sample node that renders some text. We do it this way:
// create a sample node
const node = diagram.getFactory().createShapeNode(10, 10, 40, 30);
node.setText("Hello world!");
Now if you render the project using
npm start
from the directory where the project files are, you will be able to see the page with the node.
III. Replacing Default Electron.js Menus
We want to replace the default electron menus Copy, Cut, Paste, Undo and Redo with actions performed on diagram items. The Diagram API supports the same commands and we want them to execute instead of those provided by Electron.js.
We open the index.js file of the electron project template and get the menu:
const { Menu } = require('electron');
const menu = Menu.getApplicationMenu();
Now we access each of the items that are in this menu and onclick make them send their role e.g. their behavior:
for (let item of menu.items)
  {
	if (item.submenu)
	{
	  {
	    for (let subitem of item.submenu.items)
		{
		  switch (subitem.role)
		  {
			case "undo":
			case "redo":
			case "cut":
			case "copy":
			case "paste":
			  subitem.click =
			    () => win.webContents.send(subitem.role);
			  break;
		  }
		}
	  }
	}
  }
We edit the index.html and index.js files of an Electron.js template to make our sample diagram:

Then we handle the click event by triggering the respective diagram method. We use the ipcRenderer constant to get the event:
const { ipcRenderer } = require('electron');
The ipcRenderer is Electron’s module for emitting events. We use it to learn when the click event on the menu buttons has occurred and to handle the clicks:
ipcRenderer.on("undo", () => diagram.undo());
ipcRenderer.on("redo", () => diagram.redo());
ipcRenderer.on("cut", () => diagram.cutToClipboard());
ipcRenderer.on("copy", () => diagram.copyToClipboard());
ipcRenderer.on("paste", () => diagram.pasteFromClipboard(10, 10, false, false));
This means that when the user clicks on a built-in menu item, the action will be replaced by those diagram methods.
And that is the end of our tutorial. Download the sample project from:
https://mindfusion.eu/_samples/FirstApp.zip
For technical question, please use the JS Diagram forum: https://mindfusion.eu/Forum/YaBB.pl?board=jsdiag_disc
About Diagramming for JavaScript: This native JavaScript library provides developers with the ability to create and customize any type of diagram, decision tree, flowchart, class hierarchy, graph, genealogy tree, BPMN diagrams and much more. The control offers rich event set, numerous customization options, animations, graph operations, styling and themes. You have more than 100 predefined nodes, table nodes and more than 15 automatic layout algorithms. Learn more about Diagramming for JavaScript at https://mindfusion.eu/javascript-diagram.html.
