In this tutorial we demonstrate how to create a sample diagram and arrange it with the LayeredLayout. The diagram is generated with the Xamarin flowchart library. Here is a screenshot of the final application on an Android phone:


In this tutorial we demonstrate how to create a sample diagram and arrange it with the LayeredLayout. The diagram is generated with the Xamarin flowchart library. Here is a screenshot of the final application on an Android phone:
Apply TreeLayout twice to arrange a genealogy tree
In a series of posts we’ll explore ways to combine graph layout algorithms for various purposes, such as improving layout speed or achieving specific layout constraints.
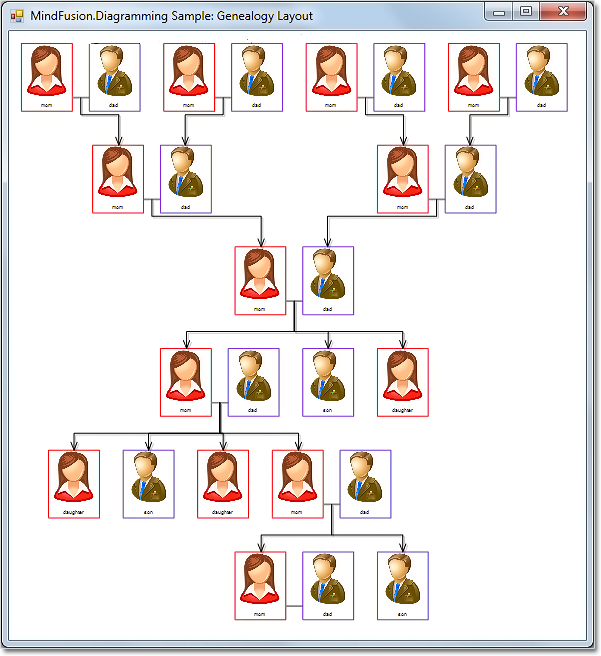
In this example we’ll show how to apply two TreeLayout instances with different settings to arrange a genealogy tree. The genealogy tree is focused on specific person, with several levels of ancestors drawn above and descendants drawn below. A Visual Studio sample project containing the code from this post is available for download here:
As a start, let’s define a new node class that will draw a person’s photo and name inside a frame, along with their partners’. This will simplify our layout code since we won’t have to take care of keeping partner nodes close to each other:
class GenealogyNode : DiagramNode
{
	public List Partners { get; set; }

	public override void DrawLocal(IGraphics graphics, RenderOptions options)
	{
		float relationLinkLen = Bounds.Width / 7;
		int relations = Partners.Count - 1;
		float personViewWidth = Bounds.Width - relations * relationLinkLen;
		personViewWidth /= Partners.Count;

		var rect = GetLocalBounds();
		rect.Width = personViewWidth;
		for (int i = 0; i < Partners.Count; i++)
		{
			DrawPerson(Partners[i], graphics, rect);

			if (i < Partners.Count - 1)
			{
				float rx = rect.Right;
				float ry = rect.Y + 4 * rect.Height / 5;
				rect.X += personViewWidth + relationLinkLen;
				graphics.DrawLine(Pens.Gray, rx, ry, rect.X, ry);
			}
		}
	}

	public override void DrawShadowLocal(IGraphics graphics, RenderOptions options)
	{
	}

	void DrawPerson(Person person, IGraphics graphics, RectangleF rect)
	{
		const float labelHeight = 5;
		const float padding = 3;

		// draw name
		var labelRect = RectangleF.FromLTRB(
			rect.Left,
			rect.Bottom - labelHeight,
			rect.Right,
			rect.Bottom);

		graphics.DrawString(person.Name,
			EffectiveFont, Brushes.Black, labelRect,
			new StringFormat { Alignment = StringAlignment.Center });

		// draw image
		var imageRect = rect;
		imageRect.Height -= labelHeight + padding;

		Utilities.DrawImage(graphics, person.Image, imageRect, ImageAlign.Fit);

		// draw frame
		var frameColor = person.Gender == Gender.Female ?
			Color.Red : Color.BlueViolet;
		var framePen = new System.Drawing.Pen(frameColor, 0);
		graphics.DrawRectangle(framePen, rect);
		framePen.Dispose();
	}
}
Alternatively, we could draw a single person per node instead, placing partners’ nodes close to each other, grouping them using AttachTo method, and later running TreeLayout with its KeepGroupLayout property enabled.
Now to generate a sample tree, we’ll define recursive methods that will create specified number of ancestor pairs (GenerateAncestors) and create random number of descendants (GenerateDescendants):
void GenerateAncestors(GenealogyNode node, int levels)
{
	if (levels == 0)
		return;
	for (int i = 0; i < 2; i++)
	{
		var p = AddPair();
		var link = diagram.Factory.CreateDiagramLink(p, node);
		link.DestinationAnchor = i;
		link.OriginAnchor = 2;
		GenerateAncestors(p, levels - 1);
	}
}

void GenerateDescendants(GenealogyNode node, int levels)
{
	if (levels == 0)
		return;
	int children = random.Next(1, 5);
	for (int i = 0; i < children; i++)
	{
		int r = random.Next(0, 3);
		if (r == 2)
		{
			var p = AddPair();
			var link = diagram.Factory.CreateDiagramLink(node, p);
			link.OriginAnchor = 2;
			link.DestinationAnchor = 0;
			GenerateDescendants(p, levels - 1);
		}
		else if (r == 1)
		{
			var p = new Person { Name = "daughter", Gender = Gender.Female, Image = fImage };
			var childNode = AddNode(p);
			diagram.Factory.CreateDiagramLink(node, childNode);
		}
		else if (r == 0)
		{
			var p = new Person { Name = "son", Gender = Gender.Male, Image = mImage };
			var childNode = AddNode(p);
			diagram.Factory.CreateDiagramLink(node, childNode);
		}
	}
}

GenealogyNode AddPair()
{
	var p1 = new Person { Name = "mom", Gender = Gender.Female, Image = fImage };
	var p2 = new Person { Name = "dad", Gender = Gender.Male, Image = mImage };
	return AddNode(p1, p2);
}

GenealogyNode AddNode(Person p)
{
	var bounds = new RectangleF(0, 0, 30, 40);

	var node = new GenealogyNode();
	node.Bounds = bounds;
	node.Partners = new List { p };
	node.AnchorPattern = AnchorPattern.TopInBottomOut;
	diagram.Nodes.Add(node);
	return node;
}

GenealogyNode AddNode(Person p1, Person p2)
{
	var bounds = new RectangleF(0, 0, 70, 40);

	var node = new GenealogyNode();
	node.Bounds = bounds;
	node.Partners = new List { p1, p2 };
	node.AnchorPattern = PairPattern;
	diagram.Nodes.Add(node);
	return node;
}
Finally we run TreeLayout twice with specified root node, arranging ancestor nodes above the root and descendant nodes below it, creating the genealogy drawing shown below:
private void GenealogyForm_Load(object sender, EventArgs e)
{
	var root = AddPair();
	GenerateAncestors(root, 2);
	GenerateDescendants(root, 3);

	var l1 = new TreeLayout();
	l1.ReversedLinks = true;
	l1.Direction = TreeLayoutDirections.BottomToTop;
	l1.Anchoring = Anchoring.Keep;
	l1.LevelDistance *= 2;
	l1.NodeDistance *= 1.4f;
	l1.LinkStyle = TreeLayoutLinkType.Cascading3;
	l1.Arrange(diagram);

	var l2 = new TreeLayout();
	l2.Root = root;
	l2.KeepRootPosition = true;
	l2.Anchoring = Anchoring.Keep;
	l2.LevelDistance *= 2;
	l2.NodeDistance *= 1.4f;
	l2.LinkStyle = TreeLayoutLinkType.Cascading3;
	l2.Arrange(diagram);

	diagram.ResizeToFitItems(5);
	//diagramView.ZoomToFit();
}
The code above uses MindFusion’s .NET API and can be used with Windows Forms, WPF, Silverlight and ASP.NET diagramming components. The Java API for Android and desktop Swing application will look similar, with setter method calls instead of property assignments.
You can download the trial version of any MindFusion.Diagramming component from this page.
Enjoy!
MindFusion has released a new version of Diagramming for WPF. It adds two new layout algorithms, here are the details:
Tree map layout
Tree maps represent hierarchies by nesting child nodes within their parents, where the areas of leaf nodes are proportional to their Weight values. Unlike other layout algorithms, TreeMapLayout expects hierarchies to be defined via grouping or containment (see AttachTo method and ContainerNode class), and will ignore any links in the diagram. The diagram area covered by the topmost nodes in a hierarchy is specified via the LayoutArea property. By default, the layout tries to keep the ratio of node sides as close as possible to one.
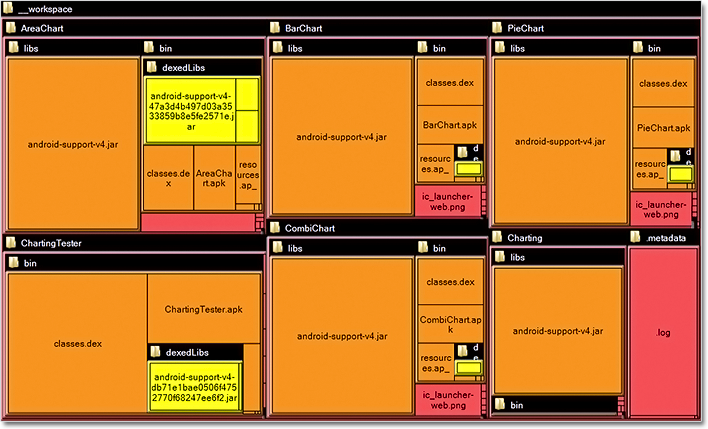
The tree map layout.
Decision flowchart layout
DecisionLayout arranges simple flowcharts consisting of decision boxes with up to three outgoing links per node and activity boxes with a single outgoing link per node. The nodes are arranged in columns and rows, whose distance depends on the HorizontalPadding and VerticalPadding property values. When links share the same row or column, they are placed at a distance specified via LinkPadding. The layout arranges nodes recursively starting from StartNode.
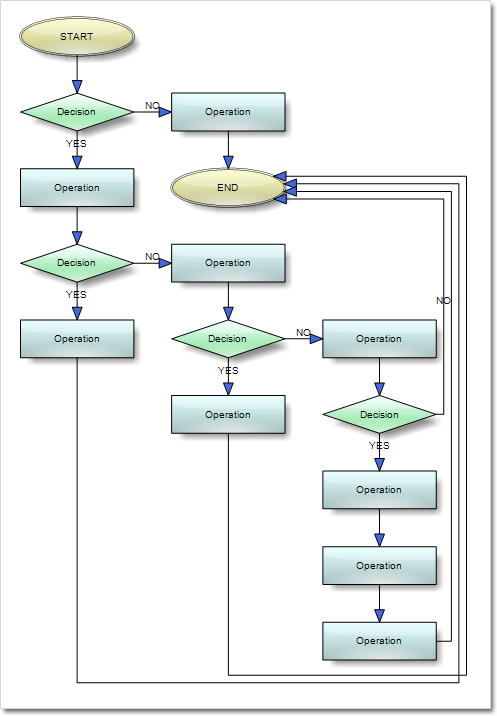
The decision layout.
Miscellaneous
Layout algorithms now automatically resize diagram’s Bounds if it’s not large enough to fit the arranged content. To revert to old behavior and keep fixed Bounds size, set GrowToFit to false.
You can download the trial version of the software from this link:
Download MindFusion.Diagramming for WPF 3.1
The download contains all runtime libraries of the control, various samples for different .NET versions, extensive desktop documentation and step-by-step tutorials.
If you face difficulties installing or using Diagramming for Wpf, please contact MindFusion support team per e-mail or phone. You can also use the forum or help desk. Most support inquiries are answered within hours of receiving them.
About MindFusion.Diagramming for Wpf: Designed and developed to be easy to integrate, use, and customize, this native WPF component places at your disposal every single feature you would ever need to create flowcharts, diagrams, graphs, schemes, DB relationships, trees and many more. Its long list of style options gives you complete control over the appearance of the diagram. With a set of eight automatic layouts you are sure to choose the best arrangement for your items and make the diagram easy to comprehend.
The control boasts a long list of events, properties and methods for user interaction, item creation,
data input and output. You can read the full features list here. The online demo shows samples that demonstrate various capabilities of the control. The licensing scheme and prices are uploaded at the buy page. Source code is also available.
MindFusion has released a new version of its Diagramming component for WinForms. It adds two new layout algorithms, available in the professional edition. Here are details:
Tree map layout
Tree maps represent hierarchies by nesting child nodes within their parents, where the areas of leaf nodes are proportional to their Weight values. Unlike other layout algorithms, TreeMapLayout expects hierarchies to be defined via grouping or containment (see AttachTo method and ContainerNode class), and will ignore any links in the diagram. Read further details about the algorithm here.
The tree map layout.
Decision flowchart layout
DecisionLayout arranges simple flowcharts consisting of decision boxes with up to three outgoing links per node and activity boxes with a single outgoing link per node. The nodes are arranged in columns and rows, whose distance depends on the HorizontalPadding and VerticalPadding property values. When links share the same row or column, they are placed at a distance specified via LinkPadding. More about the layout here.
The decision layout.
Miscellaneous
Layout algorithms now automatically resize diagram’s Bounds if it’s not large enough to fit the arranged content. To revert to old behavior and keep fixed Bounds size, set GrowToFit to false.
You can read further details about this release at the news page in the Diagramming for WinForms forum. If you are willing to try the new version here is a link to download it:
Diagramming for WinForms, V6.2
If you have questions or run into problems using the component you can use the Diagramming for WinForms forum, the help desk or write us at support@mindfusion.eu. Our support team will be pleased to help you.
About MindFusion.Diagramming for WinForms: A programming component that provides any WinForms application with a full set of features for creating and customizing all types of diagrams, flowcharts, schemes, hierarchies, trees, graphs etc. The control provides numerous ways to save and load a diagram, six auxiliary controls and more than 12 automatic graph layout algorithms. Diagram elements include scrollable tables, container nodes, multi-segment arrows, custom diagram item types and many more. Further
details here.
Diagramming for WinForms is a royalty-free component, clients get 12 month upgrade subscription when buying a license. The source code is also available for purchase. Visit the buy page for a list with the current license prices.
MindFusion has released Pack for ASP.NET, V2013.R2. Here is an overview of the most important new features in the components within the pack:
![]() MindFusion.Diagramming for WebForms
MindFusion.Diagramming for WebForms
Import of OpenOffice Draw files
The new DrawImporter class lets you import *.odg files created by the OpenOffice Draw Vector graphics editor. You just need to add a reference to the MindFusion.Diagramming.Import.Draw.dll assembly and are ready to use it. You can use various overloads of the Import method to import the OpenOffice drawing into a DiagramDocument whose pages correspond to the Draw pages, or into a single Diagram whose content is merged from all imported pages.
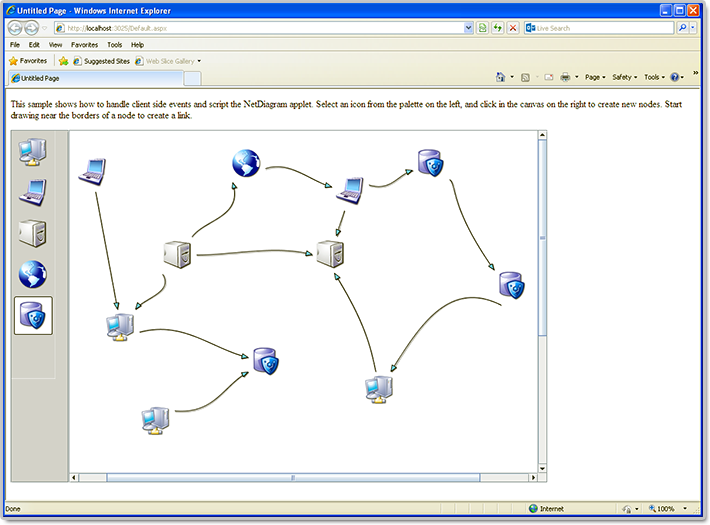
Import any type of diagram from an *.odg file
Canvas Mode Improvements
ContainerNode Improvements
Miscellaneous
![]() MindFusion.Charting for WebForms
MindFusion.Charting for WebForms
Themes
Chart themes are now XML files that you can save and load with the SaveTheme and LoadTheme methods. You can use the theme editor tool provided with the control to edit, save and load themes in a fast and intuitive way. The control provides an initial set of 8 predefined themes.
Major/Minor Axis Ticks
Use the new MajorTickLength and MinorTickLength properties to divide a chart axis in a more precise and accurate manner. The number and pen for the ticks are set with MinorTicksPerInterval, MajorTickPen and MinorTickPen.

Major and minor axis ticks
ToolTips
You can apply tooltips on all chart types. Area charts in particular can show a different tooltip for every region between two adjacent data points.
Interactive Editing of Data
Line and bar chart elements can be dragged with the mouse. Bars can be dragged either in horizontal or vertical direction according to their orientation. Line chart points can be dragged in any direction. The dragging behavior is set with the Behavior property.
As well other useful new features.
You can read more about the new features of the components in the ASP.NET Pack at the forum. The new version is available for download from this link:
Download MindFusion Pack for WebForms, VR2.2013
About MindFusion.WinForms Pack: A set of WebForms components that add great variety of features to your ASP.NET application with a few mouse clicks. The pack contains advanced components for diagramming, scheduling, charting and UI (Accordion, ColorPicker, TabControl, Window, WindowHost, DockControl, Button, Slideshow, Zoom and more). Each tool boasts easy to learn and use API and is quickly integrated into any web application that targets the ASP.NET platform. The controls support numerous options for styling, data import / export, user interaction and offer rich event set. There are plenty of samples and step-by-step tutorials as well detailed documentation.
Use the features page for each of the tools to find out more about its capabilities and
the numerous ways it can boost your performance and speed up the development of your application:
Visit the buy page for details on the licensing scheme and prices. If you have questions please contact us. We shall be happy to assist you.