In part I of the Ticket Booking System blog post we discussed the controls used in the software and how we generate and arrange the hall seats. Now let’s get deeper into the details on how we retrieve the data and how we customize the controls.
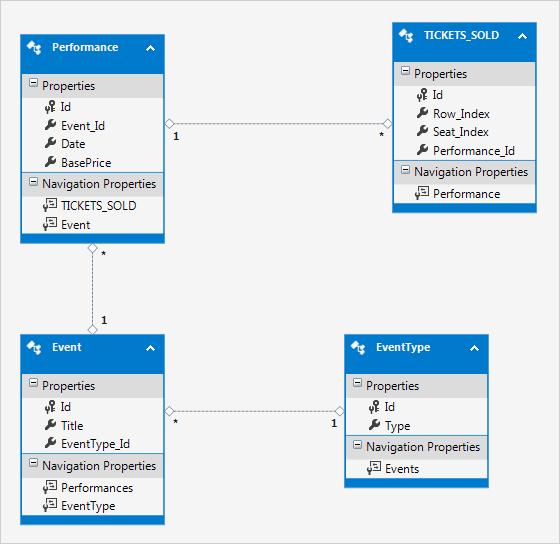
We use the Entity Framework and the Entity Data Model wizard to connect to our MS SQL database and retrieve the ticket data. Here is the model of the database:
I. The Database
We have a table for the event type (ballet, concert, opera etc.), a table for the events (Swan Lake ballet, Mozart concert, La Traviata oepra etc.), a table for the performances (an event with a date) and a table for the tickets that were sold. The performance table has a column for the base price of the tickets. The hall is divided into 3 sections according to the price of the tickets – the Performance table stores the price for the cheapest category. The other two categories are calculated according to the base price.
II. Events
We keep a class variable for the EventsTicketsEntities, which we initialize in the Form1 constructor:
public partial class Form1 : Form
{
   EventsTicketsEntities records;
   double basePrice;

   public Form1()
   {
      InitializeComponent();
      records = new EventsTicketsEntities();
      .................
}
The events are instances of the Appointment class of the Calendar. Here is the method that we use to create the Appointment-s based on the data from the database:
private void loadEvents()
{

  List performances = records.Performances.ToList();

  foreach (Performance p in performances)
   {
      Appointment app = new Appointment();
      app.StartTime = (DateTime)p.Date;
      app.EndTime = app.StartTime.AddHours(2.0);
      app.HeaderText = "";
      app.DescriptionText = p.Event.Title;
      app.Tag = p.Event.EventType_Id;
      app.Style.Brush = getBrush((int)app.Tag);
      calendar.Schedule.Items.Add(app);

     }
}
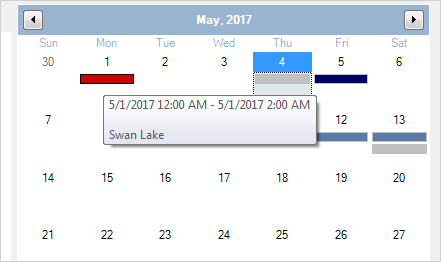
We read all records in the Performances table and create an Appointment for each one. The start date of the event is the field from the database. We add to it 2 hours as duration, otherwise the event wouldn’t show up. The brush of the Appointment depends on the type of the event. The appointment does not show any text, but the event title serves as a description. As a rule the calendar control renders an Appointment‘s description as a tooltip when the user hovers the item.
III. Hall Seats
In order to identify the location of a seat we assign an instance of the Seat structure as an Id to the ShapeNode that represents the seat.
public struct Seat
{
  public Seat (int row, int column)
   {
     this.Row = row;
     this.Place = column;
   }

  public int Row
   {
     get; set;
   }

 public int Place
   {
       get; set;
   }

}
We also include a rowStart parameter in the CreateSection method. The parameter keeps track of the total count of seats being generated. This allows each seat to have a unique row number:
void CreateSection(int rowStart, int[] seatsPerRow,
    float topY, float seatWidth, float seatHeight,
     float xPadding, float yPadding, float arcRadius)
{
        .................

        seat.Id = new Seat(rowStart + r, s);
        seat.Tag = calcSeatCoeff((Seat)seat.Id);

}
The Seat tag of the ShapeNode is calculated based on its location in the hall. It is the coefficient, which multiplied by the base price for this performance gives us the final price for this seat.
Each time a new performance is selected on the calendar, our application must refresh the seat info. Here is the method that takes care of the seat colors:
//clears the X sign at an occupied seat
private void updateSeats( double basePrice )
{
  foreach( var seat in diagram.Nodes)
  {
     (seat as ShapeNode).Text = "";
     if (seat.Tag != null)
      {
        seat.Brush = getSeatBrush(basePrice * (double)seat.Tag);
       }
  }
}
The method calculates the price of the seat and checks the color that corresponds to this price. Whenever a seat is clicked, the application marks it as selected. This is done by drawing an “X” as text on the ShapeNode using a large Font size:
Seat seatInfo = (Seat)seat.Id;
TICKETS_SOLD _ticket = new TICKETS_SOLD() { };
_ticket.Id = records.TICKETS_SOLD.ToList().Count;
_ticket.Performance_Id = (int)calendar.Tag;
_ticket.Row_Index = seatInfo.Row;
_ticket.Seat_Index = seatInfo.Place;
records.TICKETS_SOLD.Add(_ticket);

try
    {
      records.SaveChanges();

    }
catch (DbEntityValidationException ex)
    {
      Debug.WriteLine(ex.Message);
    }
    seat.Text = "X";
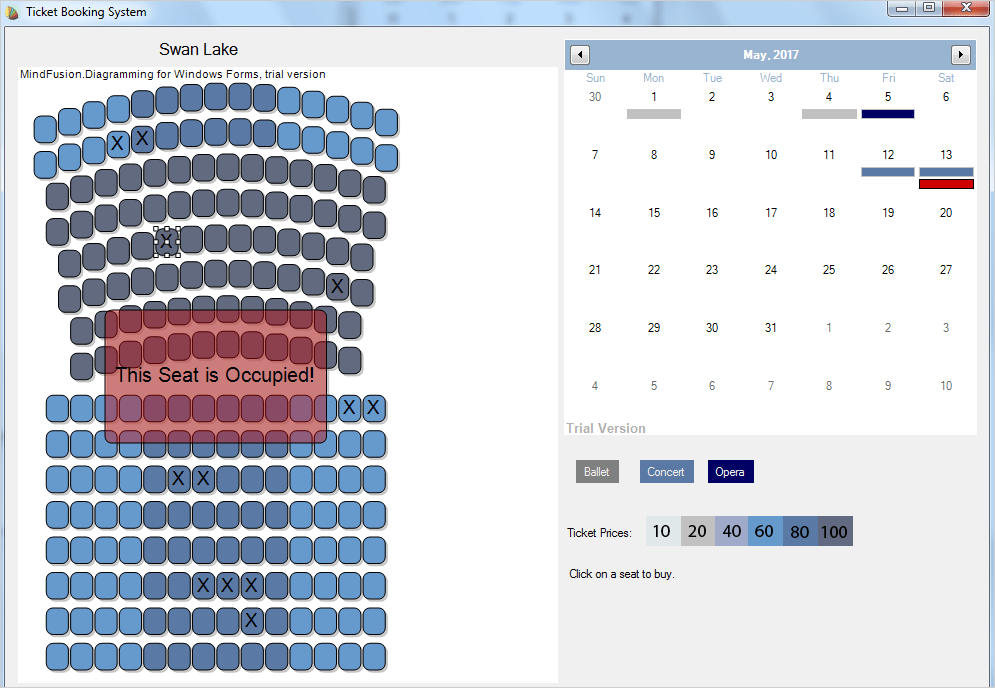
We create a new TICKETS_SOLD record, which contains a unique Id for the sold ticket, an Id for the performance, and the location of the seat (row and column). There is something more to that. When the user tries to click on a seat that is already sold we want to warn him that it is not possible to buy the seat. This is done by having a special node that stays hidden and shows up for a few seconds only to warn the user:
private void generateOccupiedNode()
  {
    float x = diagram.Bounds.Left + diagram.Bounds.Width / 2 - 50;
    float y = diagram.Bounds.Top + diagram.Bounds.Height / 2 - 30;

    RectangleF nodeBounds = new RectangleF(x, y, 100, 60);
    ShapeNode node = diagram.Factory.CreateShapeNode(nodeBounds);
    node.Brush = new MindFusion.Drawing.SolidBrush(Color.FromArgb(100, 206, 0, 0));
    node.Font = new Font("Arial", 26);
    node.TextBrush = new MindFusion.Drawing.SolidBrush(Color.Black);
    node.Visible = false;
    node.Shape = Shapes.RoundRect;
    node.Id = "Occupied";

  }
The seat is rendered in the middle of the diagram’s visible area and has a semi – transparent background. We use a timer to track the seconds when the node is displayed:
private void diagram_NodeClicked(object sender, NodeEventArgs e)
 {
   ShapeNode seat = e.Node as ShapeNode;
   if(seat != null)
     {
       if(seat.Text == "X")
        {
           ShapeNode warning = (ShapeNode)diagram.FindNodeById("Occupied");

          if(warning != null)
          {
             warning.Text = "This Seat is Occupied!";
             Timer timer = new Timer();
             timer.Interval = 2500;
             timer.Tick += Timer_Tick;
             warning.Visible = true;
             timer.Start();
          }
        }
	...........

}
We then find the node and make it invisible again:
private void Timer_Tick(object sender, EventArgs e)
  {
    ShapeNode warning = (ShapeNode)diagram.FindNodeById("Occupied");
    warning.Visible = false;
}
With this we have covered the basic methods that build the Event Ticket Reservation Software. Here is the final version:
The full source code of the application together with the sample database is available for direct download from here:
Event Ticket Booking System – Download
The sample uses the Diagramming and Scheduling controls from the MindFusion WinForms Pack. If you have questions regarding the sample or the components do not hesitate to post them on the MindFusion discussion board.


