MindFusion WinForms Spreadsheet Control: Convert XLSX to PDF

This blog demonstrates how easily you can convert XLSX files to PDF using the Windows Forms Spreadsheet control.

Setup

Create a new WinForms application and add the necessary assemblies to the project. Add a WorkbookView control to the main application window. Note, that this is not necessary for the conversion – it is done only to display the original XLSX file.

Perform the conversion

Add a button to the main form, set its text to ‘Convert…’ and handle its Click event. In the event handler display an OpenFileDialog to query the user for the input XLSX file, then display a SaveFileDialog to request the target PDF file. Once the two files are specified, proceed with the conversion by creating an ExcelImporter and PdfExporter objects and using their Import and Export methods in succession:

// Import the data
var importer = new ExcelImporter();
importer.Import(xlsxPath, workbook1);

// Export the worksheet as PDF
var exporter = new PdfExporter();
exporter.EnableGridLines = true;
exporter.Export(workbook1.Worksheets[0], pdfPath);

// Open the PDF
System.Diagnostics.Process.Start(pdfPath);

The xlsxPath and pdfPath variables identify the respective XLSX and PDF file names. The workbook1 variable represents the Workbook displayed on the form. Once the conversion is complete, the PDF file is opened in the default PDF viewer by calling Process.Start.

The following image illustrates the result:

The source code of the project together with all necessary libraries can be downloaded from here:

Convert .XLSX to .PDF Files Using the WinForms Spreadsheet Control: Download Sample

You are welcome to ask any questions about the WorkbookView control at MindFusion discussion board or per e-mail at support@mindfusion.eu.

Click here here to visit the official page of the MindFusion WinForms Spreadsheet control.

We hope you find this tutorial useful and thank you for your interest in MindFusion developer tools.

WinForms Spreadsheet Auto-Filtering

In this post we will discuss how to use the auto-filtering feature in MindFusion.Spreadsheet for WinForms.

Introduction

We start off by creating a new Windows Forms Application in Visual Studio, adding a WorkbookView control to the main form and adding the Northwind database (nwind.mdb) as a data source. For simplicity we only add the Orders table. After compiling the application we can add the DataSource and the OrdersTableAdapter as components to the main form.

Loading the data

We traverse the rows in the data source and populate the spreadsheet by assigning the data to the Data property of the respective worksheet cells. The first cell in each column is set to the name of the corresponding database field. Finally, the columns are resized to fit their contents through the ResizeColumnsToFit method of the view. The complete code of the data loading can be found in the LoadData method.

Turning auto-filtering on

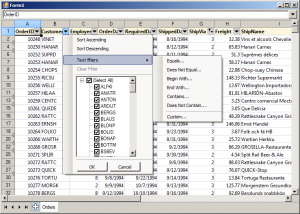
Auto-filtering is enabled by calling the AutoFilter method of the CellRange class. If the CellRange represents a range of cells, then auto-filtering is applied to that range. If the CellRange represents a single cell, then auto-filtering is applied to the rectangular area of data cells, which includes this cell. In this application, we enable auto-filtering on the loaded data, by calling AutoFilter on cell A1. In addition, we apply auto-filtering criteria on the 6-th column (ShipVia) by calling the AutoFilter overload.

workbook1.Worksheets[0].CellRanges["A1"].AutoFilter();
workbook1.Worksheets[0].CellRanges["A1"].AutoFilter(
    6, "<>1", AutoFilterOperator.Or, null, true);

The following image shows the running sample:
spreadsheet-autofilter

The source code is available for download from here:
https://mindfusion.eu/_samples/SpreadsheetAutoFilter.zip

MindFusion.Spreadsheet for WinForms can be downloaded from here:
MindFusion.Spreadsheet for WinForms

About MindFusion.Spreadsheet for WinForms: A powerful .net spreadsheet component with great capabilities for editing, styling and formatting large amounts of data.

MindFusion.Spreadsheet: Formatted Text

Starting with version 1.2, MindFusion.Spreadsheet adds support for formatted text. The control can import, create, display and export formatted texts. In this blog we will demonstrate how to create formatted text in a cell.

Introduction

As with all previous blogs we start off by creating a new Windows Forms Application in Visual Studio and adding a WorkbookView control to the main form. The WorkbookView displays a Workbook with a single worksheet.

Creating the formatted text

Formatted texts are created programmatically by instantiating from the FormattedText class. The class provides a constructor, which can initialize the formatted text from a markup string, similar to HTML. The string supports the following tags: <fontname=”fontname“>, <fontsize=”fontsize“>, <i>, <b>, <u>, <s>, and <color=”#rrggbb“>. The following code creates several formatted texts:

worksheet.Cells["A1"].Data = new FormattedText("The meeting is <color=\"#ff0000\">important</color=\"#ff0000\">!");
worksheet.Cells["A2"].Data = new FormattedText("<fontsize=\"18\">A title <fontsize=\"8\">(1994)");
worksheet.Cells["A3"].Data = new FormattedText("This text contains some keywords that are highlighted.");</fontsize=\"8\"></fontsize=\"18\">

Exporting

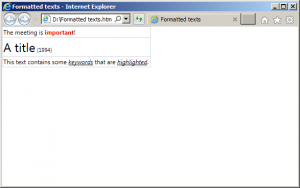
The formatted texts are exported to all supported formats, including HTML, PDF, XLSX, ODS, image, and so on. The following image illustrated the formatted texts created earlier exported to HTML:

spreadsheet-formattedtext

The source code of the sample is available for download from here:

https://mindfusion.eu/_samples/SpreadsheetFormattedTexts.zip

The trial version of MindFusion.Spreadsheet for WinForms can be downloaded from here:

Download MindFusion.Spreadsheet for WinForms Trial Version

About MindFusion.Spreadsheet for WinForms: A powerful .NET spreadsheet component with great capabilities for editing, styling and formatting large amounts of data.

MindFusion.Spreadsheet: Convert XLSX to PDF

In this blog we will discuss how to convert an existing XSLX file to PDF using MindFusion.Spreadsheet for WinForms.

Introduction

As with all previous blogs we start off by creating a new Windows Forms Application in Visual Studio and adding a WorkbookView control to the main form. The WorkbookView displays a Workbook with a single worksheet.

Importing the XLSX file

In MindFusion.Spreadsheet XLSX files are imported using instances of the ExcelImporter class. For the purposes of this blog we will import an existing report.xlsx file, contained in the zip of the sample. To import this file, use the following code:

var importer = new ExcelImporter();
importer.Import(Path.Combine(path, "report.xlsx"), workbook1);

Creating the PDF

To create a PDF file from the imported worksheet, create an instance of the PdfExprter class and call its Export method:

var exporter = new PdfExporter();
exporter.EnableGridLines = true;
exporter.Export(workbook1.Worksheets[0], Path.Combine(path, "report.pdf"));

The following image illustrates the result of the conversion:

spreadsheet-pdfexport

The source code of the sample is available for download from here:

https://mindfusion.eu/_samples/SpreadsheetConvertPdf.zip

The trial version of MindFusion.Spreadsheet for WinForms can be downloaded from here:

Download MindFusion.Spreadsheet for WinForms Trial Version

About MindFusion.Spreadsheet for WinForms: A powerful .NET spreadsheet component with great capabilities for editing, styling and formatting large amounts of data.

MindFusion.Spreadsheet: Import and Export

The following scheme illustrates the file formats supported by MindFusion.Spreadsheet for WinForms:

spreadsheet-formats

Importing

MindFusion.Spreadsheet can load data from CSV (comma-separated values), XLSX (Office Open XML), ODS (OpenDocument Spreadsheet), and its native binary and XML formats. The files are imported through a set of importer classes: CsvImporter for CSV, ExcelImporter for XLSX, and CalcImporter for ODS. To import a file, create an instance of the respective importer class, set the necessary properties, and call its Import method. The following code demonstrates how to import a workbook from an existing XLSX file:

var excelImporter = new ExcelImporter();
excelImporter.Import(workbook, @"d:\workbook.xlsx");

Importing from CSV can be further facilitated through the use of a built-in CsvImportForm. The form provides the user interface to enter various options and preview the data before it is actually imported.

Exporting

MindFusion.Spreadsheet can export data to a variety of formats, including image, PDF, CSV, XLSX, ODS, HTML and MHTML. In addition the workbooks can be previewed and printed to paper and XPS. The workbooks and worksheets are exported through a set of exporter classes: ImageExporter for images, PdfExporter for PDF, CsvExporter for CSV, ExcelExporter for XLSX, CalcExporter for ODS, HtmlExporter for XHTML, and so on. Printing is done through the WorkbookPrinter class. To export a workbook, create an instance of the respective exporter class, set the necessary properties, and call the Export method. The following code demonstrates how to export a workbook to ODS:

var calcExporter = new CalcExporter();
calcExporter.Export(workbook, @"c:\mysheet.ods");

The following image illustrates a workbook exported to an XHTML file using the HtmlExporter class:

spreadsheet-xhtmlexport

Additional information about the importing and exporting capabilities of MindFusion.Spreadsheet can be found in the online documentation of the component:

http://www.mindfusion.eu/onlinehelp/spreadsheetwinforms/index.htm?Importing.htm
http://www.mindfusion.eu/onlinehelp/spreadsheetwinforms/index.htm?Exporting_0.htm

The trial version of MindFusion.Spreadsheet for WinForms can be downloaded from here:

Download MindFusion.Spreadsheet for WinForms Trial Version

About MindFusion.Spreadsheet for WinForms: A powerful .NET spreadsheet component with great capabilities for editing, styling and formatting large amounts of data.