Scheduling for WinForms, V5.6

We are excited to announce the new release of MindFusion.Scheduling for WinForms. The new version includes:

Visual Studio 2015 Support

The installer of the Scheduling control can create VS2015 toolbox palette for its components.

Interactive Recurrence Rescheduling

You can now reschedule recurrences interactively by holding down the RescheduleRecurrenceKey while dragging a recurrent item. As a truly smart control, MindFusion.Scheduling tries to preserve the current pattern of the recurrence when possible. Otherwise, the recurrence may be modified to accommodate to the new start and end times of the modified item. Note that interactive rescheduling is not registered in the undo history.

New Theme

Bring a touch of fresh spring air to your calendars with the new built-in Light theme. It is available through the ThemeType enumeration.

The new 'Light' theme

The new ‘Light’ theme

New Properties

Scheduling for WinForms offers a few new properties:

  • The new HScrollBarHeight and VScrollBarWidth properties in the ControlStyle class allow you to modify the size of the scrollbars.
  • The RescheduleRecurrenceKey property in the Calendar class can be used to modify recurrences interactively.
  • The RotateGroupHeaderTexts property in the ListViewSettings class can be used to rotate the resource names in the group headers.
  • GroupHourCount, HourFormat and TimelinePadding added to the TimetableSettings class.

MindFusion.Scheduling as a NuGet Package

The component is also available on Nuget. To install the component, run the following command in the Package Manager Console:

PM> Install-Package MindFusion.Scheduling

The trial version of the control is available from the link below:

Download MindFusion.Scheduling for WinForms 5.6

If you have questions about the component, please use the support e-mail or the help desk. MindFusion takes special efforts in providing fast and competent answers to all support inquiries we receive.

About MindFusion.Scheduling for WinForms: MindFusion.Scheduling for WinForms is a programming component that adds to your .NET application powerful features for creating and customizing any type of schedule, calendar, time table, resource table and many more. The tool supports six data views, input/output from/to a variety of data sources and rich user interaction model. Scheduling for WinForms offers various auxiliary forms for creating and editing appointments, tasks and events. A theme editor for creating custom themes is also available. The control features a rich variety of predefined themes and various item effects.

You can read more about Scheduling for WinForms at its features page. Visit the gallery page to see screenshots of various calendars and schedules created with the tool. For more information about licenses and prices go to the buy page.

Spreadsheet for WinForms, V1.4

MindFusion is happy to announce the Scheduling for WinForms, V1.4 is out. Here is a list of the new features:

Licensing

Spreadsheet for WinForms is the next MindFusion component that no longer has separate trial build of the control assemblies. Instead, set its LicenseKey property to disable the evaluation mode and stop displaying trial messages. If your application contains more than one control by MindFusion, you could call MindFusion.Licensing.LicenseManager.AddLicense(key) to specify the key once instead of setting it per each control. License key strings are listed on the Keys & Downloads page at MindFusion’s customer portal. Don’t forget to add a reference to the MindFusion.Licensing dll if it’s not already present in your project.

Visual Studio 2015 support

MindFusion.Spreadsheet for WinForms now includes support for Visual Studio 2015. The installer can create VS2015 toolbox palette for the component.

Autofiltering

Worksheets now support autofiltering. To enable it, just call the AutoFilter method of the CellRange class. You can specify autofiltering criteria for individual columns with the the AutoFilter overload. You also have the convenience to specify these criteria interactively, through the drop-down buttons inside the headers of each column in the target range.

Spreadsheet for WinForms: Auto Filtering

Spreadsheet for WinForms: Auto Filtering

Multiple Selection

Extend the functionality of your WinForms spreadsheet application by allowing users to select multiple cell ranges. You can

    • even add cell ranges interactively, by holding down the CTRL key while dragging with the mouse. You can also do it programmatically, by using one of the new methods of the Selection class: Add, AddRow, and AddColumn.
Spreadsheet for WinForms: Multiple Selection

Spreadsheet for WinForms: Multiple Selection

Miscellaneous

      • The new EnableTypeInference property can be used to suppress automatic type inference in the workbook.
      • The tooltips displayed when the user resizes rows and columns can now be turned off through the ShowResizeHeaderToolTips property. The format of these tooltips can be specified through the ResizeColumnToolTipFormat and ResizeRowToolTipFormat properties.

You can download the trial version from the link below:

Download MindFusion.Spreadsheet for WinForms V1.4 Trial Version

If you require technical support, you can post a message at the forum, send us an e-mail at support@mindfusion.eu. or use the help desk. MindFusion takes special effort in providing fast and detailed answers to all inquiries that we receive.

About MindFusion.Spreadsheet for WinForms: An easy-to-use programming component suitable for building all types of spreadsheets fast and easy. The tool supports formulas, tool-tips, cell annotations, cell spanning, scrolling and many more. You can add charts and images as well use the flexible style system to design the perfect spreadsheet. The component supports full undo and redo as well copy and paste from Windows clipboard.
You can import spreadsheet data from CSV, XLSX or ODS files and export the final spreadsheet in a number of formats – as images, PDF or CSV, XLSX or ODS files. Various auxiliary forms help you quickly adjust the data and appearance of your spreadsheet. Read more about the features of the component here or check the license prices at the buy page.

Spreadsheet for WinForms is part of MindFusion Pack for WinForms, which offers other useful components that are of great use when you build any type of WinForms application – from a diagramming library to map control to gauges: check them here.

Scheduling for Silverlight, V3.3.2

We are happy to announce the new version of the Scheduling for Silverlight library. Here is an overview of the new features:

Licensing

MindFusion no longer maintains separate trial build of the control assemblies. Instead, set the LicenseKey property of the individual components to disable the component’s evaluation mode and stop displaying trial messages. If your application contains more than one control by MindFusion, you could call MindFusion.Licensing.LicenseManager.AddLicense(key) to specify the key once instead of setting it per each control. License key strings are listed on the Keys & Downloads page at MindFusion’s customer portal. Make sure your project has a reference to the MindFusion.Licensing assembly.

Visual Studio 2013/2015 support

The Schedule control now includes support for Visual Studio 2013 and 2015. The installer can create VS2013 and VS2015 toolbox palette for the component.

Improved data grid

You can now customize the cells and headers in the data grid through a set of new properties: CellBorderBrush, CellBorderThickness, HeaderBackground, HeaderBorderBrush, HeaderBorderThickness, HeaderFontSize, HeaderForeground, and HeaderMargin. Use the new ColumnCreating event to replace a grid column with a custom one.

MindFusion Scheduler for Silverlight: The Gantt Chart

MindFusion Scheduler for Silverlight: The Gantt Chart

New Holiday Providers

Enrich your Silverlight application with the new set of five holiday providers, which are now part of the MindFusion.HolidayProviders.dll assembly – AustraliaHolidayProvider, FranceHolidayProvider, GermanyHolidayProvider, RussiaHolidayProvider, and UKHolidayProvider.

MindFusion Scheduler for Silverlight: Holiday Providers

MindFusion Scheduler for Silverlight: Holiday Providers

Improved Timetable view

We have made some API changes to make using the component even easier. The WorkTimeStartHour and WorkTimeEndHour properties have been renamed to WorkTimeStart and WorkTimeEnd respectively and are now of type TimeSpan to allow more flexible work time intervals. In addition, you can now use the new WorkTimeStarts and WorkTimeEnds properties to specify different work time intervals for the different days in the view. The new ColumnHeaderTemplate property lets you customize the column headers by using a DataTemplate object.

Improved WeekRange view

The Week Range view can now display week numbers, similarly to the Single Month view. Use the WeekHeaderPosition property to enable week numbers and customize them with the RotateWeekHeaderTexts, WeekHeaderFormat, WeekHeaderStyle, and WeekNumbersHeaderWidth properties.

Improved Resource view

We have added a new RowHeaderTemplate property for customization of the row headers.

MindFusion Scheduler for Silverlight: The Resource View

MindFusion Scheduler for Silverlight: The Resource View

Miscellaneous

  • New resource and item hit-testing methods: GetItemAt and GetResourceAt.
  • The modifier key to clone items interactively can now be specified through the ItemCloneKey property.
  • New ItemStartModifying event.
  • Various bug fixes.
  • Two new samples – CustomMonthCalendar and CustomTimetableGrid.

See those numerous new features and tons of existing ones in action – download the component’s libraries with samples and documentation from this link:

MindFusion Scheduler for Silvelight, V3.3.2 Trial Version

Your questions, comments and inquiries are welcomed by MindFusion competent and friendly support team. Write us at the forum, Help desk or use e-mail support@mindfusion.eu

About MindFusion Scheduler for Silverlight: MindFusion.Scheduling for Silverlight provides your web application with a host of useful features for creating, customizing, importing and exporting calendars, time tables, appointment schedules. What’s more, the component includes a full-features Gantt chart with an activity chart and a resource chart. Unleash your creativity with the vast set of appearance options and enjoy the freedom to create calendars where every single detail is customizable and can be controlled by you. Implement professional Gantt diagrams and bring project planning features to your web software with a few mouse clicks. The library is packed with many samples, tutorials and extensive documentation to help you started. The licensing scheme is very attractive with various discount options and great savings for multiple licenses as well for small companies – check it here.

WinForms Spreadsheet Auto-Filtering

In this post we will discuss how to use the auto-filtering feature in MindFusion.Spreadsheet for WinForms.

Introduction

We start off by creating a new Windows Forms Application in Visual Studio, adding a WorkbookView control to the main form and adding the Northwind database (nwind.mdb) as a data source. For simplicity we only add the Orders table. After compiling the application we can add the DataSource and the OrdersTableAdapter as components to the main form.

Loading the data

We traverse the rows in the data source and populate the spreadsheet by assigning the data to the Data property of the respective worksheet cells. The first cell in each column is set to the name of the corresponding database field. Finally, the columns are resized to fit their contents through the ResizeColumnsToFit method of the view. The complete code of the data loading can be found in the LoadData method.

Turning auto-filtering on

Auto-filtering is enabled by calling the AutoFilter method of the CellRange class. If the CellRange represents a range of cells, then auto-filtering is applied to that range. If the CellRange represents a single cell, then auto-filtering is applied to the rectangular area of data cells, which includes this cell. In this application, we enable auto-filtering on the loaded data, by calling AutoFilter on cell A1. In addition, we apply auto-filtering criteria on the 6-th column (ShipVia) by calling the AutoFilter overload.

workbook1.Worksheets[0].CellRanges["A1"].AutoFilter();
workbook1.Worksheets[0].CellRanges["A1"].AutoFilter(
    6, "<>1", AutoFilterOperator.Or, null, true);

The following image shows the running sample:
spreadsheet-autofilter

The source code is available for download from here:
https://mindfusion.eu/_samples/SpreadsheetAutoFilter.zip

MindFusion.Spreadsheet for WinForms can be downloaded from here:
MindFusion.Spreadsheet for WinForms

About MindFusion.Spreadsheet for WinForms: A powerful .net spreadsheet component with great capabilities for editing, styling and formatting large amounts of data.

Visualize graph algorithms using MindFusion Diagram component

In this post we’ll explore visualization of graph processing algorithms using MindFusion.Diagramming API. The sample Visual Studio project will show animated depth-first and breadth-first search algorithms for graph traversal, but same approach can be applied for visualizing processes in any systems representable as graph data structures, such as message transmission in networks, progress of tasks in workflows, and so on. You can download the complete project here:

GraphSearch.zip

The code will show several techniques you might also find useful in other contexts:

  • build diagram programmatically from model data
  • use styles to temporarily apply several appearance attributes as a single unit
  • synchronize diagram with data coming from a worker thread

Let’s start by creating our (very simple) model classes, Graph and Vertex in this case, where connections in the graph will be stored using standard adjacency lists representation:

class Graph
{
	public List Vertices = new List();
}

class Vertex
{
	public List Neighbors = new List();
	public bool Visited;
	public int Index;
	public int SearchOrder;
}

Next, create a method that builds a diagram from the model objects. The mappings will be saved in a dictionary for later access.

private Dictionary<vertex, shapenode=""> nodes;
readonly RectangleF defaultSize = new RectangleF(0, 0, 10, 10);

///
/// Create diagram elements from graph with adjacency lists representation
/// 
void DiagramFromGraph(Graph g)
{
	diagram.ClearAll();

	// map graph vertices to diagram nodes
	nodes = new Dictionary<vertex, shapenode="">();

	// create a node for each vertex
	foreach (var v in g.Vertices)
	{
		var node = diagram.Factory.CreateShapeNode(defaultSize);
		node.Tag = v;
		nodes[v] = node;
	}

	// create links for adjacencies
	foreach (var v1 in g.Vertices)
	{
		foreach (var v2 in v1.Neighbors)
		{
			// only in one direction
			if (v1.Index < v2.Index)
				diagram.Factory.CreateDiagramLink(nodes[v1], nodes[v2]);
		}
	}

	// arrange the nodes
	new AnnealLayout { Randomize = false }.Arrange(diagram);

	// search starts from selected node
	diagram.Nodes[0].Selected = true;
}
</vertex,></vertex,>

Now create a sample graph and its corresponding drawing which we’ll use to show search progress:

void OnFormLoad(object sender, EventArgs e)
{
	// create sample graph to traverse
	var graph = new Graph();
	graph.GenerateRandom(20, 25);
	DiagramFromGraph(graph);
}

public void GenerateRandom(int v, int e)
{
    var rnd = new Random(42);
    for (int i = 0; i < v; i++)
        Vertices.Add(new Vertex { Index = i});
    int c = 0;
    while (e > 0)
    {
        var v1 = Vertices[c];
        var v2 = Vertices[rnd.Next(v)];
        if (v1 == v2 || v1.Neighbors.Contains(v2))
            continue;
        v1.Neighbors.Add(v2);
        v2.Neighbors.Add(v1);
        c = (c + 1) % v;
        e--;
    }
}

Add two styles we’ll use to show search progress. The first one is for vertices visited by the search algorithm, and the second one is applied temporarily when the algorithm back-tracks:

readonly ShapeNodeStyle visitedNodeStyle = new ShapeNodeStyle
   	{
   		Brush = new MindFusion.Drawing.SolidBrush(Color.Green)
   	};

readonly ShapeNodeStyle backtrackNodeStyle = new ShapeNodeStyle
	{
		Brush = new MindFusion.Drawing.SolidBrush(Color.DarkGreen),
		Stroke = new MindFusion.Drawing.SolidBrush(Color.Red),
		StrokeThickness = 1 // mm
	};

We’ll invoke the following methods from the search algorithm threads to show which vertices have just been processed:

void ShowProgress(Vertex v)
{
	// invoke in UI thread
	diagramView.Invoke(new System.Action(() =>
	{
		// update node style
		var node = nodes[v];
		node.Text = v.SearchOrder.ToString();
		node.Style = visitedNodeStyle;

		if (backtrackNode != null)
			backtrackNode.Style = visitedNodeStyle;
		backtrackNode = null;
	}));
	Thread.Sleep(animationDelay);
}

void ShowBacktrack(Vertex v)
{
	// invoke in UI thread
	diagramView.Invoke(new System.Action(() =>
	{
		if (backtrackNode != null)
			backtrackNode.Style = visitedNodeStyle;

		// update node style
		var node = nodes[v];
		node.Style = backtrackNodeStyle;
		backtrackNode = node;
	}));
	Thread.Sleep(animationDelay);
}

DiagramNode backtrackNode;
int animationDelay = 1000;

We now have everything ready for showing animated progress of graph algorithms. Add a form button that will run a sample depth-first search, add a click event handler called OnDepthFirstSearch, and handle it like this:

void OnDepthFirstSearch(object sender, EventArgs e)
{
	// do not search if there's no node selected
	var startNode = diagram.ActiveItem as DiagramNode;
	if (startNode == null)
		return;

	// search buttons disabled while current search thread runs
	btnDFS.Enabled = btnBFS.Enabled = false;

	// init data structures for new search
	ResetSearch();

	// get vertex corresponding to selected node
	var startVertex = (Vertex) startNode.Tag;

	// start depth-first search in a new thread
	currentSearch = new Thread(() =>
		DepthFirstSearch(startVertex, 0));
	currentSearch.Start();
}

int DepthFirstSearch(Vertex current, int order)
{
	// mark vertex as visited
	current.Visited = true;
	current.SearchOrder = order;

	// redraw its node from UI thread
	ShowProgress(current);

	// visit adjacent nodes
	foreach (var neighbor in current.Neighbors)
	{
		if (!neighbor.Visited)
		{
			// descend recursively
			order = DepthFirstSearch(neighbor, order + 1);

			// show in UI thread we are going back
			ShowBacktrack(current);
		}
	}

	if (current.SearchOrder == 0)
	{
		// enable search buttons
		SearchComplete();
	}

	return order;
}

Add a second button that will run breadth-first search thread:

private void OnBreadthFirstSearch(object sender, EventArgs e)
{
    // do not search if there's no node selected
    var startNode = diagram.ActiveItem as DiagramNode;
    if (startNode == null)
        return;

    // search buttons disabled while current search thread runs
    btnDFS.Enabled = btnBFS.Enabled = false;

    // init data structures for new search
    ResetSearch();

    // get vertex corresponding to selected node
    var startVertex = (Vertex)startNode.Tag;

    // start breadth-first search in a new thread
    currentSearch = new Thread(() =>
        BreadthFirstSearch(startVertex));
    currentSearch.Start();
}

void BreadthFirstSearch(Vertex start)
{
    int order = 0;

    // enqueue first vertex and mark as visited
    var queue = new Queue();
    queue.Enqueue(start);
    start.Visited = true;
    start.SearchOrder = order++;

    // while there are vertices in queue
    while (queue.Count > 0)
    {
        var current = queue.Dequeue();

        // show dequeued node
        ShowBacktrack(current);

        // add its neighbours to queue
        foreach (var neighbor in current.Neighbors)
        {
            if (!neighbor.Visited)
            {
                queue.Enqueue(neighbor);
                neighbor.Visited = true;
                neighbor.SearchOrder = order++;

                // show queued node
                ShowProgress(neighbor);
            }
        }
    }

    SearchComplete();
}

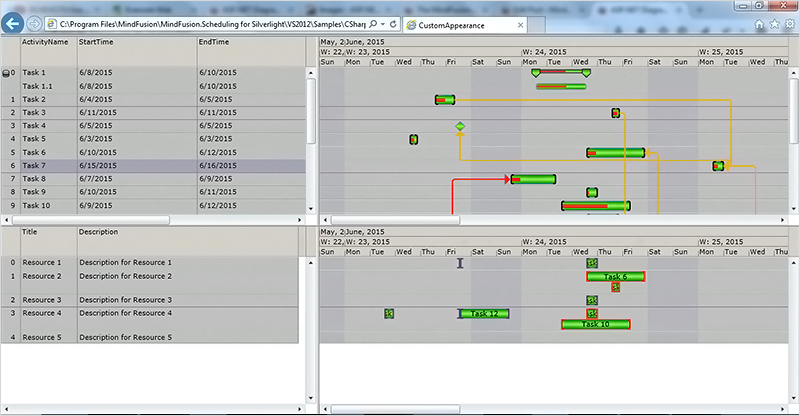
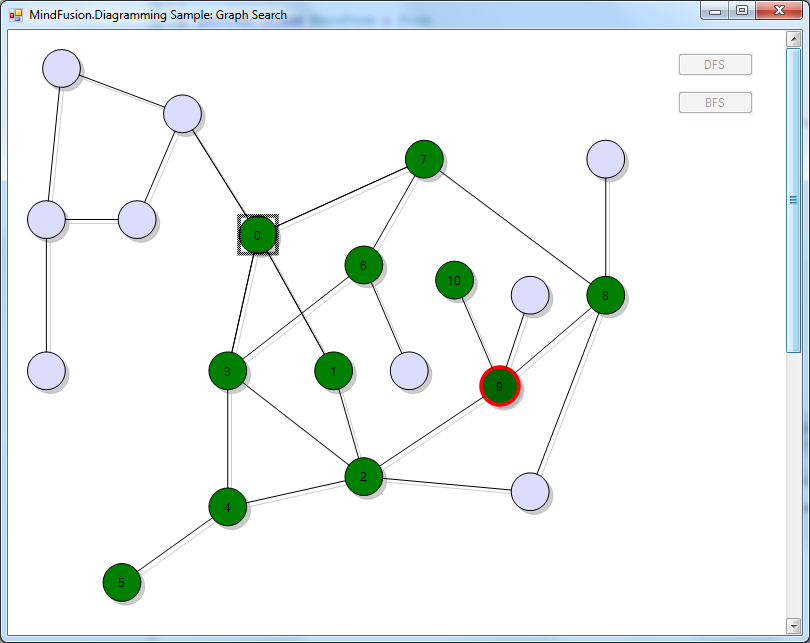
If you run the application now and click one of the search buttons, you should see this screen showing the algorithm progress, with current back-track position represented by a red border:

graph search visualized in mindfusion diagram control for .NET

The code above uses MindFusion’s .NET API and can be used with Windows Forms, WPF, Silverlight and ASP.NET diagramming components. The Java API for Android and desktop Swing application will look similar, with setter method calls instead of property assignments.

You can download the trial version of any MindFusion.Diagramming component from this page.

Enjoy!