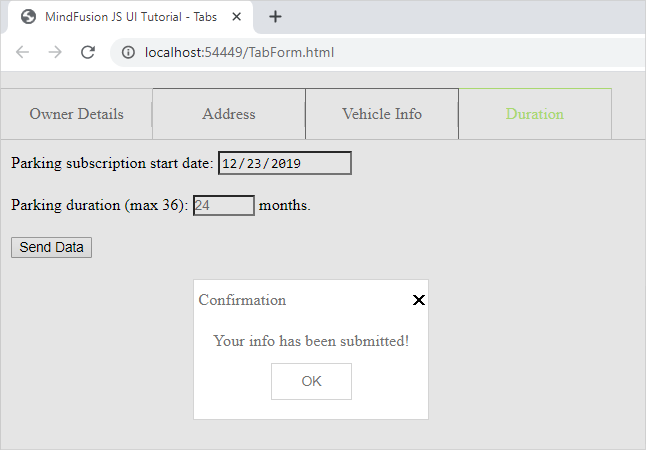
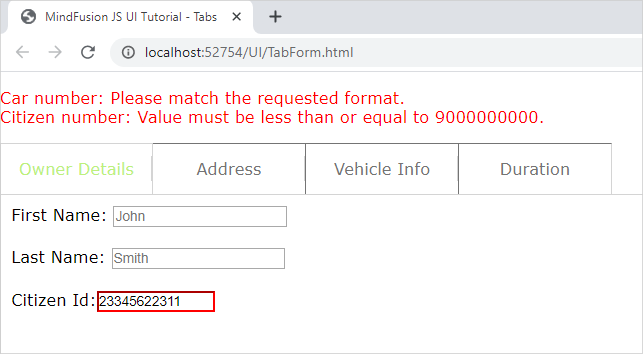
In this blog post we will create a form that spans over several tabs. Each tab contains input fields for a specific type of information. There are placeholders and restrictions for each input field. If the provided data is not correct we display a guiding message and select the first tab that has wrong data. All incorrect fields are outlined with red.
I. General Settings
We will use two files for our form – one is a web page and the other a JavaScript file that will hold all JavaScript code for the sample. They both are names TabForm.
In the web page we add references to the css file that holds the theme we’ve chosen:
<link rel="stylesheet" type="text/css" href="themes/light.css">
This is the CSS for the light theme of the MindFusion JavaScript UI controls. There are various themes provided out-of-the-box with the library and you can choose another one.
Then, at the bottom of the web page, before the closing BODY tag we add references to the three JavaScript files that we want to use:
<div style="position: absolute; top: 0px; left: 0; right: 0; bottom: 0;">
    <div id="host">
    </div>
</div>
The first two of them point to the libraries of the UI controls: MindFusion.Common and MindFusion.UI. The other is a reference to the JS code-behind file.
In order to render the TabControl we need a DIV element. So, we create one and give it an id – that is important:
We also add a paragraph with an id and red stroke – it will render text, that describes the error fields and the validation message for each one – if the user has provided wrong data.
II. Creating the Tab Control and the Tab Pages
In the code-behind file we first add mappings to the two namespaces we want to use:
var ui = MindFusion.UI;
var d = MindFusion.Drawing
Then we create an instance of the TabControl in code this way:
// Create a new TabControl.
var host = new ui.TabControl(document.getElementById("host"));
host.width = new ui.Unit(70, ui.UnitType.Percent);
host.height = new ui.Unit(70, ui.UnitType.Percent);
host.theme = "light";
We use the id of the DIV element in the constructor of the TabControl Then we use the theme property to refer to the theme that we want to use. The value of the theme property should be the same as the name of the CSS ile that we referenced in the web page. It can point to a custom theme that you have created as long as the names of the file and the property value match.
We create the first TabPage as an instance of the TabPage class:
// Create four templated tab pages and add them to the host's tabs collection.
var tab1 = new ui.TabPage("Owner Details");
// The HTML of the specified page will be set as the innerHTML of a scrollable div inside the tab content element.
tab1.templateUrl = "page1.html";
host.tabs.add(tab1);
We provide the string that will render in the title of the TabPage in the constructor. Then we set the content that the TabPage will have as a url to the web page that contains it e.g. the TabPage loads a content from a page specified with templateUrl Here is the code for the first page:
In terms of HTML, we have provided each input element with an id, a placeholder value and the necessary restrictions that will validate its content. We strictly use and follow the Validation API of JavaScript, which you can check here: https://www.w3schools.com/js/js_validation_api.asp and here https://developer.mozilla.org/en-US/docs/Web/Guide/HTML/HTML5/Constraint_validation.
III. Data Submission and Validation
On the last tab of the form, we have placed a submit button:
We wire the event handler of the click action for this button in the contentLoad event of the fourth tab, where the button is:
tab4.contentLoad.addEventListener(tabLoad);
..........................
..........................
function tabLoad(sender, args) {

    let current_datetime = new Date();
    let formatted_date = current_datetime.getFullYear() + "-" + (current_datetime.getMonth() + 1) + "-" + current_datetime.getDate();
    sender.element.querySelector("#start").value = formatted_date;
    sender.element.querySelector("#submit").addEventListener("click", function () {
    submitData(sender);
    });
}
In the event handler we get the current date and format it the way the default DateTime picker HTML control expects to get it. We get each input control through its id and the querySelector of the HTML Document object. The sender in this case is the fourth tab or tab4.
The method that validates the content is submitData:
function submitData(sender) {
    var txt = "";

    var inputObj = tab4.element.querySelector("#start");

    if (!inputObj.checkValidity()) {
        txt += inputObj.name + ": ";
        txt += inputObj.validationMessage + "
";
        inputObj.style["border-color"] = "red";
        host.selectedItem = tab4;
        dataIsCorrect = false;
    } else
        inputObj.style["border-color"] = "gray";
        ....................................
We use querySelector once again to get the input fields on each page one by one. For each one we see if the validity check has failed. If yes, we outline this field in red and append the validation message to a text variable.
We walk through all tabs and all input fields in this same manner and in reverse order. Our aim is that the first tab with error gets selected, even if there are errors in fields further in the form.
Note that if the field is OK we set its border to the default color. This way we reset the appearance of fields that were previously wrong but the user has corrected.
Finally, we assign the text to the content of the paragraph that renders text in red:
...............................
document.getElementById("error").innerHTML = txt;

    if (txt.length === 0)
        confirmData();
If no errors have been detected – that means the error text is an empty string – we submit the data. The data submission is handled by the confirmData method:
function confirmData() {

    //first tab
    tab1.element.querySelector("#fname").value = "";
    tab1.element.querySelector("#lname").value = "";
    tab1.element.querySelector("#citizen_id").value = "";
    ........................................
    ........................................
     //fourth tab
    tab4.element.querySelector("#duration").value = "";
    let current_datetime = new Date();
    let formatted_date = current_datetime.getFullYear() + "-" + (current_datetime.getMonth() + 1) + "-" + current_datetime.getDate();
    tab4.element.querySelector("#start").value = formatted_date;

    ui.Dialogs.showInfoDialog("Confirmation", "Your info has been submitted!", null, host.element, host.theme);

}
We reset the values of all input fields and we show an instance of MindFusion InfoDialog to inform the user that their data has been successfully collected.

You can download the source code of the sample and all MindFusion themes and libraries used from this link:
https://mindfusion.eu/samples/javascript/ui/TabForm.zip
You can ask technical question about MindFusion JavaScript developer tools at the online forum at https://mindfusion.eu/Forum/YaBB.pl.
About MindFusion JavaScript UI Tools: MindFusion UI libraries are a set of smart, easy to use and customize JavaScript UI components. Each control boasts an intuitive API, detailed documentation and various samples that demonstrate its use. The rich feature set, multiple appearance options and numerous events make the UI controls powerful tools that greatly facilitate the programmers when building interactive JavaScript applications. MindFusion UI for JavaScript is part of MindFusion JavaScript Pack. You can read details at https://mindfusion.eu/javascript-pack.html.

