Charting for WPF, V2.0

The list below describes recent changes and additions to MindFusion.Charting for WPF:

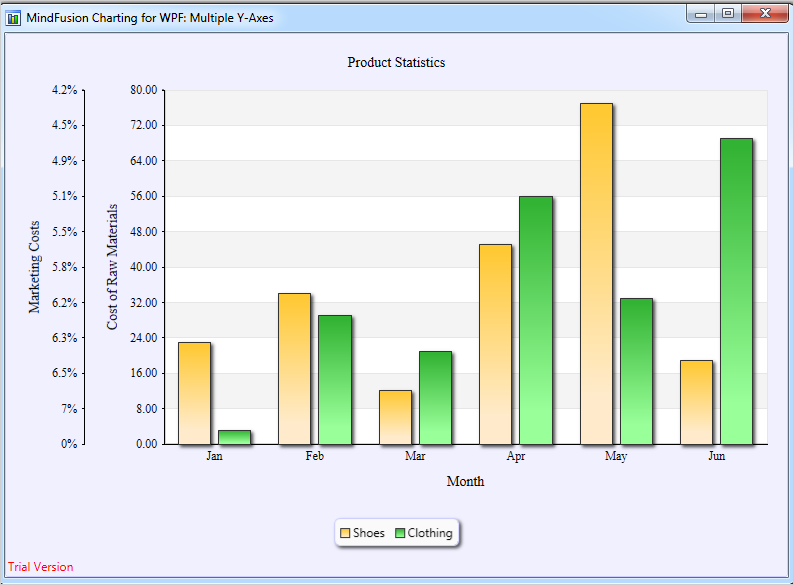
Support for Multiple Axes

The chart can now render multiple axes at each side of the plot area. To enable that, add a new Axis instance to the XAxes collection properties for bottom axes, to YAxes collection for left-hand axes, and X2Axes / Y2Axes for respectively top and right sides. The old AxisSettings class and XAxisSettings / YAxisSettings objects have been removed, and now their properties are set independently for each Axis instance in the collections.

Multiple axes in the WPF chart control.

Multiple axes in the WPF chart control.

Improved Zooming

Selected area with width smaller than MinZoomSpan does not evoke any action in the control. In addition, the new ZoomChanged event fires whenever zoom occurs and provides useful data for the zoom action with its ZoomChangedArgs.

Cross Hair Improvements

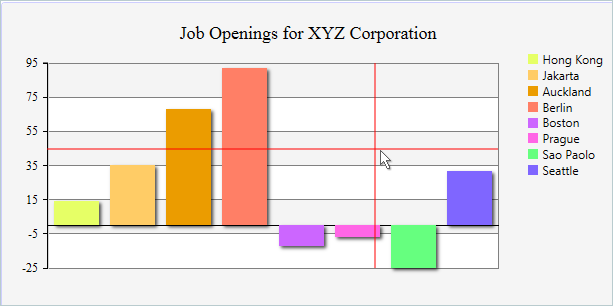
The cross hair control has been improved with several new properties, a method and an event. The properties are:

The new CrossHairPosition method returns the current location of the cross hair. For more precise handling of cross hair movements a new event is available – CrossHairPositionChanged.

Cross hair is drawn in a WPF column chart.

Cross hair is drawn in a WPF column chart.

Greatly Improved 3D Charts

3D charts have received plenty of improvements, new properties and performance optimizations: PointMergeThreshold – The property sets the radius of an area around a given point where no other points are drawn. The result is better performance especially in charts with numerous points, which happen to be close to one another. Of points with similar coordinates only a single one is rendered, the rest are omitted.

InterpolationType.None – A new InterpolationType has been added to the InterpolationType enum, which does not interpolate but adds data directly and connects the points with triangulation.

The SurfaceType enum has been replaced with three bool properties, which makes the API easier to understand and use.

ScatterFaceSize – the property regulates the size of the polygons that build a 3D scatter. Bigger values lead to bigger polygons, which results in faster performance and rougher scatter mesh. Effect3D.ShaderEffect – the property can be applied to all 3D chart elements, including scatters and performs much faster.

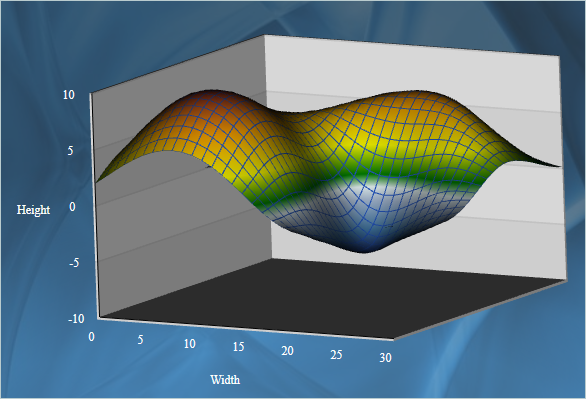
3D surface chart with color map and wire frame.

3D surface chart with color map and wire frame.

Exporting Images

Two new methods have been added for exporting the chart as an image – CreateImage and ExportImage.

Custom Formatting of Labels in Real-time Charts

A new property has been added to the RealTimeChart library – Axis.LabelFormatProvider. Use it to specify custom formatting of numeric labels. If required, you can specify format arguments for your format classes with Axis.LabelFormat.

Direct download of the trial version is available from here:

Download MindFusion.Charting for WPF 2.0 Trial Version

You are welcome to contact us with any questions, problems or inquiries about the Charting for Wpf control or any other of our products. MindFusion has always put special emphasis on providing excellent customer support and we usually answer your inquiries in a few hours of receiving them.

About MindFusion.Charting for Wpf: A programming component that combines powerful charting capabilities with an elegant API and easy use. Among the features of the control are fully customizable grid, positive and negative values on all chart axes, 3D charts, gauges and many more – read a detailed list here.

The control provides detailed documentation and various samples that demonstrate how to customize every type of chart. It supports a wide range of 2D and 3D charts including bar, line, radar, bubble pie etc. You can add tooltips, define themes, perform hit testing, zoom and more.

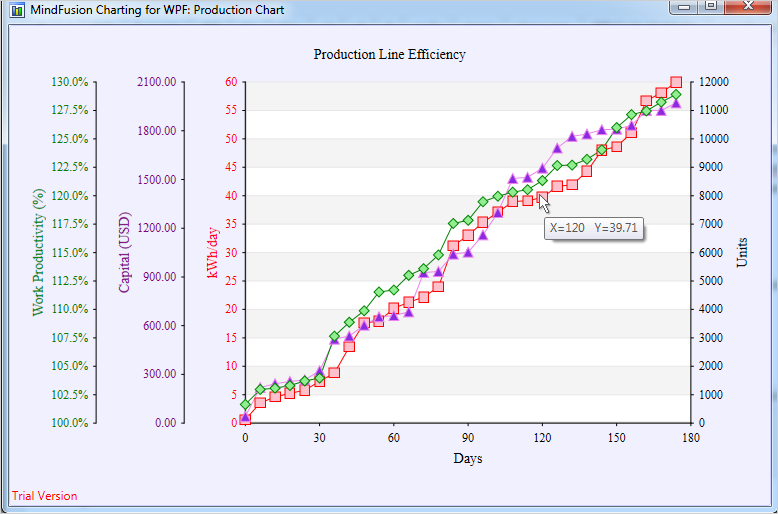
Line Chart With Multiple Axes in WPF

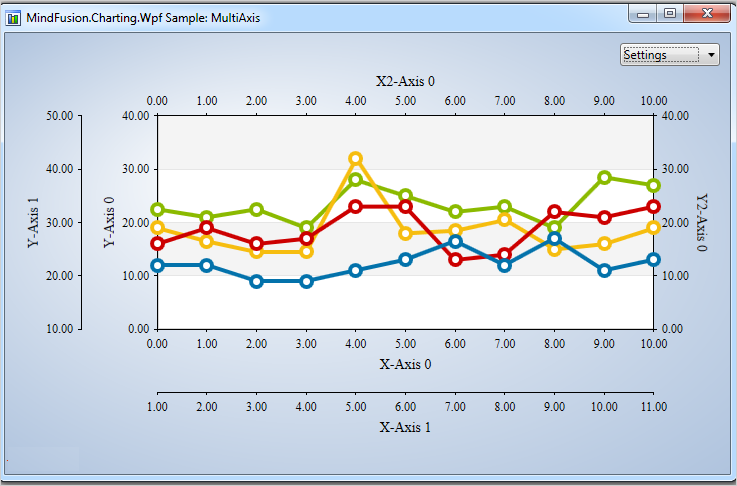
A common scenario when building charts is the ability to render multiple series bound to multiple axes, each one with its own scale. To deal with this issue, MindFusion.Charting for WPF control has added support for multiple axes of all types – X, Y, Y2, X2 and in this post we’ll look how to add and customize them and how to create series bound to a given axis.

The sample imitates a production chart, where three different scales measure three different values – work output, capital and energy consumption – all of which presumably participate in producing a single unit of a product. On the right side we have a single Y2 axis, which measures the amount of units produced. The X-axis displays the time scale. Let’s look at the chart elements, one by one.

I. The Y-Axes

The Y-axes, as all axes in the chart are an instance of the Axis class and are added to the appropriate collection property. The Axis class defines all types of useful properties needed to customize an axis. We define the three axes in XAML:

<chart:linechart.yaxes>
    <chart:axescollection>
        <chart:axis minvalue="0" interval="5" maxvalue="60" labelformat="F0" tick="3" title="kWh/day" titlerotationangle="270" labelstroke="Red" titlestroke="Red"></chart:axis>
        <chart:axis minvalue="0" interval="300" maxvalue="2100" title="Capital (USD)" tick="3" titlerotationangle="270" labelstroke="Purple" titlestroke="Purple"></chart:axis>
        <chart:axis minvalue="100" interval="2.5" maxvalue="130" title="Work Productivity (%)" customlabelposition="AutoScalePoints" axiscrossingpoint="100.0" labeltype="CustomText" tick="3" titlerotationangle="270" labelstroke="Green" titlestroke="Green"></chart:axis>
    </chart:axescollection>
</chart:linechart.yaxes>

The property names easily describe what is set: the minimum and maximum values on each of the three axes, the title, the stroke for the labels and the title, the interval and the length of the axis ticks. Let’s note that the type of labels for the last Y-axis is “CustomText” – this means we will specify the labels explicitly rather than allow the control to generate them as with the other two axes – they don’t set a label type and the default value (the auto scale) is rendered.

Here is how we define the labels:

double start = 100.0;

    //130 is the last number at the axis
    while (start <= 130)
    {
        string l = start.ToString("F1") + "%";
        chart.YAxes[2].Labels.Add(l);
        start += 2.5;
    }

II. The Y2 Axis

The Y2-axis is just one and it is entirely declared in XAML:

<chart:linechart.y2axes>
    <chart:axescollection>
        <chart:axis minvalue="0" interval="1000" maxvalue="12000" tick="3" labelformat="F0" titlerotationangle="270" title="Units"></chart:axis>
     </chart:axescollection>
</chart:linechart.y2axes>

The label format is set with the standard .NET numeric strings – in this case it is a floating number without trailing zeros. In this axis, as well in the other Y-axes you might have noticed that we use the TitleRotationAngle property. This property rotates the title label at an arbitrary angle between 0 and 360. In our case we want the label drawn vertically, to conserve space.

III. The Series

The series are created in code. They specify scatter type because we want each series to have markers at data points. The YAxis property specifies the Y-axis, which a given Series is bound to. Finally, we specify the tool tip type because we want to have a tool tip when the mouse hovers a data point.

 LineSeries series0 = new LineSeries();
 series0.YAxis = chart.YAxes[0];
 series0.ScatterType = ScatterType.Square;
 series0.ScatterFills = new BrushCollection() { Brushes.Pink };
 series0.ScatterStrokes = new BrushCollection() { Brushes.Red };
 series0.Strokes = new BrushCollection() { Brushes.Red };
 series0.ToolTipType = ToolTipType.ChartData;

The data is random generated numbers. We use the Axis.XData and Axis.YData properties to set it.

 for (int i = 0; i < 30; i++)
     {
        series0.XData.Add(i * 6);
        data1.Add(rand.NextDouble() * 60.0);     
      }

      data1.Sort();
      series0.YData = new DoubleCollection(data1);
      //don't forget to add the series
      chart.Series.Add(series0);

Last but not least – don’t forget to add the series to the Series collection property of the chart. With that our chart is ready – here is the result:

Charting for WPF: Multiple Axes and Series

Charting for WPF: Multiple Axes and Series

You can download the sample with the chart libraries from here:

WPF Chart With Multiple Axes Sample Download

If you have any questions regarding the chart component use the forum, email or the help desk to contact MindFusion. More information about Charting for WPF, which includes a premium 3D charting library and a Real time charting library optimized to handle huge data sets can be found here.

MindFusion.WebForms Pack, 2015.R1

MindFusion announceс а неш release of our WebForms suite of components. Here is an overview of the most important new features:

Licensing

We no longer make separate trial build of the control assemblies. Instead there is a new LicenseKey property, which disables a component’s evaluation mode. If your application contains more than one control by MindFusion, you could call MindFusion.Licensing.LicenseManager.AddLicense(key) to specify the key once instead of setting it per each control. License key strings are listed on the Keys & Downloads page at MindFusion’s customer portal.

Zoom control

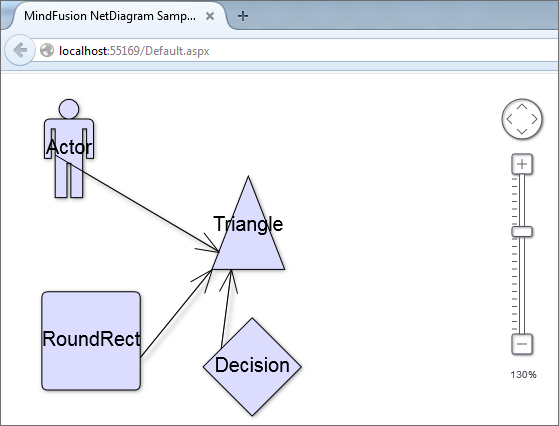
The ZoomControl class from MindFusion.Common.WebForms lets users change interactively the current zoom level and scroll position of a DiagramView or a MapView. To set it up, add a ZoomControl element to the page and set the control’s TargetId property to the id of the view. The control has numerous properties for customizing its appearance.

ASP.NET Diagrammer: The Zoom control

ASP.NET Diagrammer: The Zoom control

Visual Studio 2015 Toolbox Support

MindFusion.WebForms components can now be installed automatically into Visual Studio 2015 toolbox palette.

chartMindFusion.Charting

Custom Formatting of Labels for Line charts

Line charts now support custom formatting of labels. To use custom formatting, set LabelFormat to NumberFormat.Custom and use LabelCustomFormat.

Sorted Bars

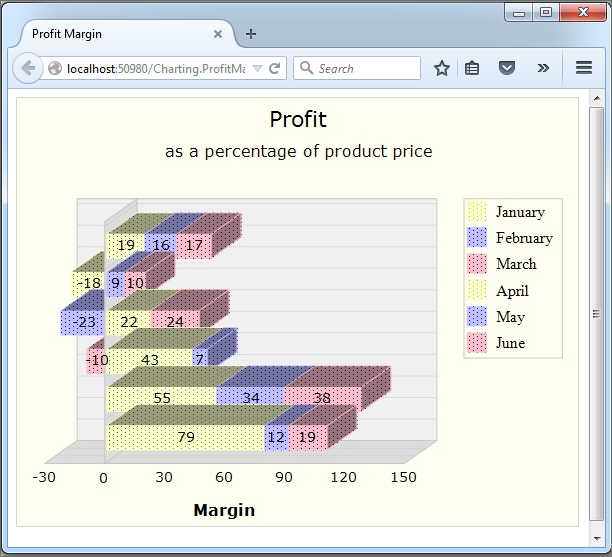
The algorithm for sorting of bars has been improved. Bars in a series or in clusters can be sorted in ascending or descending order – use the SortOrder property. You can also sort each series/cluster with the SortSeriesBy property. Bar can be sorted with their colors preserved if SortColor is set to true.

ASP.NET Chart: The Bar chart control

ASP.NET Chart: The Bar chart control

MindFusion WebForms DiagrammerMindFusion.Diagramming

Canvas mode improvements

  • Shape property of TableNode and ContainerNode is now supported in Canvas mode.
  • CellFrameStyle and EnableStyledText properties of TableNode are now supported in Canvas mode.
  • CellTextEditedScript event raised when users edit the text of table cells.
  • CreateEditControlScript event lets you create custom DOM element or fragment to use as in-place text editor.
  • NodeListView raises nodeSelected event when the user selects a node.
  • Load XML files from client side by calling loadFromXml method of Diagram class.
  • as well many more new properties and events.

Styled text in Canvas mode

The EnableStyledText property of ShapeNode allows using HTML-like formatting tags to apply various attributes to the node’s text. At this time the component supports the following formatting tags:

<b> specifies bold text
<i> specifies italic text
<u> specifies underlined text
<color=value> specifies text color
<br /> specifies line break

Zoom control

(not available in JavaApplet mode)
The ZoomControl class lets users change interactively the current zoom level and scroll position of a DiagramView. To set it up, add a ZoomControl element to the page and set the control’s TargetId property to the id of a DiagramView. The control offers numerous customization properties like ZoomStep, ScrollStep and various appearance setting properties such as Fill, BorderColor, CornerRadius and TickPosition.

WebForms Gauge Control by MindFusionMindFusion.Gauges

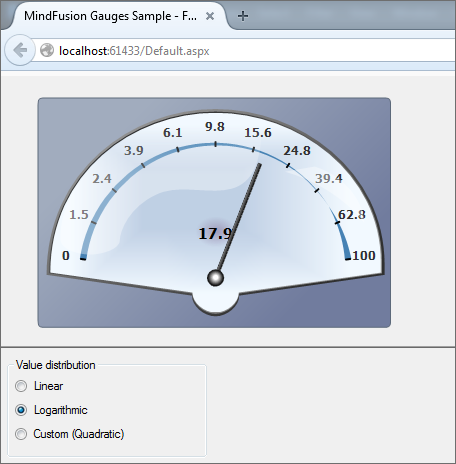
Linear and oval gauge controls have been added to MindFusion.WebForms pack. The gauges are drawn on client side using HTML Canvas API. Users can change gauge values interactively by dragging their elements.

The ASP.NET Gauge control

The ASP.NET Gauge control

WebForms Scheduler by MindFusionMindFusion.Scheduling

Horizontal Timetable view

Horizontal layout has been added to the Timetable view. The horizontal timetable view displays a collection of rows where each row represents the allotment of resources to distinct hours of a day; the rows in this view represent dates, tasks, locations, contacts or resources.

ASP.NET UI Suite of controlsMindFusion.UI

The bundled jQuery version has been upgraded to 1.11.2.

You can read further details about the release at the announcement page at MindFUsion discussion board.

The trial version of the new MindFusion.WebForms Pack is available for direct download from this link:

Download MindFusion ASP.NET Pack 2015.R1

About MindFusion.WebForms Pack: A set of WebForms components that add great variety of features to your ASP.NET application with a few mouse clicks. The pack contains advanced components for diagramming, scheduling, charting and UI (Accordion, ColorPicker, TabControl, Window, WindowHost, DockControl, Button, Slideshow, Zoom and more). Each tool boasts easy to learn and use API and is quickly integrated into any web application that targets the ASP.NET platform. The controls support numerous options for styling, data import / export, user interaction and offer rich event set. There are plenty of samples and step-by-step tutorials as well detailed documentation.

Use the features page for each of the tools to find out more about its capabilities and the numerous ways it can boost your performance and speed up the development of your application:

Visit the buy page for details on the licensing scheme and prices. If you have questions please contact us. We shall be happy to assist you.

Combination Chart in Android

This post is a step-by-step tutorial in how to create a combination chart in android with the Charting for Android library.

I. Project configuration

Let’s create a new project. In Eclipse, we choose File -> New -> Android Application Project. We write “CombinationChart” as an application name. The package is called com.mindfusion.combinationchart. The other settings remain unchanged.

II. Adding the jar file.

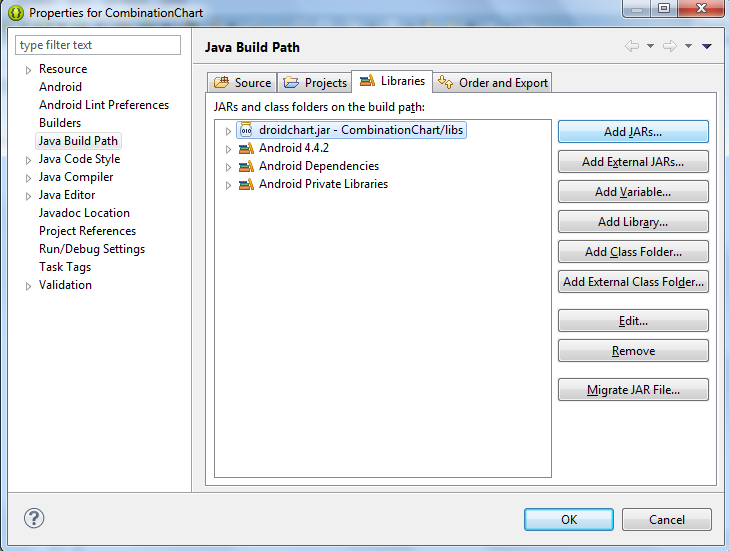
With project created, it’s time to add the libraries. Copy the droidchart.jar from the libs directory of the sample project (download file here) to the libs directory of your project. Then right-click on your project and choose Properties -> Java Build Path -> Libraries -> Add JARs. Navigate to the libs folder and add the droidchart.jar.

Adding a JAR library to an Android application project

Adding a JAR library to an Android application project

III. Declaring the chart

Time to declare the chart in the layout of the application. We build a simple application, where the chart will be the only thing that shows. So, we edit the activity_main.xml file, which is found in res -> layout folder in the project tree for the CombinationChart application.

We change the layout to Linear and we introduce a new xml node – chart. The chart node refers to a class found in the com.mindfusion.charting namespace.

<LinearLayout xmlns:android="http://schemas.android.com/apk/res/android"
xmlns:tools="http://schemas.android.com/tools"
xmlns:chart="http://schemas.android.com/apk/lib/com.mindfusion.charting"
...

Then we declare the chart:

<com.mindfusion.charting.AxesChart
android:id=”@+id/combi_chart”
android:layout_width=”fill_parent”
android:layout_height=”wrap_content”
chart:gridType=”horizontal”
chart:titleOffset=”40dp”
chart:titleHeight=”40dp”
chart:labelHeight=”12dp”
tools:context=”.MainActivity” />

We name it combi_chart. This is important because we’ll use the name to retrieve the chart object in the next step.

IV. General chart settings.

In this step we’ll set the general chart settings. First, we get the chart object, which is declared in the layour (see previous step).


private AxesChart chart;
....
chart = (AxesChart)findViewById(R.id.combi_chart);

Then we set the title and the offset of the title e.g. the space between the title and the plot are for the chart. We also set the height of the font for the title labels and the other labels at the chart.


chart.setTitle("Visitors in Paradise Hotels");
chart.setTitleOffset(50f);
chart.setTitleHeight(30f);
chart.setLabelHeight(20f);

V. The grid.

Our chart has a crossed grid with light gray grid stripes. This is set with the following code:


ArrayList gridStrokes = new ArrayList();
gridStrokes.add(Color.rgb(207, 207, 207));
chart.setGridStrokeColors(gridStrokes);


chart.setGridType(GridType.Crossed);

VI. The axes.

The X-axis has 10 intervals. Each division has its own label. We set the label type to custom text, specify the labels and customize the min and max numbers to be shown:


chart.xAxisSettings.setMin(0f);
chart.xAxisSettings.setMax(10f);
chart.xAxisSettings.setInterval(1f);
chart.xAxisSettings.setLabelType(AxisLabelType.Custom);


ArrayList xLabels = new ArrayList();
Collections.addAll(xLabels, "2005", "2006", "2007", "2008", "2009", "2010", "2011", "2012", "2013", "2014");
chart.xAxisSettings.setLabels(xLabels);

The Y-axis has no custom labels, it just shows the value intervals. But it has a title. Here is how we set it:


chart.yAxisSettings.setMin(0f);
chart.yAxisSettings.setMax(30f);
chart.yAxisSettings.setInterval(10f);
chart.yAxisSettings.setLabelType(AxisLabelType.Scale);
chart.yAxisSettings.setTitle("in thousands");

VII. The bar series.

The first series is a bar series. We create a new instance of the BarSeries class and add 10 x and y float numbers, which will be used to calculate the size and location of the bars:


BarSeries series1 = new BarSeries();

ArrayList xData = new ArrayList();
for(int i = 0; i < 10; i++)
xData.add((float)i);
series1.setXData(xData);


ArrayList yData1 = new ArrayList();
Collections.addAll(yData1, 15f, 17f, 18f, 19f, 18.4f, 16.4f, 12f, 17f, 18.7f, 19.1f );
series1.setYData(yData1);

The next thing to do is to specify the colors for the bars and their outlining. The library has the FillColors and StrokeColors property, which we use:


ArrayList fillColors1 = new ArrayList();
fillColors1.add(Color.rgb(174, 200, 68));
series1.setFillColors(fillColors1);


ArrayList strokeColors1 = new ArrayList();
strokeColors1.add(Color.rgb(115, 133, 45));
series1.setStrokeColors(strokeColors1);

Let’s not forget to add the ready series to the collection of series.


chart.addSeries(series1);

VIII. The line series with scatters.

The line series is an instance of the LineSeries class, where we set the ScatterType and LineType properties:


LineSeries series2 = new LineSeries();
series2.setScatterType(ScatterType.Circle);
series2.setLineType(LineType.Line);
series2.setScatterSize(20f);
...
chart.addSeries(series2);

The ScatterFillColors and ScatterStrokeColors are used for setting the colors of the scatters. The properties for the line are the same as with the bar series: StrokeColors.

IX The area series.

The area series has a different line type than the scatter series. We don’t set the scatter type here since its set to “None” by default.

The data in both line series is set in the same way as in the bar series and we don’t cite it again.


LineSeries series3 = new LineSeries();
series3.setLineType(LineType.Area);
...
chart.addSeries(series3);

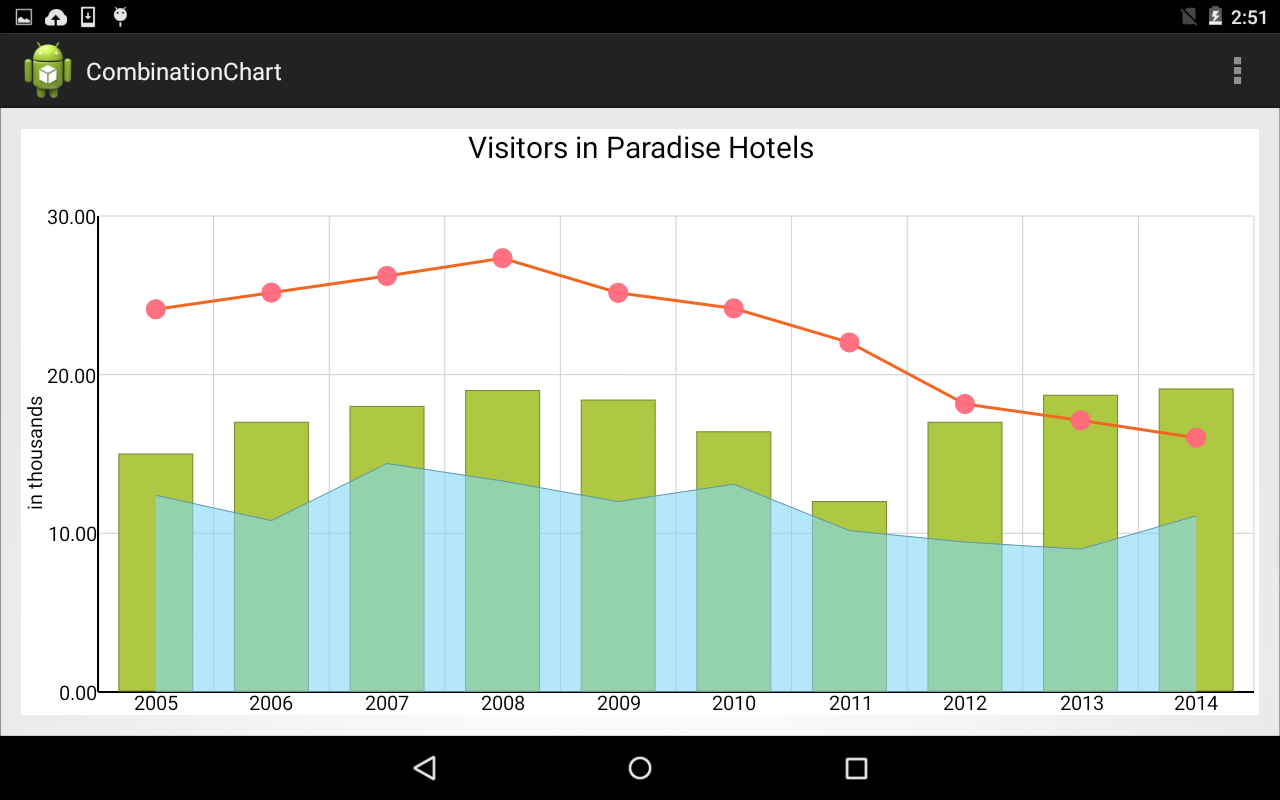
Here is the final chart:

An elegant combination chart for Android mobile devices.

An elegant combination chart for Android mobile devices.

The sample is available for download from here:

Download Android Combination Chart Sample

Read more about MindFusion Charting for Android library here.

MindFusion Controls on NuGet

All MindFusion components for WinForms, WPF and Silverlight are now available as NuGet packages. The following table lists the NuGet IDs of the individual products:

Product NuGet ID
MindFusion.Charting for WinForms
MindFusion.Diagramming for WinForms
MindFusion.Gauges for WinForms
MindFusion.Pack for WinForms
MindFusion.Reporting for WinForms
MindFusion.Scheduling for WinForms
MindFusion.Spreadsheet for WinForms
MindFusion.Charting
MindFusion.Diagramming
MindFusion.Gauges
MindFusion.Pack
MindFusion.Reporting
MindFusion.Scheduling
MindFusion.Spreadsheet
MindFusion.Charting for WPF
MindFusion.Diagramming for WPF
MindFusion.Gauges for WPF
MindFusion.Pack for WPF
MindFusion.Reporting for WPF
MindFusion.Scheduling for WPF
MindFusion.Spreadsheet for WPF
MindFusion.Charting.Wpf
MindFusion.Diagramming.Wpf
MindFusion.Gauges.Wpf
MindFusion.Pack.Wpf
MindFusion.Reporting.Wpf
MindFusion.Scheduling.Wpf
MindFusion.Spreadsheet.Wpf
MindFusion.Charting for Silverlight
MindFusion.Diagramming for Silverlight
MindFusion.Gauges for Silverlight
MindFusion.Pack for Silverlight
MindFusion.Reporting for Silverlight
MindFusion.Scheduling for Silverlight
MindFusion.Charting.Silverlight
MindFusion.Diagramming.Silverlight
MindFusion.Gauges.Silverlight
MindFusion.Pack.Silverlight
MindFusion.Reporting.Silverlight
MindFusion.Scheduling.Silverlight

The complete list of MindFusion products on NuGet can be found here: https://www.nuget.org/profiles/MindFusion.

The NuGet manager is available for Visual Studio 2010, Visual Studio 2012, and Visual Studio 2013 and can be downloaded from here: https://www.nuget.org/.

To install a package, run the following command in the Package Manager Console (accessible from the Visual Studio menu: Tools → NuGet Package Manager → Package Manager Console):

PM> Install-Package 

Where <id> is the NuGet ID of the package. For example, to install MindFusion.Diagramming for WinForms, use:

PM> Install-Package MindFusion.Diagramming

Enjoy!