Combine layout algorithms

Use OrthogonalLayout to generate initial placement for SpringLayout

In a series of posts we’ll explore ways to combine graph layout algorithms for various purposes, such as improving layout speed or achieving specific layout constraints.

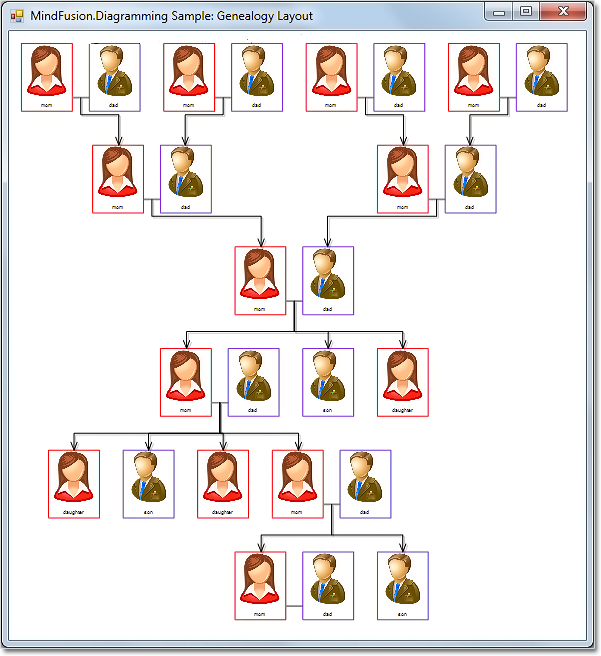
In this example we’ll show how to apply OrthogonalLayout as preprocessing step for SpringLayout used to minimize edge crossings. A problem with force-directed layout algorithms such as SpringLayout is that they can reach equilibrium of the simulated forces while there are link crossings present. However if the simulation starts from an initial layout that has minimal number of crossing, it will tend to reach balance without introducing new crossings. So we can use any of the layout algorithms used for arranging planar graphs (OrthogonalLayout, TriangularLayout, CascadingLayout) to create the initial configuration for SpringLayout.

OrthogonalLayout is designed to create planar drawings of graphs (having no crossing links at all if possible) where edge segments are either horizontal or vertical. For some types of diagrams, such as flowcharts, you might use OrthogonalLayout as is. However in many cases you might prefer SpringLayout, e.g. in order to achieve aesthetic criteria like uniform edge lengths, or to conform to accepted drawing conventions such as the one used to present state machines. So when you know your graphs are planar or close to planar, you can run OrthogonalLayout as pre-processing step, and then run the physical-force simulation using SpringLayout to achieve straight-line uniform length drawings:

void ApplySpringLayout(bool preArrange)
{
    if (preArrange)
    {
        var tl = new OrthogonalLayout();
        tl.Arrange(diagram);
    }

    var sl = new SpringLayout();
    sl.Randomize = false;
    sl.MinimizeCrossings = true;
    sl.IterationCount = 50;
    sl.Arrange(diagram);

    diagramView.ZoomToFit();
}

Here are several examples of the method results when called respectively with false (on the left side) and with true (on the right side of image). Note that for such small graphs SpringLayout will probably remove the crossings if left to run for more iterations, but in the general case and with larger graphs that’s not guaranteed.

1

2

3

The code above uses MindFusion’s .NET API and can be used with Windows Forms, WPF, Silverlight and ASP.NET diagramming components. The Java API for Android and desktop Swing application will look similar, with setter method calls instead of property assignments.

Enjoy!

MindFusion.Spreadsheet: Formatted Text

Starting with version 1.2, MindFusion.Spreadsheet adds support for formatted text. The control can import, create, display and export formatted texts. In this blog we will demonstrate how to create formatted text in a cell.

Introduction

As with all previous blogs we start off by creating a new Windows Forms Application in Visual Studio and adding a WorkbookView control to the main form. The WorkbookView displays a Workbook with a single worksheet.

Creating the formatted text

Formatted texts are created programmatically by instantiating from the FormattedText class. The class provides a constructor, which can initialize the formatted text from a markup string, similar to HTML. The string supports the following tags: <fontname=”fontname“>, <fontsize=”fontsize“>, <i>, <b>, <u>, <s>, and <color=”#rrggbb“>. The following code creates several formatted texts:

worksheet.Cells["A1"].Data = new FormattedText("The meeting is <color=\"#ff0000\">important</color=\"#ff0000\">!");
worksheet.Cells["A2"].Data = new FormattedText("<fontsize=\"18\">A title <fontsize=\"8\">(1994)");
worksheet.Cells["A3"].Data = new FormattedText("This text contains some keywords that are highlighted.");</fontsize=\"8\"></fontsize=\"18\">

Exporting

The formatted texts are exported to all supported formats, including HTML, PDF, XLSX, ODS, image, and so on. The following image illustrated the formatted texts created earlier exported to HTML:

spreadsheet-formattedtext

The source code of the sample is available for download from here:

https://mindfusion.eu/_samples/SpreadsheetFormattedTexts.zip

The trial version of MindFusion.Spreadsheet for WinForms can be downloaded from here:

Download MindFusion.Spreadsheet for WinForms Trial Version

About MindFusion.Spreadsheet for WinForms: A powerful .NET spreadsheet component with great capabilities for editing, styling and formatting large amounts of data.

MindFusion.Spreadsheet: Convert XLSX to PDF

In this blog we will discuss how to convert an existing XSLX file to PDF using MindFusion.Spreadsheet for WinForms.

Introduction

As with all previous blogs we start off by creating a new Windows Forms Application in Visual Studio and adding a WorkbookView control to the main form. The WorkbookView displays a Workbook with a single worksheet.

Importing the XLSX file

In MindFusion.Spreadsheet XLSX files are imported using instances of the ExcelImporter class. For the purposes of this blog we will import an existing report.xlsx file, contained in the zip of the sample. To import this file, use the following code:

var importer = new ExcelImporter();
importer.Import(Path.Combine(path, "report.xlsx"), workbook1);

Creating the PDF

To create a PDF file from the imported worksheet, create an instance of the PdfExprter class and call its Export method:

var exporter = new PdfExporter();
exporter.EnableGridLines = true;
exporter.Export(workbook1.Worksheets[0], Path.Combine(path, "report.pdf"));

The following image illustrates the result of the conversion:

spreadsheet-pdfexport

The source code of the sample is available for download from here:

https://mindfusion.eu/_samples/SpreadsheetConvertPdf.zip

The trial version of MindFusion.Spreadsheet for WinForms can be downloaded from here:

Download MindFusion.Spreadsheet for WinForms Trial Version

About MindFusion.Spreadsheet for WinForms: A powerful .NET spreadsheet component with great capabilities for editing, styling and formatting large amounts of data.

WinForms.Spreadsheet: Sorting Data

In this blog we will discuss how to sort existing data in MindFusion.Spreadsheet for WinForms both programmatically and by using the built-in form.

Introduction

As with all previous blogs we start off by creating a new Windows Forms Application in Visual Studio and adding a WorkbookView control to the main form. The WorkbookView displays a Workbook with a single worksheet.

Initializing the data

The data that should be sorted is contained in an CSV (comma-separated value) file, which is loaded at the start of the application. Some minor formatting is applied to the imported data, such as emphasizing the header row. The columns are automatically resized to fit the content through the ResizeColumnsToFit method of the WorkbookView class.

Sorting programmatically

The sorting is performed by calling the Sort method of the Worksheet class and providing a SortOptions object. This object contains information about the sort, such as which row or column to sort by, the sort direction (horizontal or vertical) and so on. In this particular case, we sort the data by columns, therefore we specify TopToBottom for the sort direction:

sortOptions.Direction = SortDirection.TopToBottom;

The columns (or rows) to sort by are specified by SortKey objects, added to the Keys collection of the SortOptions class. The order of the keys in the collection is important. For example, to sort by the first column and then by the fourth column, we define the following keys:

sortOptions.Keys.Add(new SortKey(0));
sortOptions.Keys.Add(new SortKey(3));

The Sort method accepts as argument the range to be sorted. In this sample we would like to prevent the header row from being sorted and specify A2:D15 for the target range.

The following image shows the running sample:

spreadsheet-sorting

Sorting through the built-in form

Sorting can also be performed through the built-in SortForm form, contained in the MindFusion.Spreadsheet.WinForms.StandardForms.dll assembly. The image below displays the form with the first and fourth columns selected as sort keys:

spreadsheet-sortform

The source code is available for download from here:

https://mindfusion.eu/_samples/SpreadsheetSorting.zip

The trial version of MindFusion.Spreadsheet for WinForms can be downloaded from here:

Download MindFusion.Spreadsheet for WinForms Trial Version

About MindFusion.Spreadsheet for WinForms: A powerful .NET spreadsheet component with great capabilities for editing, styling and formatting large amounts of data.

WinForms.Spreadsheet: Apply Conditional Formatting

In this blog we will discuss how to apply conditional formatting to a range of cells in MindFusion.Spreadsheet for WinForms. Conditional formatting is a feature that allows you to apply different formatting options, such as background color, borders, or font to cells that meet certain criteria and have this formatting automatically change depending on the value or formula of the cell.

Introduction

We start off by creating a new Windows Forms Application in Visual Studio and adding a WorkbookView control to the main form. The WorkbookView displays a Workbook with a single worksheet.

Initializing the data

The goal of the application is to display an array of temperature values, colored differently based on a standard temperature scale. The data of the application is hard-coded in several arrays, which are used to initialize the worksheet:

var names = new CultureInfo("en-US").DateTimeFormat.AbbreviatedMonthNames;
var avgHigh = new int[] { 4, 7, 12, 17, 21, 25, 28, 28, 23, 18, 10, 4 };
var avgLow = new int[] { -5, -4, 0, 5, 9, 13, 14, 14, 10, 6, 0, -4 };
var recordHigh = new int[] { 16, 17, 24, 28, 29, 32, 37, 34, 34, 30, 24, 17 };
var recordLow = new int[] { -21, -19, -15, -5, -1, 4, 7, 8, -2, -2, -7, -16 };

Applying the conditional formatting

In MindFusion.Spreadsheet conditional formatting is applied to a range of cells through its style. This is done by calling the Style.ConditionalFormats.Add method to create IConditionalFormat objects and then setting the properties of the newly created object to specify the condition criteria and the style to apply when the criteria are met. In this application we use a simple algorithm to distribute temperature values linearly along a blue-yellow-red color scale. When a cell value falls within a specific temperature interval, the conditional formatting applies a background color to this cell to visually indicate the value.

The following image shows the running sample:

spreadsheet-conditionalformats

Conditional formatting can also be created and modified through the built-in ConditionalFormatForm form, contained in the MindFusion.Spreadsheet.WinForms.StandardForms.dll assembly. The image below displays the form for the temperature cell range.

spreadsheet-conditionalformatform

The source code is available for download from here:

https://mindfusion.eu/_samples/SpreadsheetConditionalFormats.zip

The trial version of MindFusion.Spreadsheet for WinForms can be downloaded from here:

Download MindFusion.Spreadsheet for WinForms Trial Version

About MindFusion.Spreadsheet for WinForms: A powerful .NET spreadsheet component with great capabilities for editing, styling and formatting large amounts of data.