In this blog post we will build from scratch an appointment schedule for 4 practitioners. Each appointment is logged with the patient name and contact details. Each appointment can be scheduled in one of 4 rooms. We will also implement a check to see if the room that we want to assign to an appointment is free at the particular time.
You can run the sample online from the link below:
I. Project Setup
The first thing we’ll do is to create a DIV element and assign it an id. The JS Schedule library needs and HTML div element where the timetable will be rendered. We create one:
<div id="calendar" style="height: 100%;width: 100%"></div>
You can position the div element wherever you wish. It’s location and size determine the location and the size of the schedule.
Next, we need to reference the Schedule library file. It is called MindFusion.Scheduling. We reference it at the end of the web page, right after the closing BODY tag:
<script src="scripts/MindFusion.Scheduling.js" type="text/javascript"></script>
<script src="AppointmentSchedule.js" type="text/javascript"></script>
We will write the JavaScript code for the appointment schedule in a separate JS file, which we call AppointmentSchedule. We have added a reference to it as well.
II. Schedule Settings
In the JavaScript code behind file we first create a mapping to the MindFusion.Scheduling namespace and a reference to the Intellisense file:
///

var p = MindFusion.Scheduling;
Next, we use the id of the DIV element to create an instance of the Calendar class:
// create a new instance of the calendar
calendar = new p.Calendar(document.getElementById("calendar"));
We set the currentView property of the calendar to CalendarView Timetable:
// set the view to Timetable, which displays the allotment
// of resources to distinct hours of a day
calendar.currentView = p.CalendarView.Timetable;
We use the timetableSettings property to specify the time range for each day. The starttime and endTime properties set exactly the begin and end of the time interval rendered by the timetable columns. They are measured in minutes, from midnight of the day they refer to. We want the schedule to start from 7 A that is why we set 420 as value to the startTime property – the minutes in 7 hours.
calendar.timetableSettings.startTime = 420;
calendar.timetableSettings.endTime = 1260;
The titleFormat property specifies how the date at each timetable column will be rendered. The format string follows the standard date and time pattern for JavaScript:
calendar.timetableSettings.titleFormat = "dddd d MMM yyyy";
calendar.itemSettings.tooltipFormat = "%s[hh:mm tt] - %e[hh:mm tt] %h (Contact: %d)";
The tooltipFormat follows a custom formatting pattern, used by Js Scheduler. It supports special format strings like:
- %s for start time
- %e for end time
- %h for header e.g. the text of the item header
- %d for description: the text that was assigned as a description of the appointment.
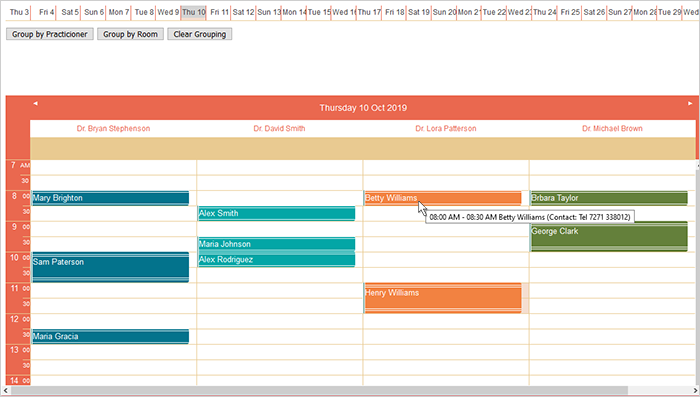
III. Contacts, Locations and Grouping
The 4 practitioners are instances of the Contact class:
resource = new p.Contact();
resource.firstName = "Dr. Lora";
resource.lastName = "Patterson";
resource.tag = 2;
calendar.schedule.contacts.add(resource);
It is important to add them to the contacts property of the schedule. The rooms where the appointments take place are Location instances:
resource.name = "Room 112";
calendar.schedule.locations.add(resource);
The grouping of the data that is rendered by the timetable is done is a method called group:
function group(value) {
	calendar.contacts.clear();
	if (value == p.GroupType.GroupByContacts) {
		// add the contacts by which to group to the calendar.contacts collection
		calendar.contacts.addRange(calendar.schedule.contacts.items());
	}
	calendar.locations.clear();
	if (value == p.GroupType.GroupByLocations) {
		// add the locations by which to group to the calendar.locations collection
		calendar.locations.addRange(calendar.schedule.locations.items());
	}
	calendar.groupType = value;
}
When we’ve created the locations and contacts, we added them to the locations and contacts collections of the schedule property of the Calendar . Grouping of the appointments is done based on the contacts and locations collections of the Calendar (not the schedule ). That is why in the group method we clear the data from the respective collection and add to it all data from the corresponding collection in the schedule Of course, we must set the groupType property to the appropriate GroupType value.
IV. Appointments
When the user selects a range of cells the new Appointment dialog appears automatically. There they can enter all necessary data. We want to implement check if a given room is free when the user tries to create a new appointment in this room. We will do the check in the handler of the itemCreating event. The itemCreating event is raised when the new item has not been ready yet and the ItemModifyingEventArgs object that is provided to the event handler gives the opportunity to cancel the event:
calendar.itemCreating.addEventListener(handleItemCreating);

function handleItemCreating(sender, args)
{
	var appLocation = args.item.location;

	if(appLocation != null )
	{
		if(appLocation.name != "")
		{
			var items = calendar.schedule.items.items();
			for(var i = 0; i < calendar.schedule.items.count(); i++)
			{
				if( items[i].location == null)
					continue;

				//if the location is the same as the location of another appointment
				//at that time we cancel the creating of the appointment
				if( items[i].location.name == appLocation.name &&
				overlappingAppointments (args.item, items[i]))
				{
					args.cancel = true;
					alert("The room is already taken");
				}

			}
		}
	}
}
We use a helper method called overlappingAppointments, whose only task is to compare the time range of two items and return true if their time span overlaps – entirely or partially.
/* checks if the time allotted to two different appointments overlaps */
function overlappingAppointments(item1, item2)
{
	if( item1.startTime < item2.startTime &&
	    item1.endTime < item2.endTime )
		  return false;

	if( item1.startTime > item2.endTime &&
	    item1.endTime > item2.endTime )
		  return false;

		  return true;
}
V. Timeline
Our timetable renders one day at a time. When the user wants to add an appointment that is due in 10 days, they will need to do a lot of scrolling. We can solve the problem by adding a date list at the top o the timetable. The list is another Calendar instance and but its currentView is set to CalendarView List.
We first need to add another DIV element that will be used by the constructor of the new Calendar:
Then we create new Calendar object and make it render a list with dates:
datePicker = new p.Calendar(document.getElementById("datePicker"));
datePicker.currentView = p.CalendarView.List;
By default each Calendar renders the current date when it starts. We make it display a succession of 30 days. We want each day to have a prefix that indicates its week day. In addition, we hide the header of the calendar and stop the default “New Appointment” form from rendering when the user clicks on a cell:
datePicker.listSettings.visibleCells = datePicker.listSettings.numberOfCells = 30;
datePicker.listSettings.headerStyle = p.MainHeaderStyle.None;
datePicker.listSettings.generalFormat = "ddd d";
datePicker.useForms = false;
How do we “wire” the selected date in the timeline to the active date in the timetable? We handle the selectionEnd event and there we assign the selected date from the timeline as the active date of the timetable:
function handleSelectionEnd(sender, args) {
	var startDate = args.startTime;
	var endDate = args.endTime;

	// show the selected date range in the timetable
	calendar.timetableSettings.dates.clear();
	while (startDate < endDate) {
		calendar.timetableSettings.dates.add(startDate);
		startDate = p.DateTime.addDays(startDate, 1);
	}
}
A timetable renders those dates, that are added to its dates property. We add just one date – the date that was selected in the list.
Let’s not forget to call the render method once we’ve finished all customizations on both Calendar render the calendar control
calendar.render();
//render the timeline control
datePicker.render();
VI. Styling
The general styling of the two Calendar instances is done with one of the predefined themes of the Js Scheduler library. First, we need to add a reference to the CSS file, where it is defined. We’ve chosen the “pastel” theme, which is defined in pastel.css:
Then we need only to set its name as a plain string to the theme property of the two Calendar instances:
calendar.theme = "pastel";
datePicker.theme = "pastel";
There is one more styling that we want to do: we want the appointments of each practicioner to be colored in a different color. We inspect the styling o the appointment element in the browser and find out that the styling of the items is set by the class mfp-item. We create 4 different sub-classes of mfp-item for the 4 practitioners:
.itemClass0 .mfp-item
		{
			background-color: #03738C !important;
			color: #fff !important;
		}
		.itemClass1 .mfp-item
		{
			background-color: #03A6A6 !important;
			color: #fff !important;
		}
..............
Then we need to assign the correct class to the appointments. We will do this with the cssClass property of Item We handle the itemCreated event where we get information for the appointment that was created:
calendar.itemCreated.addEventListener(handleItemCreated);

function handleItemCreated(sender, args)
{
	var contact = args.item.contacts.items()[0];

	if(contact != null )
		args.item.cssClass = "itemClass" + contact.tag;
}
The easiest way to assign the correct CSS class to the item is to assign data that will help us generate the correct style name. We use the tag property of Contact and assign each practitioner an id that mirrors the last letter in the CSS class we should assign to the appointments associated with this contact.
With that our appointment application is finished. You can download the full source code with the libraries and styles used from this link:
Appointment Schedule in JavaScript: Source Code Download
About MindFusion JavaScript Scheduler: MindFusion Js Scheduler is the complete solution for all applications that need to render interactive timetables, event schedules or appointment calendars. Fully responsive, highly customizable and easy to integrate, you can quickly program the JavaScript scheduling library according to your needs. Find out more at https://mindfusion.eu/javascript-scheduler.html