Appointment Scheduler in JavaScript

In this blog post we will build from scratch an appointment schedule for 4 practitioners. Each appointment is logged with the patient name and contact details. Each appointment can be scheduled in one of 4 rooms. We will also implement a check to see if the room that we want to assign to an appointment is free at the particular time.

You can run the sample online from the link below:

I. Project Setup

The first thing we’ll do is to create a DIV element and assign it an id. The JS Schedule library needs and HTML div element where the timetable will be rendered. We create one:

<div id="calendar" style="height: 100%;width: 100%"></div>

You can position the div element wherever you wish. It’s location and size determine the location and the size of the schedule.

Next, we need to reference the Schedule library file. It is called MindFusion.Scheduling. We reference it at the end of the web page, right after the closing BODY tag:

<script src="scripts/MindFusion.Scheduling.js" type="text/javascript"></script>
<script src="AppointmentSchedule.js" type="text/javascript"></script>

We will write the JavaScript code for the appointment schedule in a separate JS file, which we call AppointmentSchedule. We have added a reference to it as well.

II. Schedule Settings

In the JavaScript code behind file we first create a mapping to the MindFusion.Scheduling namespace and a reference to the Intellisense file:

/// 

var p = MindFusion.Scheduling;

Next, we use the id of the DIV element to create an instance of the Calendar class:

// create a new instance of the calendar
calendar = new p.Calendar(document.getElementById("calendar"));

We set the currentView property of the calendar to CalendarView Timetable:

// set the view to Timetable, which displays the allotment 
// of resources to distinct hours of a day
calendar.currentView = p.CalendarView.Timetable;

We use the timetableSettings property to specify the time range for each day. The starttime and endTime properties set exactly the begin and end of the time interval rendered by the timetable columns. They are measured in minutes, from midnight of the day they refer to. We want the schedule to start from 7 A that is why we set 420 as value to the startTime property – the minutes in 7 hours.

calendar.timetableSettings.startTime = 420;
calendar.timetableSettings.endTime = 1260;

The titleFormat property specifies how the date at each timetable column will be rendered. The format string follows the standard date and time pattern for JavaScript:

calendar.timetableSettings.titleFormat = "dddd d MMM yyyy";
calendar.itemSettings.tooltipFormat = "%s[hh:mm tt] - %e[hh:mm tt] %h (Contact: %d)";

The tooltipFormat follows a custom formatting pattern, used by Js Scheduler. It supports special format strings like:

  • %s for start time
  • %e for end time
  • %h for header e.g. the text of the item header
  • %d for description: the text that was assigned as a description of the appointment.

III. Contacts, Locations and Grouping

The 4 practitioners are instances of the Contact class:

resource = new p.Contact();
resource.firstName = "Dr. Lora";
resource.lastName = "Patterson";
resource.tag = 2;
calendar.schedule.contacts.add(resource);

It is important to add them to the contacts property of the schedule. The rooms where the appointments take place are Location instances:

resource.name = "Room 112";
calendar.schedule.locations.add(resource);

The grouping of the data that is rendered by the timetable is done is a method called group:

function group(value) {
	calendar.contacts.clear();
	if (value == p.GroupType.GroupByContacts) {
		// add the contacts by which to group to the calendar.contacts collection
		calendar.contacts.addRange(calendar.schedule.contacts.items());
	}
	calendar.locations.clear();
	if (value == p.GroupType.GroupByLocations) {
		// add the locations by which to group to the calendar.locations collection
		calendar.locations.addRange(calendar.schedule.locations.items());
	}
	calendar.groupType = value;
}

When we’ve created the locations and contacts, we added them to the locations and contacts collections of the schedule property of the Calendar . Grouping of the appointments is done based on the contacts and locations collections of the Calendar (not the schedule ). That is why in the group method we clear the data from the respective collection and add to it all data from the corresponding collection in the schedule Of course, we must set the groupType property to the appropriate GroupType value.

IV. Appointments

When the user selects a range of cells the new Appointment dialog appears automatically. There they can enter all necessary data. We want to implement check if a given room is free when the user tries to create a new appointment in this room. We will do the check in the handler of the itemCreating event. The itemCreating event is raised when the new item has not been ready yet and the ItemModifyingEventArgs object that is provided to the event handler gives the opportunity to cancel the event:

calendar.itemCreating.addEventListener(handleItemCreating);

function handleItemCreating(sender, args)
{
	var appLocation = args.item.location;
	
	if(appLocation != null )
	{
		if(appLocation.name != "")
		{
			var items = calendar.schedule.items.items();
			for(var i = 0; i < calendar.schedule.items.count(); i++)
			{
				if( items[i].location == null)
					continue;
				
				//if the location is the same as the location of another appointment
				//at that time we cancel the creating of the appointment
				if( items[i].location.name == appLocation.name && 
				overlappingAppointments (args.item, items[i]))
				{
					args.cancel = true;
					alert("The room is already taken");
				}
	
			}
		}
	}
}

We use a helper method called overlappingAppointments, whose only task is to compare the time range of two items and return true if their time span overlaps – entirely or partially.

/* checks if the time allotted to two different appointments overlaps */
function overlappingAppointments(item1, item2)
{
	if( item1.startTime < item2.startTime &&
	    item1.endTime < item2.endTime )
		  return false;
		  
	if( item1.startTime > item2.endTime &&
	    item1.endTime > item2.endTime )
		  return false;	
		  
		  return true;	  		
}

V. Timeline

Our timetable renders one day at a time. When the user wants to add an appointment that is due in 10 days, they will need to do a lot of scrolling. We can solve the problem by adding a date list at the top o the timetable. The list is another Calendar instance and but its currentView is set to CalendarView List.

We first need to add another DIV element that will be used by the constructor of the new Calendar:

Then we create new Calendar object and make it render a list with dates:

datePicker = new p.Calendar(document.getElementById("datePicker"));
datePicker.currentView = p.CalendarView.List;

By default each Calendar renders the current date when it starts. We make it display a succession of 30 days. We want each day to have a prefix that indicates its week day. In addition, we hide the header of the calendar and stop the default “New Appointment” form from rendering when the user clicks on a cell:

datePicker.listSettings.visibleCells = datePicker.listSettings.numberOfCells = 30;
datePicker.listSettings.headerStyle = p.MainHeaderStyle.None;
datePicker.listSettings.generalFormat = "ddd d";
datePicker.useForms = false;

How do we “wire” the selected date in the timeline to the active date in the timetable? We handle the selectionEnd event and there we assign the selected date from the timeline as the active date of the timetable:

function handleSelectionEnd(sender, args) {
	var startDate = args.startTime;
	var endDate = args.endTime;

	// show the selected date range in the timetable
	calendar.timetableSettings.dates.clear();
	while (startDate < endDate) {
		calendar.timetableSettings.dates.add(startDate);
		startDate = p.DateTime.addDays(startDate, 1);
	}
}

A timetable renders those dates, that are added to its dates property. We add just one date – the date that was selected in the list.

Let’s not forget to call the render method once we’ve finished all customizations on both Calendar render the calendar control

calendar.render();
//render the timeline control
datePicker.render();

VI. Styling

The general styling of the two Calendar instances is done with one of the predefined themes of the Js Scheduler library. First, we need to add a reference to the CSS file, where it is defined. We’ve chosen the “pastel” theme, which is defined in pastel.css:


Then we need only to set its name as a plain string to the theme property of the two Calendar instances:

calendar.theme = "pastel";
datePicker.theme = "pastel";

There is one more styling that we want to do: we want the appointments of each practicioner to be colored in a different color. We inspect the styling o the appointment element in the browser and find out that the styling of the items is set by the class mfp-item. We create 4 different sub-classes of mfp-item for the 4 practitioners:

.itemClass0 .mfp-item
		{
			background-color: #03738C !important;
			color: #fff !important;
		}
		.itemClass1 .mfp-item
		{
			background-color: #03A6A6 !important;
			color: #fff !important;
		}
..............

Then we need to assign the correct class to the appointments. We will do this with the cssClass property of Item We handle the itemCreated event where we get information for the appointment that was created:

calendar.itemCreated.addEventListener(handleItemCreated);

function handleItemCreated(sender, args)
{
	var contact = args.item.contacts.items()[0];
	
	if(contact != null )
		args.item.cssClass = "itemClass" + contact.tag;

}

The easiest way to assign the correct CSS class to the item is to assign data that will help us generate the correct style name. We use the tag property of Contact and assign each practitioner an id that mirrors the last letter in the CSS class we should assign to the appointments associated with this contact.

With that our appointment application is finished. You can download the full source code with the libraries and styles used from this link:

Appointment Schedule in JavaScript: Source Code Download

About MindFusion JavaScript Scheduler: MindFusion Js Scheduler is the complete solution for all applications that need to render interactive timetables, event schedules or appointment calendars. Fully responsive, highly customizable and easy to integrate, you can quickly program the JavaScript scheduling library according to your needs. Find out more at https://mindfusion.eu/javascript-scheduler.html

Interactive Event Timetable in JavaScript

This blog post describes the main steps on how to create a schedule table, which shows the allocation of college rooms to different courses. Users can filter the courses by lecturer(s).

I. Initial Setup

We start by copying the JavaScript scheduler files that we’ll use in the directory of our project. These are:

  • MindFusion.Scheduling.js – represents the Js Scheduler library
  • MindFusion.Scheduling-vsdoc.js – provides Intellisense support
    standard.css – in a subdirectory “themes”, this is the CSS theme styling of the resource table
  • planner_lic.txt – paste your license key here to disable the trial version label.

We create then 2 more files specifically for our application:

  • ResourceView.html – the web page of the application
  • ResourceView.js – the JavaScript code that implements the dynamic features of our application.

II. The HTML Page

In the head section of our web page we first create a reference to the theme file:

<link rel="stylesheet" type="text/css" href="themes/standard.css">

At the end of the web page, just before the closing </body> tag we add a reference to the Scheduling.js file that contains the scheduling features and the ResourceView.js files that we’ll write for the application:

<script src="MindFusion.Scheduling.js" type="text/javascript"></script>
<script src="ResourceView.js" type="text/javascript"></script>

The calendar library requires an HTML <div> element, which is used to render it. We add one:

<div id="calendar" style="height: 100%; width: 100%;">&nbsp;</div>

It is important that you add an id to this <div> because we need to reference it in the JS code behind file.

III. Basic JavaScript Settings

At the top of the JavaScript code-behind file we add a reference to the Intellisense file. We also create a mapping to MindFusion.Scheduling namespace:

/// 
var p = MindFusion.Scheduling

Then we create the calendar object. We need a reference to the <div> element that will render it:

// create a new instance of the calendar
calendar = new p.Calendar(document.getElementById("calendar"));

For this sample we will use the ResourceView The currentView property specifies that. In addition, we set the count of visible cells in the calendar to 7. That is done through the resourceViewSettings property of the calendar

// set the view to ResourceView, which displays the distribution of resources over a period of time
calendar.currentView = p.CalendarView.ResourceView;

// set the number of visible cells to 7
calendar.resourceViewSettings.visibleCells = 7;

The itemSettings proeprty lets us customize the items in the schedule We use titleFormat and tooltipFormat to specify how the title and tooltip of each item will be rendered. Both properties use special format strings:

  • %s – the start date will be rendered
  • %e – the end date of the item will be rendered
  • %d – the details of the item will be rendered.

You can specify the way dates and time are formatted by adding the desired format in brackets:

// show hours on items
calendar.itemSettings.titleFormat = "%s[HH:mm] - %e[HH:mm] %h";
calendar.itemSettings.tooltipFormat = "%d";

Then we set the theme of the calendar to standard, whose css file we referenced in the web page:

calendar.theme = "standard";

and we make one more adjustment – the name of contacts will be taken from the last name of the person. Possible valies are “F”, “M” and “L” – for first, middle and last name.

calendar.contactNameFormat = "L";

IV. Resources

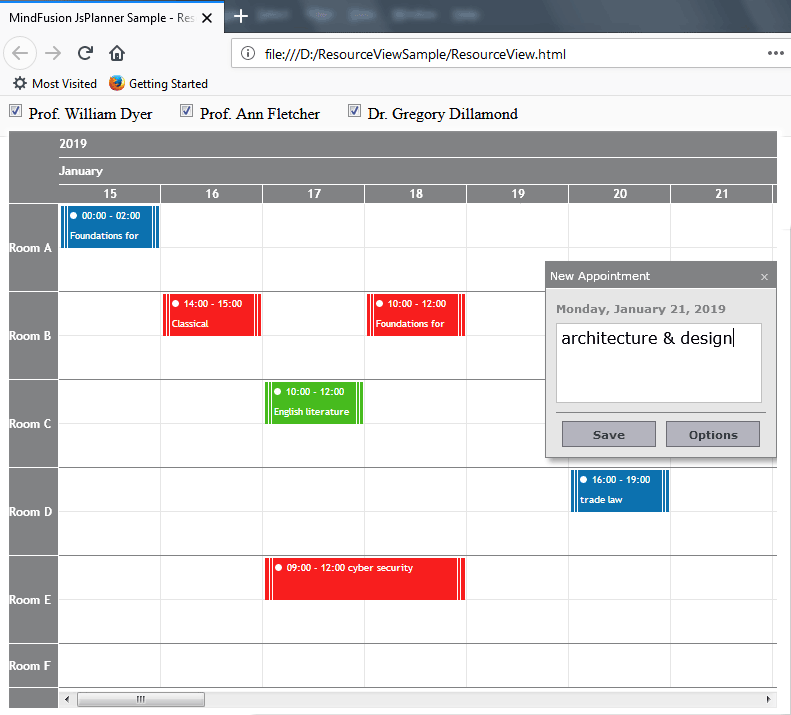
When the calendar initially loads there are several contacts and locations available. The objects that represent them are instances of the Contact and Location classes. After we create them we add them to the contacts and locations collections of the calendar schedule.

var resource;

// Add professor names to the schedule.contacts collection.
resource = new p.Contact();
resource.firstName = "Prof. William";
resource.lastName = "Dyer";
calendar.schedule.contacts.add(resource);

resource = new p.Location();
resource.name = "Room D";
calendar.schedule.locations.add(resource);

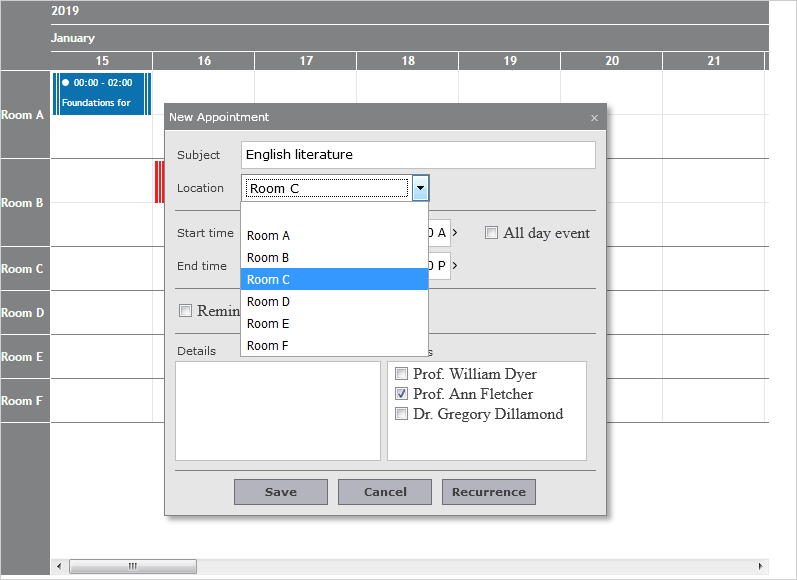
Now, when the user creates a new course they will see the Contact and Location in the Options pane of the “Create Item” form:

V. Items

The items are instances of the Item class. They represent the classes of the different lecturers. We use the startTime and endTime properties of Item to specify when the class takes place. The subject property gives the name of the class:

//always start with the current date
var date = p.DateTime.today();

item = new p.Item();
item.startTime = p.DateTime.addHours(date.addDays(1), 14);
item.endTime = p.DateTime.addHours(item.startTime, 1);
item.subject = "Classical Mechanics";

We use the location and contacts properties to set where the lecture takes place and who teaches it. Note that the contacts property is of type collection and we can assign several lecturers to one class:

item.location = calendar.schedule.locations.items()[0];
item.contacts.add(calendar.schedule.contacts.items()[0]);

We get the location and the contact from the schedule’s lists with locations and contacts We must also set the details of the item – they will be rendered as a tooltip, if you remember. We want the tooltip to show the two names of the lecturer and the location. Here is how we must define it:

item.details = item.contacts.items()[0].firstName + " " +
item.contacts.items()[0].lastName + " - " + item.location.name;

We must add the item to the items collection of the schedule we render the calendar render the calendar

calendar.render();

VI. Events

When users create new items we must set their details to tell the name and the location of the new class. We handle the itemCreating event to do this:

// attach handler - creating an item
calendar.itemCreating.addEventListener(handleItemCreating); 

function handleItemCreating(sender, args) {
    handleItemModified(sender, args);
    if (args.item.contacts.count() > 0) {
        //the details field is used by the tooltip
        args.item.details = args.item.contacts.items()[0].firstName + " " +
                args.item.contacts.items()[0].lastName;

        if (args.item.location != null)
            args.item.details += " - " + args.item.location.name;
    }

}

The itemCreating event provides an instance of the ItemModifyingEventArgs class as a second argument to the handler method. There we use the item property that tells us which item is being modified. We then take the desired contact and Location information from the contacts and location properties of the item.

When a new course item is dragged to another location we must change its color accordingly. We do this by handling the itemModified event.

// attach handler - modifying an item
calendar.itemModified.addEventListener(handleItemModified);

The diferent background color of the items is achieved by custom CSS classes. We use the cssClass property of the Item class. The CSS styles are defined in the <HEAD> section of the web page:

 .mfp-planner.standard .itemClass1 .mfp-item {
            background-color: 	#0c71af;
        }

.mfp-planner.standard .itemClass2 .mfp-item {
            background-color: #f81e1e;
        }
...........

The handler method checks the new location and assigns the appropriate CSS style:

function handleItemModified(sender, args)
{
    // you don't have to check any other conditions like dragging to another room, 
    // as it will stay the same color if you make other changes (other than dragging to a different room)
    if (args.item != null){
        switch (args.item.location.name) {
            case "Room A":  //we can also implement it with for
                args.item.cssClass = 'itemClass1';
                console.log("a");
                break;
            case "Room B":
                args.item.cssClass = 'itemClass2';
                break;
            case "Room C":
                args.item.cssClass = 'itemClass3';
                break;
            case "Room D":
                args.item.cssClass = 'itemClass1';
                break;
            case "Room E":
                args.item.cssClass = 'itemClass2';
                break;
            case "Room F":
                args.item.cssClass = 'itemClass3';
                break;
            default:
                args.item.cssClass = 'itemClass1';
        }
    }
}

The item property of the args parameter of the handler method provides access to the item that was modified.

VII. Filtering Professors

We want to add one last feature to our application. We want the user to be able to render courses only by a given professor.

We first add checkboxes with the names of the lecturers. Each checkbox has the same handler method for the click event:

<input id="dyer" checked="checked" name="subscribe" type="checkbox" value="Dyer>
<label for=">Prof. William Dyer

<input id="fletcher" checked="checked" name="subscribe" type="checkbox" value="Fletcher">
<label for="fletcher">Prof. Ann Fletcher</label>
...........................

The handler method needs to look at two cases. The first case is when the class is taught by a single professor. In this case we cycle through all items and make the item visible or not depending on whether the check box with the name of the professor is checked:

// if there is at least one present professor from the lecture professors, the lecture will not disappear
function handleClick(cb) {
for (var i = 0; i < calendar.schedule.items.count(); i++) {
        var item = calendar.schedule.items.items()[i]; //we iterate through every element
        if (item.contacts.count() == 1) {
            if (item.contacts.items()[0].lastName == cb.value)
                item.visible = cb.checked;
        }
      }
.......................
}

In the second case we look at courses that are taught by more than one lecturer. In this case we show the item if the checkbox with the name of at least one of the lecturers is selected:

else if (item.contacts.count() > 1) {
for (var j = 0; j < item.contacts.count() ; j++) {
                if (item.contacts.items()[j].lastName == cb.value) { // the checked/unchecked professor is in the contacts of this item
                    if (cb.checked == true) item.visible = true; // if there is a check, the item must be visible
                    else { // if there is no check, we see if there is at least one professor in the list of contacts of the item
                        item.visible = professorPresent(item);
                    }

                }
            }
        }

Finally we repaint the calendar:

// repaint the calendar
this.calendar.repaint(true);

Here the professorPresent method checks if at least one of the check boxes with professors that are present as lecturers in the item that we provide as argument are selected:

// return true if even 1 professor from the item's contacts is present, false otherwise
function professorPresent(item) {
    console.log(item.contacts.count());
    for (var j = 0; j < item.contacts.count() ; j++) {
        var checkBoxId = item.contacts.items()[j].lastName.toLowerCase();
        var checkBox = document.getElementById(checkBoxId);
        if (checkBox!= null && checkBox.checked == true) {
            return true;
        }
    }
    return false;
}

And that’s the end of this blog post. Here is a link to download the complete source code of this application:

Download The Sample Resource View Application

About MindFusion JavaScript Scheduler: MindFusion Js Scheduler is the complete solution for all applications that need to render interactive timetables, event schedules or appointment calendars. Fully responsive, highly customizable and easy to integrate, you can quickly program the JavaScript scheduling library according to your needs. Find out more at https://mindfusion.eu/javascript-scheduler.html