The Different Ways to Style a Schedule

In this blog post we will look at the different levels of sty‌ling the elements and items of a schedule made with a MindFusion scheduling library. In our sample we use the Java Scheduling Library, but the API members that we use and the cascading levels of styling a schedule are universal across all MindFusion Scheduling components.

I. Top Level: Theme

At the top level of styling you have themes. The scheduling library has a set of predefined themes: Light, Lila, Silver, Standard, Vista, Windows2013. You apply one of the predefined themes this way:

calendar.setTheme(ThemeType.Vista);

Here is what the calendar looks like styled with the vista theme:
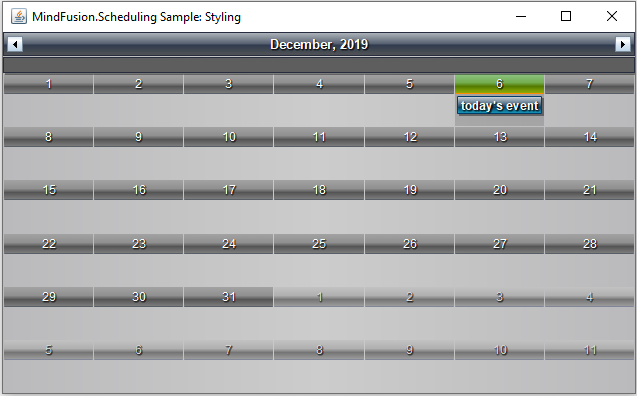
In JavaScript, the themes are defined in CSS styles and you must reference the desired file and set the name of the theme to the calendar instance. In the other libraries, they are built-in and usually are available as members of an enum.

You have the option to create a custom theme, which you can save and apply this way:

calendar.setCustomTheme(new MyTheme());

Another way to apply the custom theme in Java Scheduling is:

calendar.setCustomTheme(new MyTheme());

Here is the look of the calendar with the custom theme:
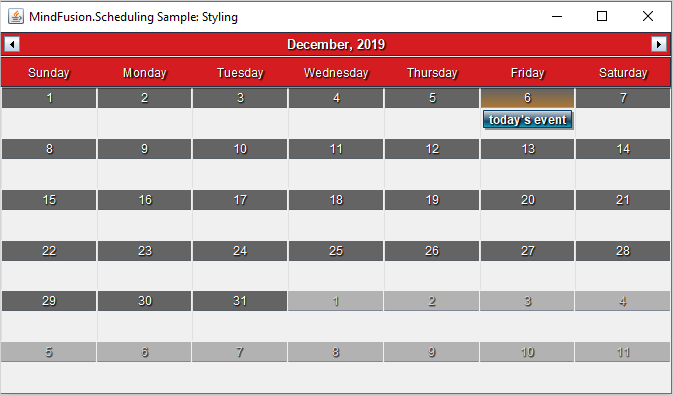
The custom theme has changed some of the colors, widened the header so that the week days could be seen and set some borders on the cells.

Creating a custom Theme requires that you override a strict set of methods. They are the public members of the Theme class. You should override all of them. Among the methods that style the calendar for each view – getMonthRangeSettings getMonthSettings etc. You could override in detail only the method that is responsible for styling the view you would use – if it is only one. For the rest of the methods you could just write:

private void initialize_MyTheme_ListViewSettings()
{
	_listViewSettings = super.createListViewSettings();
}

Every method in the Theme class must be dutifully implemented and all settings set. That comes from the fact that a Theme is the last and topmost styling instrument and it must know how to style any element that might not be explicitly styled down the tree.

The online and offline documentations of the Java Scheduling library come with topics that list in details the styling settings for each of the predefined themes. Our advice is that you get the code of the Theme that looks closest to what you want to have as a structure and modify it.

The sample project that you can download at the bottom of this post implements a custom Theme based on the Vista theme and lists all members in a theme that you must set with all details.

II. View and Item Settings

One level down the tree are the view settings properties. They are available for any view. You can access those settings with the getMonthSettings getMonthRangeSettings etc. methods. Each one of those methods returns the styling settings of a particular view. You should use the one that corresponds to the view you’ve chosen:

//set the view to SingleMonth
calendar.setCurrentView(CalendarView.SingleMonth);
//get the styling settings for SingleMonth view
calendar.getMonthSettings().getDaySettings().setTodayFillColor(Color.green);

You can style the items, regardless of the view used, with the ItemSettings object:

calendar.getItemSettings().setPadding(20);

The *Settings properties define the appearance of items in terms of alignment, spacing, padding, shadow, date format. The coloring of the elements is left to Style instances. Thus, if you want to change the color of items, you will use:

//customize just the items through the itemSettings field
calendar.getItemSettings().setPadding(20);
		
Style itemStyle = new Style();
itemStyle.setBrush(new SolidBrush(Color.white));
itemStyle.setHeaderTextColor(Color.DARK_GRAY);		
itemStyle.setHeaderTextShadowStyle(ShadowStyle.None);
calendar.getItemSettings().setStyle(itemStyle);

This styles all items on the calendar. For styling a particular item, you should use on of the methods listed underneath.

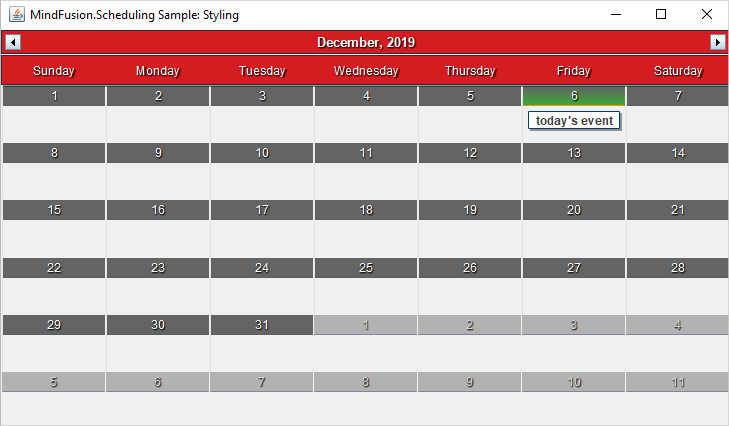
Our calendar now has green header on the current day, the background of events is white and there is a bit of a padding added to the events.
III. Using Events to Style Particular Items

When you want to select items that you want to style based on some distinct characteristics, you can use events. In our sample we handle the itemCreated event, where we check if the start date of an appointment happens to be during the weekend:

// Listen for item creation and for draw events
calendar.addCalendarListener(new CalendarAdapter(){
	//apply custom styling to selected items
	public void itemCreated(ItemEvent e) {
		onItemCreated(e);
	}				
});

The Java Scheduler provides various events, which are accessible through a CalendarListener and CalendarAdapter instances. We handle the itemCreated event this way:

//color in red events that are scheduled to start on weekends
protected void onItemCreated(ItemEvent e) {

	Item item = e.getItem();
	if(item.getStartTime().getDayOfWeek() == DayOfWeek.Saturday || 
		item.getStartTime().getDayOfWeek() == DayOfWeek.Sunday)
		{
			item.getStyle().setBrush(new SolidBrush(new Color(213, 28, 32)));
			item.getStyle().setHeaderTextColor(Colors.White);
			item.getPointedStyle().setBrush(new SolidBrush(new Color(100, 100, 100)));
		}	
}

The ItemEvent class provides the item that was created and you can use the instance to apply any particular styling to the item.

Here is our scheduler, which now colors the items on weekends in red:

In JavaScript, the items have a special field that allows you to assign to them a custom CSS style that you’ve defined. The style will be applied to the particular item only. The field is called ‘cssClass’.

IV. Custom Drawing

When you need to style in a very unique way calendar elements and nothing else helps, you have the option to draw them the way you want. Custom drawing can be made for many parts of the calendar. The available elements are identified as members of the CustomDrawElements enumeration.

You tell the control that you want to use custom drawing this way:

//specify that we will use custom drawing	
calendar.setCustomDraw(EnumSet.of(CustomDrawElements.CellContents));

The custom drawing must be part of the draw method, which is also a member of CalendarListener:

// Listen for item creation and for draw events
calendar.addCalendarListener(new CalendarAdapter(){
				
			
//add custom drawing to CellContents
@Override()
public void draw(CalendarDrawEvent e) {
	onDraw(e);
	} 
			
});

The event handler method looks like this:

//apply custom drawing to selected items
private void onDraw(CalendarDrawEvent e)
{
	if (e.getElement() == CustomDrawElements.CellContents)
	{
		DateTime date = e.getDate();		
		
		//color in light yellow the background of the first 10 days of a month
		if (date.getDay() < 11)
		{
			// Do the custom drawing
			Rectangle2D bounds = new Rectangle2D.Double(
			e.getBounds().getX(), e.getBounds().getY(),
			e.getBounds().getWidth() - 1, e.getBounds().getHeight() - 1);
			new AwtGraphics(e.getGraphics()).fillRectangle(Brushes.LightYellow, bounds);
		}
	}
}

The Calendar’s drawEvent class gives us useful methods to learn more about the item that is being drawn. In our case we want to draw the cell contents, so we check if draw was called for the cell contents, and if yes, we get the bounds of the element. We need the check, because draw is called for all elements that support custom drawing and we need to identify which one is drawn at the moment.

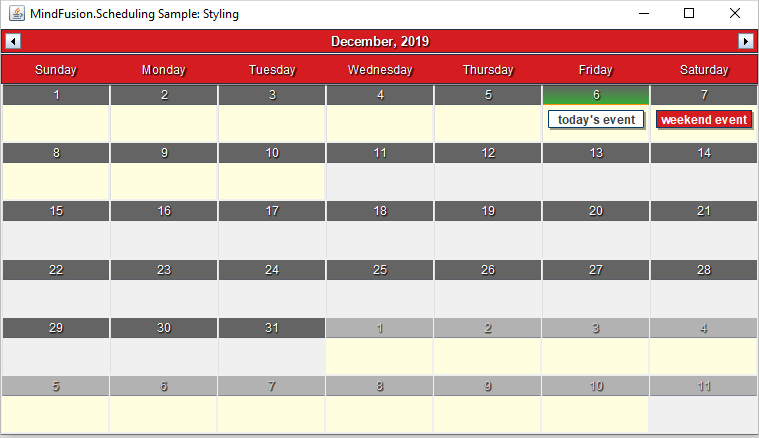
Thanks to the custom drawing, the monthly schedule now has a light yellow background on the first ten days of the month:
With this our review of the methods to style a schedule is finished. You can download the complete source code of the sample together with all MindFusion libraries used from this link:

How to Style a Java Schedule: Download Project Source Code

You can post questions about Mindusion Scheduling components at MindFusion online forums.

About MindFusion Scheduling Components MindFusion Scheduling components are available for a variety of platforms for web, mobile and desktop programming. All of them include a robust feature set that includes 6 calendar views, predefined themes, various events, predefined forms for creating appointments and recurrence. The components are fully interactive, easy to customize and style and are the ideal choice for any application that needs to implement time management features. You can learn more about MindFusion Scheduling tools at https://mindfusion.eu/scheduling-pack.html.

Charting for WPF 1.8

MindFusion has released a new version of its Charting component for Wpf with the following new features:

Styles and Themes
Styles define the appearance of individual chart elements such as the axis, the series and the legend. Each ChartTheme contains a collection of styles and defines the appearance of the whole chart. The new version lets you:

  • create themes based on the appearance of an existing chart;
  • create themes with the ThemeEditor tool;
  • save themes to XML files;
  • load themes from XML files;
  • use a number of predefined themes.

The “Working with Themes” tutorial gives detailed information on how to create, save, load and edit themes with MindFusion.Charting for WPF.

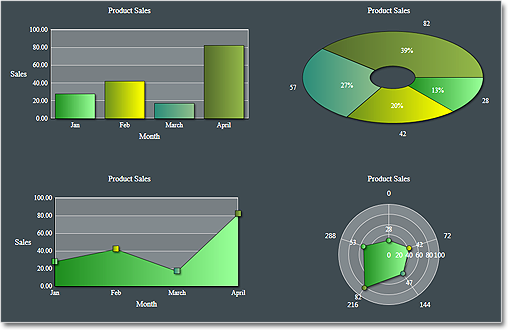
The green theme

The green theme

Improved Design Time Support
You can now edit all collection properties, including the Series collection, the brushes and strokes in design time through the property grid.

Axis Intervals
The new AxisSettings.IntervalCount property lets you specify the exact number of intervals at the axis. In such case, the control does not use the Interval property and calculates the value of each interval based on AxisSettings.Min, AxisSettings.Max and AxisSettings.IntervalCount properties.

You can read further details about the release and the other new features at the news section in the Charting forum. A trial version is available for download from here:

Download MindFusion.Charting for WPF 1.8 Trial Version

You are welcome to contact us with any questions, problems or inquiries about the Charting for Wpf control or any other of our products. MindFusion has always put special emphasis on providing excellent customer support and we usually answer your inquiries in a few hours of receiving them.

About MindFusion.Charting for Wpf: A programming component that combines powerful charting capabilities with an elegant API and easy use. Among the features of the control are fully customizable grid, positive and negative values on all chart axes, 3D charts, gauges and many more – read a detailed list here.

The control provides detailed documentation and various samples that demonstrate how to customize every type of chart. It supports a wide range of 2D and 3D charts including bar, line, radar, bubble pie etc. You can add tooltips, define themes, perform hit testing, zoom and more.

Diagramming for ASP.NET 5.0

MindFusion has released a new version of its Diagramming for ASP.NET component. There are many new features for customizing the appearance, a new layout and a few enhancements. Here are the details:

Styles & Themes

You can apply now styles to change the appearance of the diagram items. Each style is a set
of properties, which can be applied to a given diagram item (with the DiagramItem.Style
property) or to all items of a specific type (by using a Theme). The theme is a collection of
styles. Each style in the theme sets the appearance of all items of a specific type. Themes
can be loaded from XML files.

The Slate Theme

The Slate Theme

Node effects
(n.a. in Canvas mode)

Two visual effects – the GlassEffect and the AeroEffect can be applied to nodes. Effects can
be added, removed or modified at any time and this reflects immediately on the diagram. You
can apply effects of different types simultaneously.

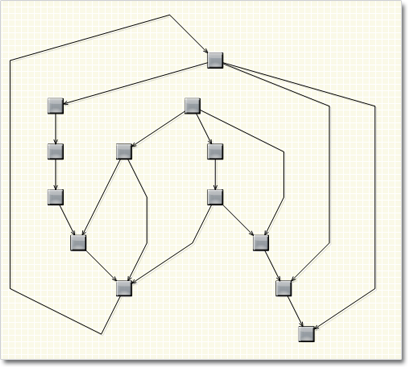
One way graph layout

This layout ensure that links enter into nodes from the same general direction and exit from
the opposite side. If the graph contains cycles some links bend around the nodes to keep the
enter/exit direction consistent. The algorithm aims to minimize the number of such links.

one_way_layout1

The One Way Graph Layout

Enhancements in Canvas mode

  • Items can cast shadows
  • Items can be Locked
  • Containers are available in Canvas mode
  • Tables are available in Canvas mode
  • Tooltips for items
  • and more

Enhancements in ImageMap mode

  • Items can be Locked
  • Interactive rotation of nodes
  • ImageFormat property added to ShapeListBox
  • and more

Multiple Labels per Link
(n.a. in Canvas mode)
The LinkLabels class allows multiple captions to be displayed for a single DiagramLink instance.
Link labels provide a set of properties that allow full customization of their location and
appearance. Labels support automatic arrangement to avoid overlapping nodes or other
labels.

Layers
(n.a. in Canvas mode)
Items can be assigned to layers and layers can be hidden, locked or moved up/down in the
Z-order or as a group. Use the LayerIndex property to associate and item with a layer in the
Diagram.Layers collection. Each layer has Visible, Locked and ZIndex properties, which affect
all items in the layer.

Parallel Layouts
The .NET 4 version of Diagramming for ASP.NET takes advantage of the Task Parallel Library
to enable parallelism on the different layout algorithms. Set the EnableParallelism property of
the Layout class to true to enable arranging different sub graphs on different threads to
improve performance on multiprocessor systems.

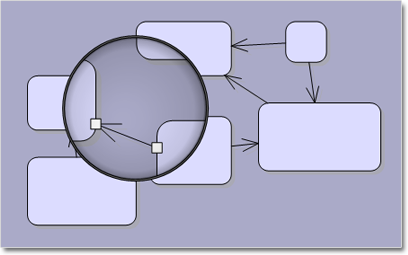
Magnifier
(in Java and Silverlight modes)
The new magnifier tool allows user to interactively zoom in or zoom out portions of the
diagram by holding down a magnifier tree or pressing a mouse button. The magnifier’s
appearance and zoom factor can be customized.

The Magnifier Tool

The Magnifier Tool

API changes
A variety of changes have been made to the API of the control to keep it elegant and simple – please consult the “What’s new section” in the online documentation.

Detailed information about the release is posted at the forum. The trial version is available for direct download from the link below:

Download MindFusion.Diagramming for ASP.NET 5.0

About Diagramming for ASP.NET: An advanced WebForms programming component that offers all the functionality that is needed for creating, styling and presenting attractive flowcharts, hierarchies, trees, graphs, schemes, diagrams and many more. The control offers numerous utility methods, path finding and cycle detection, rich event set and many useful user interaction features like tool tips, multiple selection, copy/paste to/from Windows clipboard and many more.

NetDiagram offers 87 predefined node shapes, scrollable tables, 13 automatic layouts and many more. You can check the online demo to see some of the features in action. The control includes many samples, detailed documentation and step-by-step tutorials. Every features is duly documented and there’s plenty of code to copy. We have done our best to make the component not only powerful and scalable, but easy to learn and fun to use.

Diagramming for ASP.NET MVC 1.4

We have just released a new version of the diagramming component for ASP.NET MVC. The new release contains new types of nodes, a new layout algorithm, styles, themes and more. Here are the details:

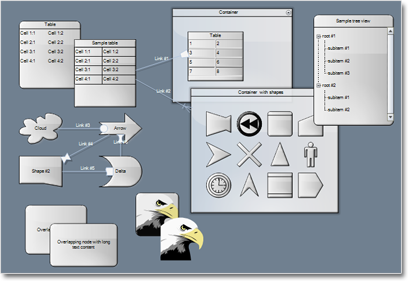
Table Nodes

Table cells can display text and/or image. The cells, columns and rows of a table have customizable style, image, text alignment and extents. The number of cells in a table’s grid can be changed programmatically. Tables with many rows can be scrolled.

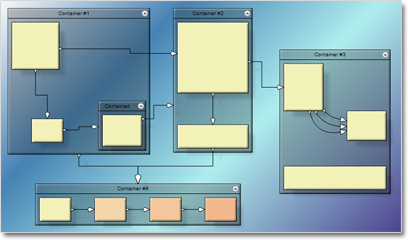
Container Nodes

Container nodes contain other diagram nodes. When a container is moved, its children are moved too. Containers can be nested within each other to unlimited depth. They can be folded and unfolded. Nodes inside a container can be linked both inside and outside of it.

Container Nodes

Container Nodes

Styles and Themes

Instances of the new DiagramItem.Style class can be used to set the appearance of items as a single unit. If the Style of an item does not define value for one of its attributes, it is looked up in the styling hierarchy – in the Style of the diagram, in the current Theme or the set of default styles defined for each item class.

The “Styles and Themes” section in the online documentation provides useful team on how to use these new features.

The Slate Theme

The Slate Theme

Shadows

Diagram items can have shadows with customizable shadow color and offset.

One-way Layout

The OneWayLayout class ensures that links enter into nodes from the same direction and exit from the opposite side. If the graph contains cycles some links bend around their nodes to keep the enter/exit direction consistent. The algorithm aims to minimize the number of such links.

One Way Layout

One Way Layout

Parallel layouts (on server side)

The .NET 4 version of MindFusion.Diagramming takes advantage of the Task Parallel Library (TPL) to enable parallelism on the different layout algorithms. Set the EnableParallelism property on the Layout class to true to enable arranging different subgraphs on different threads to possibly improve performance on multiprocessor systems.

Preserve order in tree layout (on server side)

The Balance property of TreeLayout can be set to Preserve to keep the original geometric order of child nodes when arranging them under their parent. This can be used to arrange tree branches in a specific order by first positioning them in increasing horizontal or vertical positions.

More information about the new release is posted at the forum. You can download the trial version of the component from the link below:

Download MindFusion.Diagramming for ASP.NET MVC 1.4

About Diagramming for ASP.NET MVC Control: It is a multipurpose diagramming tool that consists of two parts: a .NET class library running on the server and a client side control implemented in JavaScript. The server side .NET library implements a flow-diagramming object model that lets you define structures such as trees, flowcharts and graphs. Every element in the diagram is easily accessible and the whole diagram is rendered as part of an HTML page by just calling the DiagramView extension method.

On the client the diagram is rendered by a DiagramView JavaScript control that draws its content on an HTML Canvas. The user is able to add nodes and links simply by drawing them with the mouse. There is also a NodeListView control, which lets users create new nodes via drag and drop.

MvcDiagram also supports various automatic layout algorithms that will make every diagram easy to understand and nice to look at. The diagram can also be easily serialized in binary or XML format. Exporting is done in a variety of formats including Pdf, Svg, Visio and more. You can read details about the components at the MvcDiagram features page.