Continuing from the previous post we will now customize the appearance of the Resource view to achieve a more aesthetically pleasing presentation. The appearance of the view is customized by setting various properties of the Calendar.ResourceViewSettings object.
We will build our presentation on the Silver theme by reducing the sharpness and contrast of colors and making the font uniform across the entire view. The customization process is divided to the following steps:
Customize the view background.
calendar.ResourceViewSettings.CalendarStyle.Background = Brushes.White;
Customize the row headers.
calendar.ResourceViewSettings.ExpandableRows = false;
calendar.ResourceViewSettings.HeaderStyle.FontFamily = headerFont;
calendar.ResourceViewSettings.HeaderStyle.FontSize = 13;
calendar.ResourceViewSettings.HeaderStyle.Foreground = new SolidColorBrush(Color.FromArgb(255, 64, 64, 64));
calendar.ResourceViewSettings.HeaderStyle.Background = Brushes.White;
calendar.ResourceViewSettings.HeaderStyle.BorderBrush = borderBrush;
calendar.ResourceViewSettings.HeaderStyle.BorderThickness = new Thickness(0, 0, 0, 1);
Customize the view cells.
calendar.ResourceViewSettings.CellStyle.Background = Brushes.White;
calendar.ResourceViewSettings.CellStyle.BorderBrush = borderBrush;
calendar.ResourceViewSettings.WeekendStyle.Background = new SolidColorBrush(Color.FromArgb(255, 250, 250, 250));
calendar.ResourceViewSettings.WeekendStyle.BorderBrush = borderBrush;
Customize the view timelines.
calendar.ResourceViewSettings.BottomTimelineSettings.CalendarStyle.Background = Brushes.White;
calendar.ResourceViewSettings.BottomTimelineSettings.CalendarStyle.BorderBrush = borderBrush;
calendar.ResourceViewSettings.BottomTimelineSettings.CalendarStyle.FontFamily = headerFont;
calendar.ResourceViewSettings.BottomTimelineSettings.CalendarStyle.FontSize = 13;
calendar.ResourceViewSettings.BottomTimelineSettings.CalendarStyle.FontWeight = FontWeights.Normal;
calendar.ResourceViewSettings.BottomTimelineSettings.NowFillBrush = Brushes.Transparent;
calendar.ResourceViewSettings.MiddleTimelineSettings.CalendarStyle.Background = Brushes.White;
calendar.ResourceViewSettings.MiddleTimelineSettings.CalendarStyle.BorderBrush = borderBrush;
calendar.ResourceViewSettings.MiddleTimelineSettings.CalendarStyle.FontFamily = headerFont;
calendar.ResourceViewSettings.MiddleTimelineSettings.CalendarStyle.FontSize = 13;
calendar.ResourceViewSettings.MiddleTimelineSettings.CalendarStyle.FontWeight = FontWeights.Normal;
calendar.ResourceViewSettings.MiddleTimelineSettings.NowFillBrush = Brushes.Transparent;
Note that the font, headerFont and borderBrush variables are defined as follows:
FontFamily font = new FontFamily("Segoe UI");
FontFamily headerFont = new FontFamily("Segoe UI Light");
Brush borderBrush = new SolidColorBrush(Color.FromArgb(255, 224, 224, 224));
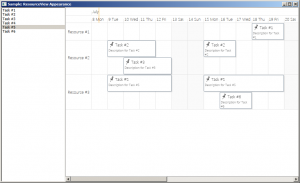
The final result is displayed below.
The complete sample project is available for download here:
https://mindfusion.eu/_samples/WpfPlannerResourceViewAppearance.zip
You can get the trial version of MindFusion.Scheduling for WPF from this link:
https://mindfusion.eu/WpfPlannerTrial.zip
Enjoy!


